Learning how to water plants to increase growth in pots, container or garden - especially how to water roots and tubers. Specialities: root growth or tuber growth of lawns, fuchsias, geraniums, dahlias and begonias.

29 April 2011

Watering A New Geranium (Pelargonium)

new geranium (pelargonium)I have been looking for a means to show you a one-size-fits-all method of watering a pot plant. At last we're getting there. This geranium (pelargonium) was purchased in a garden centre five days ago, the healthiest of a bunch, with three growing stems. Rather heavy, though.

wet geranium roots in soggy compostAlthough recently watered - and thus expected to be heavier - these sparse (compared to the rest) wet roots at the base of the soggy compost reveal it has in fact been over-watered for some time. Pots usually fill with roots from the bottom up. And the tap root circling the base shows this plant has been in the pot for some time. I popped it on the kitchen scales: 13 ounzes (about 370 grams).

After standing the pot on a splayed out kitchen towel overnight, and leaving for a further day, it then weighed a full 3 ounzes (85 grams) less, a loss of 23%. It has not been watered since.

On the fourth day, it weighed 8 ounzes (226 grams), and the compost was just starting to change colour - about right for growth (for a geranium). We should start seeing some root recovery now. Placing the pot outside in the sun for some of the time has helped it dry out more quickly. We need to watch it carefully now, so it doesn't get too dry and scorch the foliage.

root growth just startingThe fifth day, and there's some root growth starting. About three quarters of the compost has now changed colour. The weight is down to just over 7 ounzes (about 200 grams). We could withold watering another day, or so. But best not. Geraniums don't really droop (unless they're sick). The older leaves just turn brown and crinkly. So gave it a good soak and put outside.

With water-sensitive plants, I find it best to water first thing in the morning. This way, the pot has time to drain, and the roots can take up any excess water from the compost more quickly, thus eliminating the risk of leaving the roots in soggy compost without air. And because things are generally drier overnight, there is less risk of disease taking hold. It is good policy to keep a pot drier tissue under the pot on a permanent basis. This ensures compost cannot be too wet for too long.

USE ONLY PLAIN WATER - NO FEED
It is important not to feed the plant until it starts to lose colour. The compost will almost certainly already contain some slow release feed which might support growth for a couple of months. There is no way of knowing, unless you see the feed pellets in the compost. Best to be safe. We can soon feed if we have to.

FOLIAGE COLOUR
I like to avoid plants with dark green foliage. This indicates too much nitrogen has been given for firm healthy growth; the growth will have been forced. And contrary to opinion, plants do not seem to grow fastest in this condition. I find a leaf which is mid-green in the centre (the new growth), turning slightly darker towards the edges is the colour which supports optimum growth.

KEEP CHECKING THE ROOTS
Many people are afraid to remove plants from their pots to examine the roots. Don't be. It's the best way to learn how to grow any plant. Just be careful not to damage it. Place stem between fingers and invert pot onto palm, then press the base of the pot with thumb of other hand. Plant falls out of pot onto palm. Easy.

Drying is important. NEVER WATER ANY PLANT UNTIL THERE HAS BEEN AT LEAST SOME DRYING OF THE COMPOST, the more the better. Some plants can be dried out more than others. You will need to experiment.

Taking A Begonia Shoot Tip Cutting

Now is a good time to take begonia shoot tip cuttings. The plants are still young and growing quickly, the air temperatures warmer, and there's still enough time for them to grow into nice plants.

strong healthy begoniaThis is a plant we started early in the heated propagator. Removing it, once started, and placing in cooler conditions has helped it grow strong and healthy. If we want good-sized flowers, it's best to reduce the number of shoots to two or three.

trimmed begonia cuttingAfter removing a shoot tip about 5 cm (2 inches) long, carefully tear off the scales and cut the leaf to a size which will fit within the confines of a 3 to 3.5 inch pot (do not actually remove any leaves). This is important, since we are going to cover the pot with a plastic freezer bag and we don't want any leaf to touch the plastic.

The best time to take the cutting is first thing in the morning, preferably after the plant has been watered the previous night. If you cannot do this, stand the severed cutting in water for a couple of hours or so.

The growing point of the cutting is the smaller bud-like leaf (pink). Many growers cut just below this, but as you know, I prefer to have more leaf area, because I feel this will help it root quicker.

I am therefore cutting one node lower down and leaving the lower leaf on (it would normally be removed). So, to be clear, this cutting is actually one node lower down the stem than it need be and has an extra leaf.

After dipping in hormone rooting powder and knocking off the excess, bury the cut end in multi-purpose compost (you can use added perlite or grit, if you wish) from which drops of water just appear between the fingers when squeezed, but retract into the compost when released - water should not actually run down the fingers.

begonia cutting with partly buried growing pointPush into the compost until the small bud (containing the apical meristem) is almost completely buried (it can also be buried). The base of the stem should be in contact with the compost.

Dribble some water around the stem.

begonia cutting seen through hole in freezer bag

Cover with a freezer bag, into which a 2.5 cm (1 inch) 'V' has been cut, top centre. This is also very important; it helps avoid rotting.

Place in a well lit spot, out of direct sunlight.

If it starts to dry too much, dribble some more water, through the hole, around the stem.

Watch for excess condensation on the bag in the mornings. If large drops appear, open the hole further till there is no more than a mist. Also ensure that it's not too hot (preferably about 18 to 19 degrees C). This will help avoid disease.

The hole can gradually be torn further open after the first week, so that the top if fully open after about 14 days.

It should root in about 21 days, and should have started to grow.

Dry Soil: Where Roots Won't Go

Contrary to popular belief, roots do NOT grow into dry soil. Simple as that. DryING soil - Yes. Even dryISH soil (provided it becomes progressively wetter, not drier). But DRY soil - emphatically NO. And not just dry soil - roots don't like air pockets either.

roots won't go into an air pocketNot a very good photo. It's a pot of old coriander roots. I only noticed when I viewed it against a light background that there is an air pocket in the bottom. Look what happened to root growth as soon as they hit it - they stopped growing and presumably changed direction in search of richer pastures. This is what plants do. They send their roots out in all directions in search of ideal conditions. When they find it, they branch out prolifically; if they don't find it, they search elsewhere.

Considering the vast numbers of roots on any mature plant, I find this feat absolutely mind boggling - just the fact that the plant is in complete control of them all, as well as countless other operations conducted simultaneously. Incredible.

WATERING FOR ROOT GROWTH
In my opinion, there's no doubt about it: Constant wetting and drying of a soil is the way to more roots. But when I say 'wetting', I mean REALLY wetting, involving a good soaking - one which will sink deep into the soil or compost. Because, once drained, soil dries from the surface downwards, this induces the roots to follow the water level down.

MANY GROWERS WATER TOO EARLY
This process of drying happens naturally at this time of year (a little earlier this year in the U.K.). As soon as the surface dries, it is tempting to reach for the hose or watering can. Don't. Because, if you do, the roots will stop following the natural water table and become dependent upon the water supplied by you. And once this process occurs and the water table sinks even lower, the link is seldom re-established.

So. Don't start watering your plants until they are on the verge of wilting. You will be surprised at how long they can last out. If you can do this, it will pay dividends.

What Is Osmosis?

diagram of osmosis through a partly permeable membraneOsmosis can be considered as a specialised form of diffusion and is the means by which, in plant systems, water (the solvent) moves across a partly-permeable membrane (the plasma membrane of the cell) in an attempt to equalise solution concentrations on each side of that membrane.

A solution consists of the solvent (water) plus the solute (e.g. sugar or salts).

As you can see, only water can diffuse through the partly permeable membrane because the pores are too small to allow any solute through. Hence, to equalise concentrations on each side of the membrane, water passes from the side with the highest proportion of water (the most dilute, or 'hypotonic' side) to that with the least proportion of water (the most concentrated, or 'hypertonic' side). Consequently, the volume of this hypertonic side increases.

If allowed to continue unhindered, each side of the membrane will eventually become equal in concentration, or 'isotonic'. However, this rarely happens in plants, since the cell wall exerts a backward pressure called the 'turgor pressure'. Once the turgor pressure equals the osmotic pressure, an equilibrium is reached and water stops crossing the membrane.

The key thing to remember with osmosis is that it involves the passage of WATER only, from a relatively dilute (greater proportion of water) solution to a more concentrated one, across a partly permeable membrane (plasma membrane of the cell in plants, but could also be cellophane or pig's bladder in experiment).

In plant root cells, the surrounding soil solution usually contains a relatively dilute concentration of mineral salts to that of the cytoplasm of the root cells (i.e. it is hypotonic to the root cells), so water enters the root by osmosis. I have often heard it said that feed enters plant roots by osmosis or that it moves around the plant by osmosis. This is untrue. Remember, only WATER MOVEMENT is involved.

21 April 2011

Can A Dahlia Tuber Wheel Produce New Plant Vigour?

New cuttings from strong, healthy shoot tips produce the healthiest and most vigorous plants (I covered propagating dahlia shoot tip cuttings last year). But heat and good light are needed early on in the year.

Failing this, shop-bought tubers (which are produced from one-year-old cuttings) are the next best alternative. New plants produce more vigorous root systems than older ones. However, there is a downside in that fewer flowers are produced.

But I wonder if we took an over-wintered clump of budding tubers, divided it into separate tubers, each with its own shoot bud, then laid them out in a wheel formation, would this reproduce the increased vigour whilst maintaining the number of shoots (and therefore flowers)?

Selecting Dahlia Tubers From Storage

If You Want A Stronger Plant, Choose A Stronger Bud

All beginners, note this maxim well. It's one of the fundamental principles of growing. If you want good results, they cannot be had in an instant, or even in a hurry. They must be built upon a strong foundation. We are talking rock here, not sand. In growth terms, this means strong healthy stock - grown naturally, not forced.

As far as over-wintered dahlia tubers are concerned, we can to some extent 'back the horse after it has passed the post'. Of my stock, only the earliest varieties have yet sprouted; the rest may never sprout, but there's no way to tell for certain which tubers will and which won't.

So instead of putting them all in the soil and hoping for the best, I always wait until they have started. This way, I can select the best stock, be certain (as near as can be) they will grow, and avoid undue exposure to pests and disease whilst they wait in the soil for things to get going. These selected tubers will grow very quickly, especially if planted as recommended (see other posts on planting dahlia tubers)

Recognising A Pot-Bound (Root-Bound) Plant

root (pot) bound plantThe brownish roots encircling the base of this pot plant (red) are a sure sign it needs re-potting.

Tease away (lime) old matted roots and re-pot into a slightly larger pot of fresh compost (see 'Re-potting Coriander').

If It Walks Like A Duck

french lavender live (right) and dead (left)Been seeing what can be salvaged from the plants overwintered in garage, in containers. Surprised this French lavender on left hasn't made it; it was under the fleece with the fuchsias, which have all survived. Usually it's worth waiting to see if dead material throws out new growth. This didn't seem likely here. So pulled it up and checked it out. Sure enough, suspicions confirmed. No sign of life whatsoever (left). Hurray for the autumn 'Multi-Plant' insurance cuttings (right). Very often, first impressions prove correct. What's that they say: 'If it walks like a duck...'

Fixing An Over-Watered Plastic Cup

Plastic cups can make useful growing vessels (keep out of strong sunlight), especially for novices. Being able to see the compost is a distinct advantage and can be very enlightening. But what happens if we over-water?

cut a slice out of base with a felt (craft) knifeUp 'till now, we've relied upon a pin-prick hole punched in the base of the cup. But this will only let out the excess water. If you remember, I showed you a way to remove even more water from the compost by standing a plant pot on a piece of absorbent material such as a kitchen towel. I know this looks a bit 'Heath Robinson', but it really does work very well (I recommend you keep a piece under all your pots on a permanent basis 'till you master the art of watering). However, it was little use on these plastic cups.

So I took a craft knife and sliced some larger holes in the base, so that the compost (soil in this case) can actually come into direct contact with the paper, which then acts as a wick. This seems to work fine.

Producing Drought-Resistant Dahlias In Shallow Soil

Although dahlias are one of the easiest flowering plants to grow, because they develop very quickly they need a good supply of water. So most growers water their plants very often. But if the roots can access damp soil, this watering will be greatly reduced. I am going to show you how I achieve this.

As you will have seen from previous dahlia posts, two things will help here:
  • planting tubers deeper in soil
  • helping plants develop a larger root system (not dealt with here; see last year's posts on dahlias, watering and water conservation)
One or the other is a real benefit. But we want to have both (if you haven't already done so, please read: 'How To Produce Drought-Resistant Dahlias', posted on 24th March 2011 and 'Dahlias Need Stronger Light', posted last week, 14th April 2011).

PLANTING TUBERS DEEPER IN SOIL
With normal fertile (dark in colour) soil, this is no problem - just dig a deeper hole and bury. Simple. However, things are rarely so straightforward. Lots of growers have to contend with shallow soil. It might not be physically possible to dig a deep hole; or there might be a shallow depth of FERTILE soil (i.e. soil is deep but soon changes to a lighter colour of infertile subsoil) What then? And don't even think about a pick and shovel! Although, I don't know, you could dig a hole and fill it with potting compost. It has been known. But these would be a desperate measures.

Obviously, all we can do is try to get the tubers as low as possible. But this can be a problem, especially with those large clumps of tubers - you know, the ones in soil we awakened.

depth of dahlia tubers below surface is 4 inchesThese clumps are enormous. As you can see, even when stood in a 30cm (12 inch) hole, the shoots are only 10 cm (4 inches) below soil level. Before we go any further, we should be very clear about something:

IT'S THE SHOOT BUD DEPTH THAT MATTERS, NOT THE TUBER DEPTH

Whilst 10 cm (4 inches) is the recommended depth for dahlia tubers, unfortunately this is TOO SHALLOW for our purposes. If we want to reduce watering, we need to somehow get the shoots lower - preferably at least 20 cm (8 inches) below ground.

dahlia tuber levelsSorry. It's not a very clear photograph. But the large clump on the right is a clump of awakened, unsplit tubers - as they were stored over winter. The tray on the left contains the tuber we put there recently. In order to level the shoot buds in both cases, I had to stand the tray on a house brick. The red line represents the level of the base of the the tray. Everything below the red line needs reducing, all 40 cm (8 inches) of it. How?

Clearly, separating the clumps and planting the tubers flat in trays, as you have seen, is good. And we could still separate the clumps into single tubers. Why not do this? Well, it's getting too late*. The clumps will have quite a bit of root growth in their soil, and if we removed this, it would waste time re-growing. Best keep disturbance to a minimum.


sliced dahlia tuber on side, cut end downwardsDivide clump by slicing down between buds (try to get at least one strong bud on each piece) with a sharp knife or spade. This photo shows a slice laid on its side, cut-end downwards. It can be planted like this. Don't worry about the buds pointing sideways, not upwards: they'll soon turn upwards; and the roots downwards.

Yes. O.K. But this is a smaller clump. We've lost some buds. There won't be as many flowers, will there?

No. But there is a way: Make a dahlia tuber wheel.


DAHLIA TUBER WHEELdahlia tuber wheel

Once the tuber clump has been carefully sliced into thinner sections, it can be re-constructed in a different dimension. Lay the slices, bud ends inward, out like the spokes of a wheel in the bottom of the hole (this one is on the surface). This way, no buds are lost from the original, yet we have achieved our purpose: THE BUDS ARE NOW AT ABOUT 17.5 cm (7 inches) deeper in the soil. How about that, Ben Murphy?

FEEDING
Last year, I laid the tubers on muliti-purpose compost in the bottom of the hole. This provides nutrition to get a good start, then extra water-holding capacity. It's a good policy. I recommend it. However, I haven't used compost, this year - only a handful of bonemeal, as outlined in other posts (please read them all, if you can - including last year's).

Some growers recommend laying tubers on a bed of garden compost. This, in my opinion, is not a good idea. Chances are, it will be too strong and will burn the delicate young root hairs, especially in dry soil. If you want to use garden compost - or any other type of feed - make sure it is kept at least 5 cm (2 inches) away from the roots - and offset to the side, if possible, so the tap root (which goes straight down) does not have to grow through it. I usually scatter a handful of bonemeal around the edges of the hole. This way, the lateral feeder roots are encouraged to search for it. Roots will always select the right course, given the opportunity.

COVERING
Carefully cover over tuber and young shoots with soil from hole. But only to a depth of about an inch. If you can position the shoots on the sunny side of the hole, the rapidly-emerging shoot (due to warmer soil) will have shorter growth.

WATERING
Water covered tuber well to settle soil for a good start. Then only water again if absolutely dry. This will encourage strong root growth.

* This refers to rooted single tubers. If coming straight from the packet, just dig a hole and pop them in. Note that they are best laid on their side, as this gets the shoots lower.

Troubleshooting A Sickly Pot Plant

You can tell when plants are healthy. They kind of glow with energy. Hard to explain. But you'll know when you see it.

a droopy and off-colour plantThis pot plant isn't glowing - the first sign of trouble. What's wrong?

When troubleshooting any plant, the first thing to do is: EXAMINE THE ROOTS. If these aren't healthy, the plant won't be, either. Most healthy plants have at least some white and fresh roots.


REMOVE PLANT FROM POT
Place one hand over top of pot so plant stem is between fingers. Take care not to damage the plant.

Invert pot, now supported on palm of hand.

Grip rim of inverted pot with fingers of other hand, and press centre of base with thumb(s). This slight movement is usually enough to release plant onto palm of other hand. If it doesn't release, give base a sharp tap. Make sure you catch it. Failing this, cut round edge with a knife (not recommended).


first examine plant's rootsThe side of the pot shows roots are not too bad. But compost gets quite wet (dark) towards base. Pot is heavy. Suspect over-watering.

the roots of this pot plant are rotten due to excess waterThese mouldy, brown, rotting roots are the problem: Over-watering confirmed.

PROGNOSIS
ON NO ACCOUNT WATER until plant is almost wilting. Might be several weeks later. Rotten roots could have been removed, and plant re-potted. Will only do this if it fails to recover. Check regularly for signs of new white root growth. And try not to give too much water (usually caused by watering too often - see last year's earliest posts on watering) in future.

14 April 2011

Watering A Cyclamen For Dormancy

fading cyclamenAs days get longer, especially as it hots up, pot cyclamens decide it's time for a rest; in this case, a well-earned one. Despite starting flowering a month late it then continued as per normal.

JUST ONE LAST DRINK
What I do now is give it a final light watering to see it through the 'shutting down' into dormancy. Although the plant seems to be dying back, its leaves will be working overtime, making food for the corm so it can keep ticking over. Gradually, the leaves will die back as everything dries. I leave the leaves on.

You can lay it on its side, as recommended. However, provided the crown of the tuber is dry enough, you don't need to. That's all there is to it 'till the first signs of new life appear around the middle of June. Could do with a good rest, myself.

Dahlias Need Stronger Light

Thought they'd never wake up - the dahlias. Now they have and there's nowhere to put them; the spring bulbs haven't yet finished. Problems. Problems.

TUBERS IN TRAYS AND POTS
shoots on dahlia which was in trayThese tubers in tray now have shoots which need stronger light. They need putting outside. No problem. Just move outside. Can be left out. But beware of slugs and frost.


AWAKENED DAHLIA TUBERS
'arabian night' dahlia shoots The tubers we awakened with water have also produced new shoot buds, though not as large as in the trays. They have also just started to grow new roots (below).

roots just starting on 'arabian night'It's always best - with all plants - not to disturb the roots too much. So these tubers need putting in the soil before their roots get tangled. But can't do this yet. So. Compromise. Stand clumps on soil surface next to spring bulbs. This way, they keep growing, producing strong short growth. Again, watch out for slugs and frost. Roots will grow down into soil a bit, but not into other plants - and they shouldn't be there long.


BEST TIME FOR DIVISION
If you want to increase your stock, now is a really good time to divide them. Get a sharp knife or spade and cut between the buds and down through the tubers, so that each half has bud(s), a stem(s) and at least a bit of tuber attached. Take care not to damage the buds. Each bud will produce a new stem. So you can determine the size of each new plant. The further you split them (i.e. down to a single bud with stem and piece of tuber), the stronger they will grow. You won't get as many flowers - although these will be larger.

Bulbs In Pots Do Work

pot daffodils floweringIf you remember, late last September I put a few daffodil bulbs into 15 cm (6 inch) pots and, after getting them started, buried them 10 cm (4 inches) deep in the space left behind by the dahlias. The bulbs seemed small - too small for the pots - so I didn't expect too much. They're not fantastic. But at least I can remove them early - complete with pot, if necessary - to plant up the beds. This is good. However, they didn't seem to flower any earlier than the rest (as I had hoped), but this might be due to variety (some flower earlier than others).

You might be wondering why I don't remove them now to make room for a dahlia re-plant. Well, I could. But there's no rush. As I have told you before, Mother Nature has a way of catching up. I know the daffs are late, but they're not nearly so late as they were in January. They've caught up brilliantly. Things always do. Getting the best results is more about timing - picking the right moment - than about being first; a bit like the hare and the tortoise in that respect. Last year there was little difference between early and late-planted dahlias (because I had started the dahlias well before planting) In fact, if anything, the late-planted might have done better. You need to understand that the soil hasn't really warmed up properly yet, especially down below. Come May...Now that's a different story...

Coriander Root: No Discussion

new severed coriander root Thought it strange what happened to that severed root. You know - the one in the plastic pot. So tried something else. Planted another pot, then severed all-but-one root, each in a different place and at a different stage: some before reaching pot bottom, others after. Not conculusive. But two things likely:
  • even though root was severed before it reached the bottom (so, presumably, before it came into contact with other roots), it is still apparently alive (white) after 8 days
  • relative to the control unsevered root, there seems to have been quite a check to growth on the other plants, even though they have developed good lateral root systems (however, as you can see, these roots have thrown good lateral roots above the cuts)
I wanted to see how much this check might be. Now we know. Since no contact between roots in this case seems likely (because I cannot see any), there's little chance it could have been fed by a neighbour. Probably being sustained by sugars present before it was severed. Anyway, at least we have seen the check to growth. So it hasn't all been in vain.

Pot been deliberately kept on dry side. So now want to see what happens once it's watered. Will extra lateral growth of severed roots allow them to catch up, in time? Let's wait and see....

P.S. Little change in condition of root in original pot.

Geranium Cutting: Getting The Right Angle

short-jointed geranium cutting All right. It doesn't look much, I know. But I still couldn't resist a cutting. Why? Well, it's only about 7.5 cm (3 inches) long (no comments, please). Consider how close the leaf nodes* are. And look at those two side branches (red) just itching to get going. And look at the leaf size and how healthy they are (sorry they're upside down - just couldn't get the right angle on this one). And the stem's bright and shiny . . . And it's already flowering (pink) . . . Pity about the shape, though. Never mind. Nothing's perfect.

Made sure there were no dead leaf bracts left on stem to go mouldy in soil, and removed flower; then pushed into freshly-drained garden soil, just like last week.

* Geraniums produce short-jointed growth during the winter months. Since the side shoots come from the nodes, it should produce a more compact plant

Troubleshooting Mystery Holes On A Spring Lawn

starling damage leaves holes on a lawnIf mystery holes like these suddenly appear on your spring lawn, suspect bird damage, particularly starlings. These will be searching for grubs (usually leatherjackets or chafer grubs) in the turf. We dealt with leatherjackets and how to remove them, last year. But if damage is serious (i.e. there has been considerable root and/or young shoot damage), you will see dead patches suddenly appear (around where the holes are) during dry spells. If you pull the grass, it can be removed easily. If you really suspect grub damage, best to remove a divet of turf with a trowel and search in the turf for them. You can also water the lawn, then cover with a light-proof sheet overnight. Leatherjackets will be seen in the morning if they are there, and can be picked off. You'll need to be early, though. Otherwise, it's chemicals. TREATMENT FOR LAWN GRUBS 'Provado Lawn Grub Killer' is very effective. See last year's posts (first link). However, one or two grubs will not do much harm. So I would not recommend using this treatment unless absolutely necessary. You can also use nematode worms as a non-chemical approach. But they're expensive, not always effective, and need specific temperature and moisture conditions.

7 April 2011

How Adventitious Roots Can Supercharge Growth

adventitious shoots on node of a fuchia stemIf ever you see adventitious roots (roots arising from stems and leaves) growing at the leaf nodes (that point where the leaves join the stem) of your plants, jump for joy. It means that, if utilized, a plant's growth can be supercharged. Why? Well, to a plant, having two or more sets of roots is the equivalent of an Olympic sprinter having two sets of legs - an obvious plus (forget the cost of the extra shoes).

HELPING THINGS ALONG
Of course, there's only an advantage if the extra roots can be buried. In a garden, this is usually no problem. But things are not so easy in a pot. Tomato growers, once they see these roots appear on the bottom nodes, remove the old leaves and place sleeves filled with compost (sitting on top of the original compost) around them. This is the next best thing to deeper soil.

this triphylla has a buried nodeAs far as fuchsias are concerned, things are not so easy unless the plant is short-jointed, which this triphylla isn't. Never mind. Burying the node as much as possible will both lower the plant and produce shoots from the buds in the buried leaf axils (these will push up through the compost). It should also produce extra roots, provided the top of the compost is kept moist.

Geranium Shoot Tip Cuttings: How More Leaves Can Accelerate Rooting

Once a shoot tip is severed from the parent plant, it must get busy producing new adventitious roots at the base of the stem. Because all growth needs fuel (sugar) for energy, the first thing the cutting does is use the reserves made before it was severed from the plant. If these reserves are large enough, the plant might be able to make itself a fine and strong new root system. However, this is unlikely. Usually the reserves need supplementing with new sugar made by photosynthesis in the remaining leaf(ves).

Obviously, the more leaves on the cutting, the greater the leaf area, so the more sugars will be produced. Whilst all this seems pretty obvious, there is a problem: Greater leaf area means greater water loss. But without roots, the cutting cannot take up water from the compost. So it can wither and die. A vicious circle.

For this reason, a compromise is reached when taking cuttings. It is standard practice to reduce the number of leaves to just one or two. However, over the years I have consistently noticed two things:
  • small leaves are no use at all - they produce very slow growth
  • a large leaf area greatly accelerates rooting - and plants can determine this better than we can
'Better than we can? Cripes! Does this mean they can think?'
'Don't be silly. They haven't got a brain!'

geranium cutting branched geranium cutting
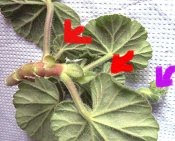
Most growers would be embarrassed to show plants with shrivelled leaves. But I'm encouraged. Why? Well, look at the evidence. These cuttings, taken last week, are really romping away. I don't think they have yet rooted, but that's not important (well, it is - but not here). What I want to show you is how the plants are jettisoning the excess they don't want (the leaves that are changing colour).

Why not just remove them at the start? Wouldn't this be better?

I don't think so. Even if we didn't remove them, and cut the larger leaves in half (to cut down on water loss), this would also remove any spare sugars lying around in the unwanted leaf. The clever part here is that the cutting can first utilize these sugars, THEN jettison the leaf.

I have found using more leaves to be the best way of taking geranium shoot tip cuttings. First, start with a soil which just binds together when squeezed and is slightly cool to the touch (I use the back of my fingers). Then take the cutting and don't water again as long as there is some sign of green life, especially NEW green life. Watch for new roots at the bottom of the pot. When you DO water, do it from the bottom: stand the pot in a saucer of water for about 10 to 15 minutes.

Of course, everything is not cut and dried. It wouldn't be 'growing' if it were (well, that's not strictly true; it would be growing, but 'growing by numbers'). Because your conditions differ from mine in terms of temperature, humidity, air speed etc., slight adjustments will be needed. But you'll be on the right track. At least, I hope you will.

air-rooted fuchsia cutting showing dead leafJust out of interest, and to consolidate the point somewhat, this fuchsia cutting was taken about a month ago. I know the large leaves are dead (one has already fallen off). But bear in mind it has never been covered. It's been in dry air - even in the sun - the whole time. A seemingly impossible feat. And it's not as if 'Annabel' (it's name) even likes the sun, indicated by the dark red veins. It doesn't. Yet it rooted and is now growing strongly (though uncovered cuttings do take longer to root).

See also: 'A Cut Below Average'

What Causes Red Fuchsia Leaves?

chilled fuchsia leavesJust like we humans, fuchsias can also get a bit grumpy and difficult if the weather gets too chilly. Red leaves, as shown on this fuchsia plant, is a sure sign they have caught a chill. It is usually caused by the build-up of the red pigments, anthocyanins, and is especially associated with fabulous autumn colours in certain years (think about acers and ancient oaks).

Although commonly believed to be due to early frosts, this is not in fact the case. Anthocyanins build up in the leaves with an increase of carbohydrates (sugars). This occurs during cold nights and warm sunny days. Carbohydrates produced by photosynthesis in the leaves during the day, are not fully distributed at night because this process slows down due to low temperature. Hence the build-up.

WHERE'S THE CHLOROPHYLL?
The green chlorophyll has not disappeared. It's still there, masked by the anthocyanins. We can show this by boiling the leaf. Because anthocyanins are water soluble they will be removed once the cell walls have been broken down, leaving the chlorophyll pigments, which are lipid (fat) soluble, not water soluble.

boiled red fuchsia leafThis leaf was taken from the plant above, then the left half was boiled for about 30 seconds in a microwave. You can see the red anthocyanins have disappeared, leaving it surprisingly green and normal-looking.

WHAT DO YOU DO ABOUT IT?
Unfortunately, the leaves do not behave like traffic lights. They don't turn back to green once warmer weather arrives. However, new green leaves do finally appear and things return to normal.

P.S. Triphyllas also contain anthocyanins.
P.P.S. ON NO ACCOUNT BOIL YOUR PLANTS; THEY WILL NOT RECOVER!

Meet Son Of Turbo Pot Dryer**

son of turbo pot dryerYes. I know it's not much to look at (a bit of an understatement). But don't be deceived by appearances. This could be the best idea I have ever had (what do you mean, 'that figures?').

And before you ask, I'm not talking about the 6.25 cm (2.5 inches) pot made from the base of a 200 ml plastic cup*, ingenious as it is. No. I'm talking about the length of toilet roll, complete with twisted end stuffed down the inside of the pot. Who would believe this could be like 'Manna from Heaven' at the appropriate time (what, you as well?)?

As you know, I'm trying to keep my fuchsias outside, because of the light (it keeps them tight-jointed). But in strong winds the other week, they kept blowing around. So watered the pots to keep on ground. Needles to say, once watered, wind dropped. What to do? This was the result.

Although not shown in the photo (to maintain dignity), the toilet tissue was actually nearly 2 feet (60 cm) long, and dangling in the air. Left in the pot overnight, the compost had miraculously dried next morning. A brilliant wick. Fantastic.

* I made this to fit into the coffee jar propagator. But it's too flimsy and disturbs the roots too much when I pick it up. Not too good in the sun, either!. ** See also 'The Turbo Pot Dryer'

Severed Coriander Root Dying After 29 Days?

Something has happened to the coriander root severed 29 days ago. The severed half seems to be dying.

severed coriander roots are dying and going brown Sorry about the photo. But the severed base of the old root (red) has suddenly begun to wither at the top. Strangely, it still seems white at the base, presumably where it's attached to the other roots. However, what I don't understand is why the base of the new lateral side shoot (pink), attached to the original intact root, is turning brown at its base. Since it seemed so strong and healthy, I would have expected it to be pristine white.

Seems strange one is withering at base, other at top. i.e. Both are dying in roughly the same part of the cup. Could there be something (perhaps a toxin of some sort) causing this? I don't know. But what I can say is that there's no compost behind the roots in this area, so it might have caused too much desiccation (drying).

However, it's unlikely, since roots do not normally turn brown and begin to die when they reach an air pocket; they just stop growing and hang around in limbo. Mysteries, mysteries.

P.S. Have started another pot of coriander and have cut the roots in several places. Tell you about this later . . ..

P.P.S. Rising temperatures means now watering about every 5 days. Look at how much this watering has stimulated root growth.

Feed Potassium To Avoid Fallen Daffodils

fallen daffodilsSo much for the ericaceous feeding, back in February. It wasn't the wrong time; it was the RIGHT TIME; but unfortunately the WRONG FEED. Daffodils should be fed twice: once in February (in the UK) at the beginning of spring growth to fuel flowering, and again at the end of flowering to feed the bulbs .

Of course, the cause of the problem is TOO MUCH NITROGEN, which gives excess soft growth. It also gives loose bulbs, which can cause problems. Whilst ericaceous feed is not really high in nitrogen, a better feed for spring bulbs is the one I usually use: high potash (potassium) - tomato feed, or 'Phostrogen'. These will harden the stems and tighten the bulbs. Had it not been for the recent strong winds, this problem might never have occurred. But, as is often the case in life, they did - and it did.

1 April 2011

Coriander Re-Pot Increases Growth Rate And Leaf Size

The time has come to give the coriander roots more space - time for a re-pot (see last year's post). Although this is not absolutely necessary, a larger root run will vastly increase both growth rate and leaf size. And we need to get a move on now so we can cut the crop before it goes to seed, as it does in early summer. coriander now ready for a re-potIf you want to keep a plant growing, keep the roots growing. Once this stops, growth stops. As you can see, the roots are beginning to fill the pot, so growth will be slowing down. Most growers re-pot in half inch stages, saying this helps fill the pot better. They also use additions to the compost, such as grit or perlite, to help avoid over-watering. I have never done any of this - I have always used plain multi-purpose compost. Provided it is not compressed too much, and provided it is allowed to dry out adequately between waterings, there should be no problems. I am not saying there are no benefits to compost additions - there will be. But growing, to me, is about keeping things simple and cheap. Re-potting can be done as per last year. A frost-free spot in the garden would also be ideal. If you want to cut costs, try mixing about half compost, half garden soil. Because of the severed root, I am not re-potting this pot. The severed root seems to be still alive, and the new root buds formed on the other half are starting to grow.

Moss-Free Spring Lawn After Autumn Treatment

lawn after first cutMy lawn hasn't looked like this in spring for ages. No moss whatsoever. I'm really pleased. Although I fed it a couple of weeks ago, I have resisted cutting it till now to help root growth. Leaving the grass longer both provides more food for root growth and prevents stress. This last point has been apt this year; things are getting very dry.

lawn after rakingGave it a quick comb with the raker (scarified lightly at half walking pace)
to remove the dead grass. Quite a lot came out but it hardly showed. Great. Autumn moss treatment definitely pays dividends.

P.S. Don't throw your rakings away. They make an excellent soil conditioner and moisture retainer. We shall soon be digging them into the soil.

Geraniums: Removing Unwanted Long Autumn Growth

3 new geranium cuttings from 1 plantThe geranium cutting you saw last year has produced lots of new short growth (red) over the winter. This is good, since it will lead to a more compact plant. Pity about the autumn long growth (pink) stuck in the middle. Never mind. Splitting this plant into 3 sections (green) will help remove the unwanted growth.

geranium remainsThis will leave a compact plant with 3 stems (right). Because this plant now has a basic structure, it can be watered and fed to build it up. It can also be re-potted, soon.

2 extra geraniumsAs a bonus, we also have 2 more short-jointed geranium cuttings. I put these into 3 inch square pots of soil to root (square pots cuts down on space). Soil will keep the growth short-jointed whilst we build up the structure of the new plants. I will also keep them on the dry side and will not feed.

Shriveled Stems On Geranium Cuttings

The last batch of geranium cuttings, taken last November, have never done well. It was asking for trouble trying to root them on old ripe wood so late in the year, but I wanted to show that they could make roots.

unhealthy geranium cuttingThings were going fine until the compost dried out, forcing me to water - almost always fatal with geranium cuttings. The first sign of trouble is when the leaves lose their bloom and become dull and lifeless.

shrivelling geranium stemExamination of the stem shows that instead of being round and shiny, it is becoming sunken, dull and shrivelled (especially at the base). Some sort of wilt or rot disease has taken hold.

Although I have seen this condition several times, I have never been able to match it with any bacterial or fungal disease illustrated in the text books (not the ones that I have, at least). I don't think its 'Pythium' (blackleg) fungal disease. It might be Xanthomonas 'campestris pv. pelargonii' (bacterial stem rot), but I'm not sure. Although this seems most like it, I don't think so. Both diseases are common on geraniums. There are also several other geranium diseases which I have not yet investigated, such as 'Fusarium cutting rot' or 'Cottony stem rot'.

Anyway, whatever the cause, I sealed the whole lot in a freezer bag after first spraying with bleach, then thew the lot in the bin. On no account should this type of infected compost be allowed to infect garden soil.

Conifer Hedge - Does Potassium Feed Prevent Die-Back?

die back on conifer hedgeNormally, at this time, the conifer hedge has several dead patches from the previous year, plus occasional winter damage. Not this year. Although there is slight frost damage, it's still completely free from die-back. Why?

'<span class=I'm not sure. But I think feeding last year with 'Phostrogen Plant Food', a highish potassium feed (14-10-27), has much to do with it. I think the potassium has hardened the foliage, making it less attractive to insects and fungal disease.

I am still not really sure what causes die-back, even after much research. There seem to be several theories, ranging from suffocation through to disease and aphid attack. The trouble is that by the time the symptoms appear the causal agent is long gone. I currently think it's aphids, since the birds start feeding on the hedge around this time.

I applied the feed with a hosepipe applicator.

TREATING THE DIE-BACK
If you're wondering what the holes are for, they're where I dug out the last lot of die back. I have found that after cutting out the dead tissue back to the stems, re-growth occurs and the holes fill in. However, it's very important not to cut TOO far back. You want to be able to see at least a glimmer of green life.