Learning how to water plants to increase growth in pots, container or garden - especially how to water roots and tubers. Specialities: root growth or tuber growth of lawns, fuchsias, geraniums, dahlias and begonias.

Showing posts with label aeration. Show all posts

1 July 2011

Slow-Release Lawn Feeds Create Problems

lawnAlthough slow-release lawn feeds have a lot going for them, they also create problems. I'm not referring to the fact that the grower loses nearly all control over the rate of food release to the turf (because they work best in wet, warm conditions and hardly work at all in cold, dry ones). No. There's another problem: They preclude work on the turf whilst they are active. And because some of them last over four months, this means for the whole summer.

Normally, this would not be a problem. But it is on my lawn. I can't rake out the old dead grass, which would help get air and water in to rejuvenate the turf, because if I do this I will also remove the remaining feed. Not ideal.

20 May 2011

Revive A Summer Lawn By Watering Its Roots

patchy summer lawn
The recent long spell of dry weather has not done much for lawn growth in the UK. Roots have become starved of water, thus causing the turf to wither and die. I thought mine would be OK after all the treatment it had last autumn. Not so. As this recent photo - taken about three weeks ago - shows, it was looking decidedly patchy; yet it still felt soft under foot.


Always a handy tool, a garden fork soon revealed the problem: The patches of dying grass were bone dry underneath - so much so that it was sometimes difficult to get the fork into the ground because the soil had become hard. So there was nothing I could do except fork it all over and apply water into the holes. The fork test is a good guide. It should always be possible to push the tines into a lawn fairly easily; if you need to stand on it too much, water is needed - or soon will be.


TAKE IMMEDIATE ACTION

If you can see drought damage, it will already be well-advanced. So the sooner you take action, the better.


WETTING A DRY LAWN

Once a lawn dries out, it is virtually impossible to re-wet; the dry surface acts like a thatch roof, so water just runs off. We covered this last year when I showed how I get water into a dry lawn.


If all the above seems just a bit too strenuous and you don't mind running a sprinkler (or you're fortunate enough to have had some rain), you might be able to get away with just pricking the surface to get the water through the thatch.


I use a spiking tool if I can. But usually the surface has become too hard for the spikes to penetrate, so a sharp fork is useful.


WHAT YOU MUSTN'T DO

There is always a temptation to feed a dried-out lawn. DON'T - at least, not yet. Feeding a dry lawn is fatal, since it will invariably cause scorching. Always water first, then feed once it starts to recover.


WATERING ALMOST ALWAYS WORKS

In fact, I have found that WATERING WILL ALMOST ALWAYS REVIVE A LAWN, no matter how bad it looks. But the water must be applied to the roots not just to the surface. This is the stumbling block. Because it is easy to assume that if water is applied in abundance, it will find its way down. Take if from me - IT WON'T - it simply runs off.

Reducing Water Produces Strong New Roots On Geranium (Pelargonium)

reducing water produces strong new growth on geranium
Look at the strong new roots growing on the geranium (pelargonium) we looked at three weeks ago. If you remember, it had been over-watered. (the pot weighed 370g (13 ounces)) before purchase and the roots weren't looking too healthy.

WETTING AND DRYING INDUCES ROOT GROWTH
By repeatedly allowing the pot to dry down to 7 ounces (about 200g) then adding 4 ounces of water (about 120ml), with no other watering, the aeration of the compost together with drying has produced this result. The pot is watered just as the compost, as seen through the holes in the base of the pot, is just starting to change colour. This now defines the watering regime for the plant.

NO FEEDING YET
I have applied no feed yet, since there will be slow-release feed already in the compost. This has meant I could not dry the pot out to its maximum. I did try to go further, but the leaves started to scorch. No matter. At least we know what the limit is. And new leaves will soon grow.

3 March 2011

Fuchsias Seem To Root Well In My Soil: Should I Add Perlite?

fuchsias rooted in soil last autumnSorting out the fuchsia cuttings taken last autumn, I came across these lovely roots on a soil-based cutting from last July. As you can see, there is lots of new white growth. I said last year that fuchsias seem to root well in my soil (unsterilized). I suppose this is because it is quite light (gritty), and not too acid.

I really like the look of these roots. And watering doesn't seem to be a problem with soil in the autumn. I didn't get problems with botrytis, as I did with soil-less compost - even with added perlite. Garden soil contains anti-pathogens which combat lots of plant fungal diseases.

The only problem is that it can tend to puddle, thereby preventing air getting to the roots. Perlite might solve this. It would help hold moisture whilst keeping the surface open.

But there is also the problem of unwanted pests with unsterilized soil.

25 September 2010

Is it Friable? - The Ideal Soil State for Lawn Aeration

It makes things an awful lot easier if we can work with Mother Nature instead of against her. This is brought home nowhere clearer than when working with soil: It can be either a dream (well, almost), or a nightmare.

And I think all gardeners and growers understand why a soil's water content plays a major role:

  • too wet, and it turns into sticky 'plasticine', impossible to control
  • too dry, to dust

However, there is a very narrow window of opportunity which presents itself as a soil dries out (thank goodness).

At this point, it forms into a ball when squeezed in the hand. And this ball breaks up easily when poked with a finger. This happens to all soils and composts which contain some structure to bind them (it is that same condition, ideal for propagating cuttings, described earlier). At this stage, the soil is said to be FRIABLE.

THIS IS THE IDEAL CONDITION FOR LAWN AERATION, especially by hand fork.

FABULOUS DRYING DAY
Today's weather came right out of the blue. The cold north-east wind is really drying things up, especially the lawn.


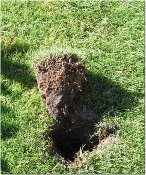
I rturf divotushed out with my trowel and removed this divot. Can you see what I mean about thatch? It starts at the top and goes about two thirds down, to a depth of about 5 cm (2 inches).

But it's not the thatch we're interested in at this stage; it's the dark soil beneath it. I'm not sure if you can see, but it's still rather wet, but becoming rapidly drier. And because this weather is set to continue tomorrow, this would be a good opportunity for aerating the heavier ground (who knows what the weather might do next; and for how long?).

AERATING WITH A FORK

hollow-tining a lawnThe rows are similar to hollow-tining (shown here), but wider apart. However, the process is different.

Using my fork with the finest (thinnest) tines (a border fork), I drive it full depth into the turf, at a slight angle back from vertical.

On pulling the fork handle back towards me about 30 cm (1 foot), a layer of turf, at least 10 cm (4 inches) thick, is prised up on the tines. When the fork handle is raised and the tines withdrawn, this turf does not fall back completely (since it has been stretched), but remains slightly arched. Since the fork holes are in rows, the effect is to produce something like shallow drills of turf across the lawn, separated by the rows of fork holes.

It is the ARCHING which is important. The fine tines break a friable soil up easily, including any compaction (this technique is especially useful for areas of heavy traffic).

Aeration is achieved, firstly from the holes made by the fork; and secondly by the newly-formed cracks in the turf (caused by stretching).

IDEAL FOR LIQUID AUTUMN FEED
The holes are at the bottom of the ridges. So liquid feed can run straight into the soil, down to the roots. This is important for root formation, since phosphates (essential for root production) are, within a short time, nearly completely immobilised upon entering the soil.

And things get even better: rainwater can also get through the turf.

SPACING
About 25 cm (10 inches) between rows, for a small border fork, seems ideal.

FEEL THEM ROOTS
The idea is to get the fork in deep enough to reach beneath the roots. What I find is that this is easy in the heavier parts, where root formation has been limited by poor aeration. But one can feel the roots really resisting where the conditions for growth have been ideal. At this point, forking is not necessary; pricking will do, just so the water and feed can get through the turf.

LEAVE UNCUT
I really prefer to do this after the last cut, since it is important not to re-compress the turf. However, I find a small hover mower ideal, especially since the grass is best left longer so it has maximum length to produce food to fuel root production. I know it can thin the turf, but it is worth it at this stage.

HIGH POTASH FEED
Do not use summer feed; use a high potassium autumn feed. If you can't get a liquid (tomato feed will do), get a good brand of granules (this might contain a mosskiller and weedkiller).


P.S. Good news, thatch-wise: It's a lot softer than it was - the woody rhizomes have almost broken down (probably thanks to our early summer feeding).

9 September 2010

Hollow-Tined Lawn

hollow-tine holes in lawnBefore top-dressing the complete lawn, I hollow-tined a small part comprised of wet heavy soil.

My lawn is a problem because the soil varies in texture from almost clay at one end, to almost sand at the other (yes, I know it's just right in the middle, and I can't have everything; but it's still difficult to manage).

I don't know if you can see (probably not) that the spacing between rows varies from about 10 cm (4 inches) to about 12.5 cm (5 inches). I only tined a few yards. I would have done more, but the tiner kept clogging up.

However, I feel that, provided water can get into the turf, the best time to aerate the lawn is after the end of cutting: and there's still over a month of this left, yet.

Nevertheless, I have found that deliberate aeration greatly enhances root growth. This is important, because I believe that the grasses grow a new root system each season. We are always starting each year afresh, so to speak.

Re-seeding
I added about 17.5 grams per sq metre (1/2 oz per sq yd) of grass seed before I applied the top dressing.

28 August 2010

Lawn Action in August

Reply to comment:

'What action do you take in August?
By Anonymous on Moss in Lawn on 25/08/10'


Thank you for your comment. As far as the lawn is concerned, if you look in the blog archives, you will see that I posted a 'Moss Alert' on 6th August which alerted readers to the dangers of moss getting hold at this time of year. If you look at the post, you should find links back to other lawn articles which will outline moss and other lawn jobs. Also, if you look at the categories at the side and click the 'lawn' link, you should find all the lawn posts.

There was also a lawn posting yesterday which was written before I read your comment.

The Lawn in August

August is in many ways a strange month, certainly as far as a lawn is concerned. Temperatures are still reasonably high, and provided there is sufficient moisture in the ground, growth should be quite strong. It is therefore a good opportunity for a lawn to recover from the hot often dry summer months (especially this year). High nitrogen (these should also contain some phosphates and potash (P and K)) feeds can be given up till the end of the month, which will really help the lawn recover.

However, there is also a downside. Overnight dews combined with high temperatures provide an ideal breeding ground for fungal diseases. You will see that I have had problems with 'Dollar Spot' disease (apart from the blight on the tomatoes). This has been largely dealt with by raking it out somewhat prematurely. This operation has been mostly successful, though there is still a little bit left. This disease is not fatal (it only affect the finer grasses, anyway); it merely disfigures the lawn for a while.

And of course, there is moss, the bane of my life (one of them). Warm dewy nights are also ideal for spore germination. Moss is sneaky and can suddenly appear, as if from nowhere, as I am sure you are well aware. So I really do advise you to be on the lookout for it.

I limed my lawn this summer (see 'Keeping it Sweet') to help with my moss problem. And, touch wood, this seems to have worked, at least so far. Usually I have had moss before now. But the lawn seems clear. Hope I haven't spoken too soon.

Removing acidity (by liming), and improving drainage, can each help tremendously with the moss problem (liming is best done early in January).

If you look back at the summer lawn posts, you will see that I spiked the lawn to aid water penetration (look under 'lawns', 'watering' and 'water conservation'). Water penetration can be prevented either by a thatch on the surface or by compacted dry soil beneath. Spiking, or pricking punctures the surface to allow the water through it.

A good technique is to go further than this and push a fork further down into the soil (as I did in the summer). If it is wiggled around, in the right conditions, it will break up compaction. But there is a downside: The soil needs to contain the right level of moisture, otherwise it can do more harm than good (this will be explained soon). Furthermore, because it breaks the root system, we need to be sure that the grass can recover quickly enough by growing new roots. For these reasons, I do not recommend deeper tining at this time (best to wait till further in September). Stick to pricking, spiking or shallow tining if you can.

If the soil is really hard - so hard that water just cannot penetrate (as it has been this year) - I push the fork deep into the soil just to make a hole, but do not wiggle it. This way, root damage is minimised, and the water has more chance to get deeper down to where it can begin wetting the lower levels.

The other thing which is good is Hollow Tining (provided the ground is not too hard), which I briefly touched on in a previous post.


If there is one thing I want to teach you about growing, more than any other, it's that we need to do things when the plant dictates, not the calendar. I know there are good arguments for doing things at the appropriate time. But nevertheless, this should be dictated by the plants. Times have changed. Seasons have changed. Methods and opportunities have changed. Equipment has changed. It's all changed from how it used to be years ago. We need to bear this in mind, yet still consider the wisdom from the past.

As the autumn progresses and the nights draw in further, the lawn detects this and changes its growth pattern from producing leaves to producing roots for next year. I have just given my lawn a feed which should be enough for leaf growth this year and give the grass a good start into the autumn when we can concentrate on the roots.

So, to sum up, make sure the drainage is good on your lawn and that water can penetrate down into the soil, ensuring any winter rains can get away without waterlogging the surface. Get on top of the moss, rake out any thatch and dead grass if necessary.

I hope this will be useful.

Best wishes,

Jimini

2 June 2010

Lawn Update

Last week's spiking has had some effect. But things are progressing very slowly.

And it's patchy. Some parts are normal; others still rock hard. This is no use for growing. We want all one or all the other. Only then shall we know where we stand.

Decided to fork lawn all over, in rows 10 cm (4 inches) apart, to a depth of 15 cm (6 inches). I then got the hosepipe and filled up the holes a couple of times with water, then applied an inch of water with the sprinkler.

It's much better now. Funny, but I'm sure I could see the lawn growing as I performed this task. Shows how much grass appreciates water and air. This job is rather boring. But in a strange sort of way, I rather enjoy it.

At least we have some defence against a drought and hosepipe ban, now.

28 May 2010

Thatch Should Do It!

Meet Spike.
lawn spiking toolTo get water into my lawn when it's dry, I use a lawn spiker. It punches nail holes in the turf as I push it along. Fantastic.

However, there is one proviso: The lawn needs to be soft (i.e. moist) first - too hard and it just bumps along over the surface, like it did yesterday. It's a chicken-and-egg situation.

This is where patience comes in. Wetting the surface layer allows the spikes to get a hold, then they will dig into the thatch, making holes for the water. But it's not easy. In fact, it is just about the hardest job in my garden.

If the thatch will not wet, then a few drops of washing-up liquid applied with a watering can (use an eco-friendly washing liquid if you wish) works wonders. They act as a surfactant (I think that's the word for a wetting agent) and reduce the surface tension, thereby facilitating wetting. However, I don't like doing this, because water from down below reaches the surface, soil particle by soil particle, using this same surface tension. Removing it could deprive the roots of water. I don't know this, but I suspect.

A sharp garden fork is a good tool for breaking through the thatch. You don't need to spike it all: just dry spots.

Compaction Story

One spring, about fifteen years ago, the lawn just wouldn't grow. Oh, I had given it all the treatments - twice over, just to make sure. It had been fed, watered - the lot. Still nothing. It stood there like a worn-out cricket pitch. Weeks went by. Still nothing.

Then, one day, I noticed some growth. Not where it should be, in the centre of the lawn, but around the edges. Recent heavy rain had moistened the borders around the lawn. The problem seemed to be water. The edges had soaked up water from the borders.

But how could it be water? Apart from that month, it had been raining since the previous autumn. It couldn't possibly be short of water, could it?

It was. When I dug through the surface, the soil was bone dry, set like concrete underneath. I could not believe my eyes.

plug of lawn thatchThen I looked at the inch and a half of thatch which was standing between the soil and the rainwater. It too was bone dry.

I got a fork and forced it down through the thatch (It was so hard I had to jump on the fork. It is like this again, now) and stirred it around. In fact, I had to move the fork around just to get it in. I did this all over, then filled up the holes with water. After this, further water went in as if by magic. It hardly seemed to take any water to wet the deeper layers, whereas I had had the sprinkler running for hours before. Amazing.

This problem is called 'Compaction'. Of course, I had heard of it, but thought it was caused by children playing on muddy turf. I had no idea that it applied to almost every lawn in the country. Yes, it will apply to yours as well. Give it a test.

TEST FOR COMPACTION

If you can easily push a garden fork into the surface to full depth on a dry lawn, then things are O.K. If you can't, then there is a problem. The fork is the test. It never fails.

compaction-busting toolsThe tool on the left is a hollow-tiner. You push it into the soil and it takes out plugs to let in air and water. There are mechanical versions if this seems like too much work. Professional lawn companies will do it for you. But it's expensive. And it only lasts two or three years.

4 May 2010

Panned Soil

, beAs you can see, the recent heavy rain followed by sun has baked this soil surface into a hard crust (pan). This is partly because there is little structure in the soil to resist this, but mostly because it was broken up too finely before planting.

This pan needs to be broken up immediately, since it is preventing oxygen getting down to the roots. And roots cannot take in water without oxygen, contrary to what we might suppose. It is also preventing other essential gaseous exchange.

A Dutch hoe is an ideal tool to use, since this will also kill off any small weeds which might be gaining a hold.

To give a soil more structure, we can add organic matter to it in spring. This will be broken down by the soil micro-organisms to form humus which has the effect of sticking the finer particles together to form larger ones (crumbs). Not only do these allow gases to access and leave the soil more easily, but they also resist this panning.