 Corn and other grasses (monocots) have a special sheath of cells called a coleoptile which surrounds the true leaves. On germination, this coleoptile is first to emerge from the ground and provides protection for the young tender meristem of the first true leaf which then emerges from within it (see diagram). As we shall see later, oat coleoptiles are famous for being used in experiments on growth hormones. See also: 'Types of Seed Germination - Epigeal and Hypogeal'
31 March 2011
Hypogeal Germination of Monocot, Corn ('Zea mays') Produces Coleoptile
In monocots, such as corn and grasses, only one cotyledon is present. At germination, this remains below ground (hypogeal germination), permanently in the grain, and in direct contact with the large endosperm. COLEOPTILE PROTECTS THE SHOOT TIP  Corn and other grasses (monocots) have a special sheath of cells called a coleoptile which surrounds the true leaves. On germination, this coleoptile is first to emerge from the ground and provides protection for the young tender meristem of the first true leaf which then emerges from within it (see diagram). As we shall see later, oat coleoptiles are famous for being used in experiments on growth hormones. See also: 'Types of Seed Germination - Epigeal and Hypogeal'
Corn and other grasses (monocots) have a special sheath of cells called a coleoptile which surrounds the true leaves. On germination, this coleoptile is first to emerge from the ground and provides protection for the young tender meristem of the first true leaf which then emerges from within it (see diagram). As we shall see later, oat coleoptiles are famous for being used in experiments on growth hormones. See also: 'Types of Seed Germination - Epigeal and Hypogeal'
Structure of Corn ('Zea mays') Seed
 In maize, the seed coat is fused with the ovary wall, so this technically makes it a fruit, not a seed.
As with all monocotyledonous (monocot) plants, obviously only one cotyledon is present - in maize, this is large and shield-shaped.
Members of the grass family (e.g. 'Zea', 'Avena', and 'Triticum'), plus some other monocots, have an additional structure, called the coleorhiza, covering the root tip; the coleoptile encloses the young primary shoot.
Upon germination, the radicle and epicotyl rupture the seed and enter the soil.
24 March 2011
Severed Coriander Root Still Alive After 15 Days?
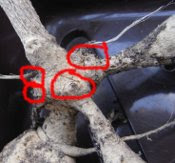
 15 days ago, one of the coriander roots was severed half way up, shown here by the green arrow.
I cut the root to see what effect this would have on branching. As indicated last week, unlike the other roots, it initially produced just one lateral branch, although this was longer than those on the other roots.
Now, 15 days later, two new lateral buds (indicated by red arrows) have also appeared.
 However, what's even more surprising is that the severed base of the root still seems to be very much alive, complete with pristine white root hairs. Once again, the question arises as to how it is sustaining itself without obvious connection to a leaf as a source of food?
- There is a clean break, so the root has not just healed up and continued as normal.
- There is not much water on the side of the cup, so it is unlikely that nutrients have diffused to the root this way.
 It does seems that it's either using sugars previously stored, or it's being fed from the other unsevered roots. As you can see, these have formed a nice group at the base of the cup and are clearly in contact with each other.
What we have here is a community of coriander plants, just as we had with the 'Multi-Plant' * fuchsias.
* The term 'Multi-Plant' is what Ken Pilkington, a fuchsia grower and ex-exhibitor, called this technique of growing several plants in one pot. He found that when he did this, his fuchsias changed their growth habits as they formed communities, and he described these in his excellent book 'How to Grow Fuchsias - A Practical Guide'. I don't want to get into fuchsias here, as we shall be covering these soon elsewhere. But mention is justified because we have a coriander 'Multi-Plant' community, and the effects discovered could be the result of inter plant communication within this community. All we have to do is prove it . . ..
Lettuce First Water After 43 Days
 The lettuce planted in a cup of soil last month has reached 'pricking out' stage (the first true leaf has emerged - see red arrows) and would normally be transplanted into a tray(s). Things have been very slow because of the weather and because I have been deliberately withholding water to show just how well they can manage without it.
 As you can see, (and similar to the coriander) despite little action on top, there has been considerable action below ground. The roots reached the bottom of the cup (some 7 or 8 cm (3 inches) about a week ago. To split the plants now would cause quite a bit of damage * to them. But this doesn't matter, since I intend to grow them as a unit, as another community of plants.
Because this is a leafy type of lettuce and doesn't form a head, it should be possible to pot them up into a larger pot and pick at the leaves all summer. That's the theory, anyhow.
I gave them a good drink for now to help them along.
* If you want to prick out your seedlings, best to use shallow compost. This makes separating the plants much easier.
Coriander First Water After 43 Days
 As with the lettuce, the emergence of first true leaves (arrowed) indicate it is time to transplant to provide more room and better compost for the coriander seedlings. We're not doing this. As mentioned elsewhere, we are going to keep them as a community, just like last year.
Because the cup is getting rather light, and there is little condensation left on its sides, I applied the first water since planting 43 days ago. A good soak now and then is usually preferable to little given often, since it allows the compost to draw in vital oxygen from the atmosphere to replace the water lost as the compost dries out.
I gave about a quarter of a cup (50 mls) of plain water. Still too early for feed.
It is unfortunate that this is the cup with the severed root described earlier. I would have preferred to keep the side of the cup dry. Never mind.
Awakening Dahlia Tubers
 Storing dahlia tubers over winter with some soil clinging to the roots (a bit more than shown here) has its advantages. Apart from preventing the tubers drying out too much, this now almost dry soil can be gently watered with tepid water to encourage new spring growth. As far as 'awakening' is concerned, the tubers don't actually need any - they will do this all by themselves. Nevertheless, this water seems to help them along. Watch that the water does not just run off the roots if the soil is dry. I do mine at least twice, with at least a day between treatments.
Watering also wakes up the slugs. So you need to put slug pellets down and pay close attention. But its better dealing with them now rather than burying them in the ground, where they are more difficult to deal with. If buried, they might have destroyed the plant before you realise they are there, and it will probably be too late to do anything about it.
Once the buds start to develop, the tubers can be re-examined and split up appropriately.
Fuchsia Surface Roots Show Us How To Water
 This photograph doesn't show it very well, but the surface lateral feeder root which emerged horizontal from the side of the compost has turned downward, following the lowering water level as the surface dries out.
Most don't realise it, but many plants - including fuchsias and dahlias - produce surface fibrous feeding roots, as well as tap roots for anchorage and access to water reserves deeper in the soil. The surface roots spread out widely and usually follow the soil surface, even if it is uneven.
From observation, it would appear that fuchsia roots prefer almost dry compost. It has to be changing colour (as it is here) before they reject it. Using clear plastic pots, we can learn how to water our plants so that roots grow throughout the whole cup (pot), even close to the surface. Keeping this surface layer too dry, as many growers do for fear of over-watering, is a waste of potential. Perhaps surface spraying is the best way to water these plants, with the lower layers fed by water trickling down by gravity.
This pot has hardly been watered since last October. I have now watered the surface and marked the position of the root tip to see if it turns up towards the surface. It is not uncommon to see fuchsia roots on the surface of damp compost. Perhaps they are coming up for air, I don't know.
How To Produce Drought-Resistant Dahlias
This technique is also ideal for producing strong bushy plants from new single tubers.
Ask any dahlia grower the secrets of success, and they'll tell you that dahlias need lots and lots of water, plus much much feed . . . And before one can even think about planting dahlias, it's essential to dig lots of compost or manure into the ground the previous autumn . . . Then an organic feed, such as bone meal, should be dug in at the rate of about 140 grams per square metre (4 ounces per square yard) . . . Oh, and don't even consider the project if you haven't got a hosepipe . . . plus lots of garden canes . . . plus gallons of nettle or chamomile tea (or similarly wizardry) . . . Forget it!
Whilst all this could well be so - and I am not disputing it - those who tried the method I outlined last year might well wonder where their stunning plants and flowers came from. And all this without an autumn pre-treatment, with little supplementary feed, without the use of a single cane, and despite early season cold weather complete with drought.
In my own garden I went further. If you check last year's dahlia posts, you will see I deliberately withheld water from my plants up to a point where I nearly lost them - I only watered once, all season. And I supplied no supplementary feed (apart from that specified). Yet the plants flowered almost as well as normal . . . Yes, there were slug and snail problems. But this was probably because the plants were doing too well, producing too much lush growth - something I never expected.
So why am I not recommending the same methods this year? Well I am . . .sort of. But I feel there's room for improvement. I didn't plant all the tubers 30 cms * (1 foot) deep in March, last year; I also started some in pots, once the weather had become warmer. With the spring bulbs being late this year, I want to use this method again (I usually remove the spring bulbs to make way for the dahlias). But there's also another reason, which will become clear as we go along.
STARTING DAHLIA TUBERS
After uncovering, the over-wintered dahlias look much the same as last year (see last year's notes for separating).
 After separation, ensure all soil is removed along with over-wintering pests and slug eggs (like little round yellow pills). Look for a good strong shoot with at least one tuber attached. The axillary buds, from where the new shoots will emerge, will probably be visible at the neck, where the tuber attaches to the stem (see diagram).
 After trimming, if necessary lay the tuber in a shallow tray of soil or compost (or you can use a pot) so that its neck is just exposed (this makes it easier to take early cuttings, if required). The food in the tuber will support the shoot whilst it roots. Note that it doesn't need a full tuber - just a small piece will do if you only have a small pot.
 After watering, place tray in a well-lit spot to encourage tight, strong growth. This is very important. We don't want etiolated (weak and spindly) plants. If you can find a nice sunny spot outside, this would be ideal. Watch out for frost. And make sure the soil/compost does not completely dry out. The idea is to keep the roots moist, not wet.
Within a few weeks, young strong shoots should develop from the buds.
Note: Young dahlias are a favourite food of slugs. I always add some slug pellets, once the surface starts to dry.
* The tops of the tubers were not 30 cms deep. This depth allows for adding the compost and for the depth of the tubers. The eyes, from where the new shoots developed, were about 20 cm (8 inches) below ground level.
P.S. If you have shallow soil, don't worry, I'll be dealing with this soon.
See also:
How Geotropism Can Build Drought Resistance In Dahlias
Dahlias Started In Trays Are Short-Jointed
Potassium Deficiency On Fuchsia Leaf?
 Because this fuchsia has been growing unfed in soil since last July, the red-brown edges and downward-facing tip would seem to indicate potassium deficiency.
Fed with 'Phostrogen', a potash feed. Could have used tomato feed, which is even higher in potash.
17 March 2011
Roots Don't Grow Upwards, Do They?
 I've never really thought about it before. Those roots on the surface. I suppose I've always assumed they just get pushed up from down below, nowhere else to go. So I could hardly believe my eyes when I saw this fuchsia root growing UP the side of the plastic cup. I had always assumed they always grew downwards, not upwards. Apparently not. It's funny how reality suddenly strikes us and we see things we've only looked at before.
 So, just to make sure I wasn't dreaming, I removed another fuchsia from its pot and examined its roots. Sure enough, some of these were also growing upwards.
These are not the main roots; they're lateral roots, branches off them. I would be interested to know why some roots (the minority) turn upwards. Is this just a random process, or is it connected with something else, such as a more nutritious spot in the compost, or even a cunning plan on the part of the plant? I should not be at all surprised to discover the latter.
I have turned the pot on its side. If gravity is involved (geotropism), the roots should change direction by 90 degrees. But there are factors which might influence the results, such as light, nutrition and water levels. Never mind. Let's wait and see . . ..
Re-Potting Root-Bound? Geranium (Pelargonium)
Been recently getting a lot of limp, floppy, yellowing leaves after watering the geraniums in the house. Although they recover, and also produce large flowers, the plants are not as attractive as they could be. The yellow leaves fall off, leaving bare bases to the stems. Plants flower best when they are root-bound. But I am wondering if this has gone too far. Time to check.
 The pot is getting rather full of roots. And there is not much evidence of new growth; the fine feeder roots look old and tired - I don't think they can sustain the plant for another full season, not as they are.
Now is a reasonable time to re-pot the plant (spring). I know there are buds about to break open. But they haven't yet done so. And the plant may never stop flowering for the rest of the season. Growing is always a compromise.

 Gently brushed away old roots and compost to reveal the inner core and the main root system. Careful not to damage the new fine white roots growing out of the old stuff. This reduced root ball by about two thirds (left). Stood this in water for a few minutes. A drink will help sustain the plant till it can establish itself.
Until now, I have always used plain multi-purpose compost. Time for a change. Used a slightly damp multi-purpose:sand:perlite medium (same one as used on fuchsias), mixed in the ratio of 6:1:1. Carefully coaxed it into spaces around roots with a finger, tapping pot on floor and bashing sides as I went along. Then gently firmed, to give plant support.
I only did one of the two plants. So it will be interesting to see how the other one gets on.
The only thing that worries me about all this is that the over-watering symptoms seem to have occurred since re-commencing feeding after the winter, and since the weather started to warm up. This could be an indication of bacterial or fungal disease. But it seems unlikely. Let's see how things go for now. Time will tell. . ..
 The pot is getting rather full of roots. And there is not much evidence of new growth; the fine feeder roots look old and tired - I don't think they can sustain the plant for another full season, not as they are.
Now is a reasonable time to re-pot the plant (spring). I know there are buds about to break open. But they haven't yet done so. And the plant may never stop flowering for the rest of the season. Growing is always a compromise.
 Gently brushed away old roots and compost to reveal the inner core and the main root system. Careful not to damage the new fine white roots growing out of the old stuff. This reduced root ball by about two thirds (left). Stood this in water for a few minutes. A drink will help sustain the plant till it can establish itself.
Until now, I have always used plain multi-purpose compost. Time for a change. Used a slightly damp multi-purpose:sand:perlite medium (same one as used on fuchsias), mixed in the ratio of 6:1:1. Carefully coaxed it into spaces around roots with a finger, tapping pot on floor and bashing sides as I went along. Then gently firmed, to give plant support.
I only did one of the two plants. So it will be interesting to see how the other one gets on.
The only thing that worries me about all this is that the over-watering symptoms seem to have occurred since re-commencing feeding after the winter, and since the weather started to warm up. This could be an indication of bacterial or fungal disease. But it seems unlikely. Let's see how things go for now. Time will tell. . ..
Coriander After 34 Days
 Coriander just starting to develop true leaves. Sorry for delay. Things been slow because of low temperatures.
Although we have not yet reached the traditional pricking out stage (we are very close), look at how much root development there has been. It would be impossible even now to remove these plants individually from the compost without breaking the roots, probably causing a setback. Well, don't worry. We are not going to remove them.
Incidentally, it was this thought of breaking the roots which caused me to have a look see just what would happen if they were broken.
THE PLANTS HAVE NOT YET BEEN WATERED.
Severed Coriander Root
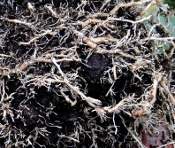
 This is the root development story 27 days after planting the coriander. Development has been slow because the temperatures have been cut right down. No matter. I wanted to see if severing a root induces branching. So I took a craft knife and pushed it through the side of the plastic cup, cutting one root in half. No lateral roots had developed on any of the roots at this stage.
 8 days later, the result is not as expected. Although the severed root (left) has apparently developed one long lateral root at its base (top), the remaining two unsevered roots seem to have developed more, and these are distributed along the full length of these roots. It's difficult to determine this definitively, since lateral roots could be hidden in the compost behind, out of view. But there does seem to be a difference in development.
It also seems that the lateral on the severed root is following the moisture level of the compost down the cup as it dries. This could lead to an interesting insight into watering techniques for optimum root development.
I was also fascinated to discover that the severed base has not died off, but is still apparently in full health, albeit not growing. How is it doing this? What is it living on? Had it already got some food reserves passed down from up above? Or is it be being fed from the other half, through an inter-root connection? Stranger things have happened.
P.S. If you are wondering why I am so interested in roots, see 'Roots Are Hoots' from last year.
Frost Damaged Rose Stem?
 I spotted this dying rose stem (the one on the right) on one plant whilst applying feed. Don't think it was there before when I applied fungicide, though not certain. Definitely looks like the start of something, probably dieback. Although, having said this, on first impressions I would say it was a burn of some sort - perhaps caused by the spray or, more likely, by frost.
IS IT TOO MUCH FEED?
Last year I gave rather a lot of feed: A lot for me, that is. I only gave the recommended dose. But this could have caused new growth to continue too late into the autumn, with insufficient ripening taking place. Lots of soft green tissue is asking for trouble where frost is concerned.
Of course, it might not be frost damage. But it IS the coldest plant. And it's the only one affected in this way. Were the damage caused by spraying, other plants would have been damaged.
TREATMENT
I used same feed as last year but cut rate in half. Back to normal.
Begonia Tubers Cooled Down
 It seems ages since I put the begonia tubers in the propagator. As you can see, there are enough shoots to take some cuttings. But because I have cooled off and opened up the propagator, they will not be big enough for a while yet. This is fine, since it will mean we can propagate cuttings without bottom heat, giving much sturdier stock.
Night temperatures have been quite low recently, down to 5 deg C. This should be O.K. Because dormancy has been broken, there is not much danger of it being reinstated. Dormancy is usually hormonal (controlled by abscisic and gibberelic acids in seeds), induced by daylength. So we don't actually need constant heat, just at the start.
The wayward begonia (the one which had already begun germination) has not done too well. Although the initial pair of shoots have developed, only two more shoots have formed. This might be because I didn't cover the tuber with compost (although I didn't cover the one shown, either).
The tubers placed in pots are doing well.
Breaking Down Lawn Thatch By Feeding
 Although now free from moss, the lawn has taken a real battering over the winter months and is in need a pick-me-up. There is also the problem of the old thatch.
TREATMENT
Have given a liquid feed of 'Phostrogen Plant Food' (14-10-27) at rate of a level 5ml scoop (dissolved 50ml in 2 galls water and applied by watering can over 10 sq metres) per sq. metre.
FEED THE BACTERIA 'EATING' THE THATCH
 Now, whilst the turf is still damp and the weather is warming up, is a good time to feed the bacteria breaking down the old thatch. The feed will supply vital organic nitrogen (See photo. 'Phostrogen's' 14% nitrogen is supplied as: ureic (12%) and ammoniacal (2%)**) to allow the bacteria to build protein and therefore increase in numbers.
The lowering of the acidity from the addition of lime, last autumn, will fuel the process. Without it, the urea will not work in this way, since the thatch is effectively pickled by the acids in the turf.
Old thatch contains a lot of tough old carbohydrates, such as celluloses, hemicelluloses and lignin. Soil animals (fauna) and fungi also break down this material.
SOLUBLE PHOSPHORUS BUILDS UP ROOTS
Between autumn and spring is the time plants stop leaf growth and build up a new root system to supply food and water for the coming season. 'Phostrogen' supplies soluble phosphorus to help root growth, which is in full swing at this time.
POTASSIUM HARDENS GRASS
The high potassium level in 'Phostrogen' will harden the grass against frost and disease.
MICRO-NUTRIENTS
'Phostrogen' will also add any micro-nutrients which might be lacking in the turf.
* Note that we are applying 'Phostrogen PLANT Food', NOT 'Phostrogen LAWN Feed' at this stage. Normal lawn feed contains too much nitrogen for our purposes, and might induce leaf growth too early. Lawn feed can be given later, as per last year.
** Liquid lawn feeds usually supply nitrogen in ureic and/or ammoniacal form. Nitrogen in nitrate form (usually found in pelleted fertilizers) is unsuitable for this purpose.
10 March 2011
Is This A Leaf Spot?

 This is the second yellowing leaf found within the past two weeks with a fungal attack at its base. And, as you can see (right), it has gone right through to the underside. Is it leaf spot? I don't know. Had a look through manuals but can't find it.
Although there was an infestation of leaf spot last year, started from an ivy leaf geranium brought in from a new source, it had a different appearance. This infection was walnut-brown with dark, concentric rings. So, if it is leaf spot, it looks like a different type.
All the plants which had been outside were treated with fungicide last year. But this plant was kept indoors, not exposed. There has never been anything like this before. Anyway, even if the plant were infected and if the fungus survived, why has it not appeared before now?
The yellowing leaf was taken from the over-watered plant recently described. So it might not be a leaf spot fungal infection; it might be a disorder caused by the over-watering, which has gone mouldy. Any thoughts?
The Turbo Pot Dryer
Pot plants usually have a considerable proportion of their root tips (that part which takes up water) at the bottom of the pot. And because this is where water gathers after watering; and because most young roots (especially fuchsias) cannot tolerate these conditions for long, it is always worth 'blotting the base of the pot dry' after each good watering.
 I know this is not new. We covered it last autumn, when I showed you much the same thing. But what I didn't tell you is that you can greatly accelerate the process.
We saw that a paper kitchen towel, or similar, makes a good wick for removing excess water by capillarity. However, if things are really bad, you can greatly accelerate this process by placing the pot and kitchen towel on a sheet of newspaper, or anything which will absorb the excess water and spread it out further away from the pot. This greatly increases the evaporative area. As the newspaper dries, more water is drawn out of the pot to replace it. Simple.
It's common sense really. I don't know why it took me such a long time to think about it.
If you are new to watering, it's worth placing an absorbent pad beneath each pot, preferably about twenty minutes after watering to give the pot time to take up the excess. Then leave it there until it dries out. You will be surprised at how much water comes out of the pot. But this would only be taking up valuable air space needed by the roots.
The downside is that there is some loss of nutrients. No matter. These can be replaced later.
P.S. It works even faster if you first remove the plant from the pot. But don't stand it directly onto newsprint as it might be too acid and burn the roots. Put a folded kitchen towel between the plant and the newsprint.
Displaced Coriander Seedling Shows Geotropism At Work
The main roots on both the coriander and the lettuce have now reached the bottom of their cups. No water given yet. We shall soon be returning to this for a fascinating insight. For now, I want to tell you about GEOTROPISM - a plant's growth response to gravity.
Shoots grow away from gravity and are said to be NEGATIVELY GEOTROPIC. But roots show POSITIVE GEOTROPISM, growth towards gravity.
 Just a couple of weeks ago, all seemed lost for this germinating coriander seedling. The seed case had been pulled out of the compost during germination; the root lay prostrate on the surface, its tip facing upward.
 Examine the seed's response in its struggle to survive (right). Notice how, 28 days later, the root hairs have anchored the root (radicle) to the surface of the compost, allowing its tip to be thrust downwards to access water and food from the compost. Meanwhile, the cotyledons (seed leaves of developing shoot) are struggling free from the seed case (testa) and are thrusting upwards towards the light.
It's amazing just how resilient, resourceful and determined plants are. It seems they will do everything they can to survive any situation. And I do mean ANY situation. If only they had a brain . . . .
Primary Growth Points (Meristems) Of A Plant
We saw recently that root growth does not occur all over the surface of the roots, but is restricted to the meristems at the tips (hidden within the root cap for protection). Root extension then occurs in the regions just behind. The meristem at the tip of the main root is called an 'apical meristem'.
Similarly, we saw last year that a stem also has an apical meristem. If you remember, we removed this to create bushiness in our plants.
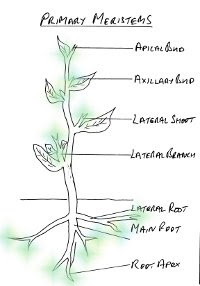 This removal released the dominance effect ('apical dominance'), created by this apical bud, on other meristems in the axillary buds in the leaf axils lower down the stem, allowing these to develop into side shoots.
As with roots, stem growth occurs in the regions just behind these meristems.
The meristems of a typical plant are shown here in green. As growers, we are very much concerned with these meristems, since they control the development of the plant.
Avoid Stretching Young Plants
After nurturing the fuchsia cuttings all through the winter, I am left with compact plants. Now, as temperatures start to rise, especially when the days are dull, there is a risk of losing all this work. Etiolation (stretching towards the light, producing thin, leggy growth) usually occurs overnight. And once it occurs there is no way back. For this reason, many serious growers keep their plants outside.
 But things are not so easy with young tender plants - these need to be first hardened off (acclimatised). This half-tray propagator, complete with a ventilated lid, is a way of protecting up to 9 cuttings in 2 inch (51mm) pots against the chilly winds. It allows cuttings to get maximum light at minimum temps.
However, care must be taken to keep the propagator out of the sun to keep temperatures as low as possible and avoid scorching the young leaves. A sunless spot might look like shade to us, but it's paradise to a fuchsia, especially on a bright, cloudless day.
Guttation, Red Edges: All Is Well
 The early morning water droplets on the red edges of this fuchsia leaf are a sign that the re-potting has worked wonders (for this plant, at least). Since more water is being pumped up from the roots (by osmotic pressure) than is escaping from the leaves through transpiration (plant's equivalent of perspiration), and since the cells are turgid (full of water), the excess is shed through special valve structures called 'hydathodes' at the tips of the leaf veins.
Since nutrients are carried in the water delivered to the leaves, guttation is a way of maintaining this delivery whilst normal transpiration cannot take place (e.g. in conditions of high humidity; or when the stomata (leaf pores) are for some reason closed). Plants are extremely resourceful, far moreso than we give them credit for.
P.S. I don't know what causes the red edges, but as pointed out last year , they denote a vibrant, healthy plant.
Fleece Bad For Botrytis (Grey Mould): Myclobutanil Not Helped
 I have never seen botrytis (grey mould) as bad as this on overwintering plants. As you know, I covered them with a double layer of fleece (first time I had used it) late last autumn, just before the severe frosts. Although it helped the plants resist the frost, the trapped, moist, still, cold air provided ideal conditions for this air-borne disease.
I get some botrytis every year, though not to this extent. Of course, I can't say for sure that the fleece made it worse, because I can't be certain what it would have been like without it. I say this because the plants were put in late and had not had time to dry off properly before they were covered, although I did spray them with myclobutanil at storage. And before you say it, I know ventilation is necessary. But there is some ventilation, and giving more is just not an option in this case.
I'm disappointed - Having never treated my plants with anything at this time, I thought I was pretty safe. Live and learn.
P.S. All is not lost. Provided the geraniums can be cut back to clean stem, they will survive. But it is best to wait till new growth is well-established. Any open wounds at this time is asking for trouble.
Next year I will dry the compost off even more before storage. I would have done it last year, but the pots were out in the soaking rain for too long at the end of the season. I'll have to try to cover them.
3 March 2011
Cyclamens Like 'Phostrogen'. But Don't Over-Feed
 This cyclamen has not turned out too badly after its poor start last year, and will soon be in full flower. Since potting up in multi-purpose compost, it has received only plain water, apart from a tiny pinch of 'Phostrogen' (just a 'smell').
I have found this feed ('Phostrogen') to be wonderful for all sorts of plants and have used it all my life. I would strongly recommend it for all novice growers. But you must not over-feed. If you stick to about a third of the recommended rate, and only apply once the plant is well-established and is looking under-nourished, you should have no problems. Remember, over-feeding is a big killer of all plants - much bigger than you might suppose.
I do not like leaves to be dark green all over, as is the case with a lot of fast-grown plants. Contrary to opinion, I don't think this type of plant grows to its potential. My plants seem to grow best when the leaves are a vibrant lightish green in the centre and darker around the edge. It is difficult to explain. But you will recognise this when you see it. You can feel the good vibes from the plant - at least I think you can (there I go again, take no notice).
I suggest novices have a look at last year's notes on feeding. Just click the link at the side.
Help! What's This?
 I don't know whether this is pest or disease. But I found it under a geranium leaf yesterday.
The plant has recently been over-watered, so it could be the disorder oedema (corky scab).
However, it seems to be mostly on the veins, which would tend to indicate pest trouble. Or perhaps it is scar material from a pest attack (though haven't seen any pests)? Can anyone help?
Hyacinths Flowering: Must Be Christmas!
 The Christmas hyacinths have arrived a little late. Calculated to flower at Christmas, 10 weeks after planting, they are arriving now, approximately 10 weeks after Christmas - about the normal time. Why?
Obviously my fault. I must have bought normal hyacinth bulbs instead of specially treated 'Christmas' ones. I did give them 10 weeks of dark and cool treatment, but it must have been too late. Perhaps I should have started 10 weeks earlier and put the bulbs in the fridge to keep them cool and dark. Live and learn.
Fuchsias Seem To Root Well In My Soil: Should I Add Perlite?
 Sorting out the fuchsia cuttings taken last autumn, I came across these lovely roots on a soil-based cutting from last July. As you can see, there is lots of new white growth. I said last year that fuchsias seem to root well in my soil (unsterilized). I suppose this is because it is quite light (gritty), and not too acid.
I really like the look of these roots. And watering doesn't seem to be a problem with soil in the autumn. I didn't get problems with botrytis, as I did with soil-less compost - even with added perlite. Garden soil contains anti-pathogens which combat lots of plant fungal diseases.
The only problem is that it can tend to puddle, thereby preventing air getting to the roots. Perlite might solve this. It would help hold moisture whilst keeping the surface open.
But there is also the problem of unwanted pests with unsterilized soil.
Vine Weevil Grubs On Fuchsia Roots?
 This fuchsia was cut back almost to surface level last autumn and kept in its original compost. It seemed to be doing quite well until a week or two ago, when the bloom disappeared and it didn't look so healthy. At this time of year, the root damage caused by over-wintering vine weevil grubs in the compost becomes noticeable on plants. I would not expect to see vine weevil, since the compost and roots were treated with 'Provado Vine Weevil Killer' (9g/litre thiacloprid) in August; this should protect for six months so is probably about spent. Nevertheless, we cannot take a chance. Time to examine the roots.
Removed plant from pot and gently brushed away compost from around roots, trying not to damage them. No vine weevil grubs. So washed off rest of compost, just to make sure. Still no grubs.
 There is very little new root growth. And what there is is not yet of the fine fibrous kind (this develops later) which fuchsias use for feeding. I don't know why this should be, unless it is a late developer (I haven't grown it before).
As to the loss of bloom, I could have damaged them in some way, though I can't think how. Although I might have recently given the plant a bit of dilute feed to help it along. This could have burned the infant root hairs. Seems the most likely cause. Will I ever learn?
 Just out of interest, here is a different variety of fuchsia treated in an identical fashion. Look at how many fine white feeding roots there are. Note that they are growing from the old, thicker, brown root material which seems to be attached (I'm 99% certain) to the old, thicker, tapered, brown 'tap*' root on the right.
*A tap root system develops from the radicle, the first primary root to emerge from a seed.
Stem cuttings produce several primary adventitious roots around the stem, each of which produces lateral offshoots. When young, these roots are white, but as they get older, secondary thickening occurs (we haven't covered this yet) and cork material is laid down producing a darker brown root behind the area of the root hairs.
Plants do not take in water and nutrients through older wood, but through the root hairs, as seen elsewhere. These are very short-lived and exist only at the tips of new roots. It is worth bearing this in mind when growing plants, because it is this area which needs special nurturing; the older wood doesn't matter.
Floppy Yellow Geranium Leaves
 Growing is not easy. I mean, we do our best, but we don't get everything right (though it would be nice to get SOMETHING right, now and again!). Stepping up the watering on this geranium (pelargonium), to support the flowers, was too hasty. The weather turned dull and cold, and the plant didn't use the water quickly enough. The yellowing floppy leaves are signs of over-watering.
The plant has jettisoned the oldest, lower, leaves first, leaving the younger ones - especially the apical (top) bud containing the meristem - to support the flower (out of sight at the top of the picture).
This shows that we don't need lots of leaves to support flowers - just a few will do.
Incidentally, it wasn't a complete disaster. The next flower will also be large, thanks to the water.
But there is something else which might be significant: I only seem to get this problem at this time of year after the plant has been fed. The same thing happened last year. It might be the increased activity associated with the feed which has caused the problem. Who knows?
Re-Potted Triphylla Fuchsia
Some plants grow all by themselves. Perhaps I should say 'ALL plants, left alone, grow all by themselves'. We growers create the problems. Surely not? Problems are created by moving plants from their natural environment and altering them to our liking. Then we can sometimes get bucketfuls of problems. This triphylla fuchsia is just one of mine. Nothing seems to have gone right since August.
After looking at it sitting there doing nothing for week after week since its last treatment , I decided water was not reaching all parts of the compost. So I emptied it out of its pot, removed the new compost - along with the few new roots grown over the winter - and re-potted it.
 Of course, it turned out to be a futile gesture. The compost was fine. But what I want to show you are these new shoots which have developed from the leaf joints (nodes) on the old stems beneath the surface of the compost (I removed the top of this to expose the stems). These stems should help thicken the plant up a bit (at least, that's my story). Roll on summer.
Fuchsias Really Got Going This Week
 And about time! I am not talking about fuchsias in general (although these have also started growing well), I'm talking about those fuchsia cuttings propagated in a 2 inch (51 mm) pot last autumn, in the coffee jar. These seem to have been stuck in limbo for weeks. Now the leaves are starting broadening. This is a sure sign they have rooted (still not sure about the one in the middle, though).
Of course, it is not entirely unexpected. Because of the fear of botrytis I removed them from their cosy jar prematurely and kept them in a cold place. It must have been an awful shock. But other younger cuttings removed from other jars at the same time seem to be a week or so ahead.
It's hard to learn much from this. Plants often hang around for weeks on end - and for no apparent reason - at this time of year. And it's not just fuchsias. All plants do it. Growers (including myself) are often tempted to misinterpret this and proffer the wrong treatment. Anyway, fortunately, I held my nerve on this one. Things might progress a little faster from now on.
Subscribe to:
Posts (Atom)