Learning how to water plants to increase growth in pots, container or garden - especially how to water roots and tubers. Specialities: root growth or tuber growth of lawns, fuchsias, geraniums, dahlias and begonias.

Showing posts with label geraniums. Show all posts

12 August 2011

Bleach Seemed To Remove Botrytis From Fuchsia Stem

botrytis on fuchsia stemFollowing a recent post on botrytis on this fuchsia stem, (see 'Troubleshooting Furry Mould On Fuchsia Stem'),
I can say that a drop of thick domestic bleach - the smallest drop that falls naturally out of the bottle - in a 500ml hand spray not only contained this disease, but actually seemed to remove it. I tried this on a couple of plants and the result was the same in both cases. You might also remember that I used kitchen cleaner with bleach, carefully applied, last year on the troubled triphylla. This also worked, and the plant survived without any obvious detriment.

Young fuchsia cuttings seem to take a bit of a pasting, though. And I'm sure it will damage the tender young root hairs. However, they are still living - just.

PREVENTION
Watering with one or two drops of bleach per gallon (4.5 litres) of water is said to give effective prevention against botrytis. But don't know if it will actually remove it.

BABY BOTTLE STERILANT
Chlorine has been used for years in the mushroom industry against bacterial blotch. Last year I tried baby bottle chlorine sterilant (supermarket own brand) at recommended strength. This seemed to work against the fungus, but caused some damage to the larger cuttings. Younger cuttings were damaged even more. However, these nearly all survived, of a fashion - without botrytis. I was going to do some tests with weaker concentrations, but haven't got around to it. Story of my life!

Remove Dead Leaves In Wet Weather

dead geranium leaves should be removedThis time of year can be dangerous to plants. Old dead leaves, already infected with botrytis (grey mould), left lying (or hanging) around is a recipe for future disease trouble - especially when compost becomes over-wet. These should be removed as soon as possible. In fact, best remove them even sooner to allow air to circulate within the plant (stagnant moist air is the killer).

Plants do not need many leaves to flower well. In fact, as you have seen previously on the geraniums (pelargoniums), they seem to use just those surrounding the young flower stems. Perhaps the lower leaves have some value. But this is not significant. For the extra risk involved in keeping them on the plant, any potential reward is too small.

MAKE A BIT OF SPACE
You don't have to denude the plant. Just make a bit of space. This will also enable better access to the debris. A long pair of tweezers is also a good investment for reaching the awkward places.

22 July 2011

Rooting Geraniums In Perlite And Water

ROOTING IN PERLITE
geranium rooted in perliteIt took me years to get around to using perlite on a regular basis. But it really is an excellent product. Just look at the roots on this woody geranium cutting. Kind of speaks for itself, doesn't it?


Because it is inert, and therefore contains no nutrients:
  • New roots quickly proliferate in an attempt to reach a food source. This also happens to some extent with potting compost, which only has restricted nutrients.
  • Woody stems can be softened without rotting. So perlite is ideal for semi-ripe and ripe cuttings.
TECHNIQUE
Cut stem just below a leaf node, then remove bracts. Insert it about an inch (2.5cm) into perlite and water, so water is just touching its base. Leave until roots appear, ensuring container does not run dry.

After trimming an old plant, I place about 5 cuttings into a small cup of perlite, fill to top with water, then just leave until roots are visible.

ROOTING IN WATER
geranium rooted in waterIf you haven't got perlite, don't worry. Woody stems can also be rooted in plain water. But best to sterilize this in a microwave first (don't forget to let it cool before inserting cuttings). I haven't found this method as reliable as perlite, but it's still quite effective.

24 June 2011

Minimizing Die-Back When Cutting Back Geranium (pelargonium) Stems

geranium die-back is unsightlyCutting back geranium (pelargonium) stems is not so straightforward as it sounds. Firstly, not every node will produce side shoots unless an axillary bud is visible. But geranium stems are often devoid of axillary buds, and any dormant buds are invisible. So we cannot just cut back to any node and expect new shoots to appear where we want them. Quite often, unsightly die-back (pink) left protruding into nowhere is the result of our efforts, try as we might.

This is why I recommend waiting till a strong new shoot is growing before cutting back to it see 'Cutting Back Geranium Stems'.

And even then I leave a good margin of error (red). This can be carefully cut away once our new branches are growing (lime - best if they're growing stronger than this). New cuttings can be taken from the off-cuts.

WHAT IF NO SHOOTS ARE AVAILABLE?
If a stem needs to be shortened and there are not side shoots, cut back about half way and hope for the best. After a few weeks, new shoots might have developed lower down the stem; if not, let them die back, then remove. We can't win them all . . ..

Small Geranium Leaves

small geranium leavesThese are leaves on the geranium I re-potted in March. (see 'Re-Potting Root-Bound? Geranium (Pelargonium)')

As the leaves gradually became smaller and paler, it seemed feeding might be necessary (plant had received no feed until about three weeks ago). I say this because plants reduce the size of their leaves in bright sunlight, so this could have been the cause (it's amazing that just one or two small leaves like these can support flowering).

However, as you can see, feeding has darkened the leaf colour, indicating it was necessary, and leaf size has slightly increased. I have been feeding 'Phostrogen' (14-10-27) at a pinch per half litre (should be 3 per litre) at every watering. Dark colour indicates even this could be too much. Might cut it down to every other watering and see what happens. A general basket feed (7-7-7) could be used, but this might cause long-jointed growth. 'Phostrogen' worked fine last year - it contains more nitrogen than a normal high potash feed such as tomato feed, so will not make the stems as woody.

Although it took the plant some while to get going after re-potting, probably because it was budding up for a flush of flowers, it has flowered extremely well and is just getting ready to start again.

White Patches On Geranium Leaves

sun-scorched geranium leafHad I not seen it with my own eyes, I never would have believed geraniums (pelargoniums) could catch sunburn (sun scorch). Apparently so. This raises an interesting question; what has happened to the thick cuticle (see 'Plant tissues') which protects against the sun?

Kept in low light conditions for a long time, the plant will have adapted itself to these - probably reducing (or even almost removing) its waxy cuticle (sun and water-loss protection). It would be interesting to confirm this by taking a leaf section and viewing under a magnification. I say this because leaf size has also increased in low light (leaves do this, and vice versa). It might be that the cuticle is still in tact, but the plant has itself jettisoned some chlorophyll and perhaps mesophyll tissue for reasons best known only to itself. In other words, this reaction is the plant's way of reducing its leaf area.

27 May 2011

Old Cuticles Are Sure Sign Of Pest Trouble

old cuticles on leafold cuticle on leaf (enlarged)If you find discarded cuticles lying around on your plant's leaves (this is a geranium leaf), it's a sure sign of pest trouble. These look like aphid cuticles, and aphids reproduce very quickly. So check the plant immediately and take appropriate action.

provado sprayI use thiacloprid spray (eg 'Provado Ultimate Bug Killer', which is a long-lasting systemic (enters plant and moves to where needed) pesticide. But you can use an organic spray, or even soapy water (some growers even wash them off with plain water). The only downside with contact pesticide sprays is that, because they work by contact, you must apply to the whole plant.

Geranium (Pelargonium) Adventitious Roots

geranium (pelargonium) adventitious rootsWashing the soil off this geranium (pelargonium) cutting has revealed adventitious roots (marked with red arrow) growing from the stem branches which were below soil level. The cutting was started from the branch on the right; the branch on the left has grown from an axillary bud (see 'Taking Geranium Cuttings').

20 May 2011

Reducing Water Produces Strong New Roots On Geranium (Pelargonium)

reducing water produces strong new growth on geranium
Look at the strong new roots growing on the geranium (pelargonium) we looked at three weeks ago. If you remember, it had been over-watered. (the pot weighed 370g (13 ounces)) before purchase and the roots weren't looking too healthy.

WETTING AND DRYING INDUCES ROOT GROWTH
By repeatedly allowing the pot to dry down to 7 ounces (about 200g) then adding 4 ounces of water (about 120ml), with no other watering, the aeration of the compost together with drying has produced this result. The pot is watered just as the compost, as seen through the holes in the base of the pot, is just starting to change colour. This now defines the watering regime for the plant.

NO FEEDING YET
I have applied no feed yet, since there will be slow-release feed already in the compost. This has meant I could not dry the pot out to its maximum. I did try to go further, but the leaves started to scorch. No matter. At least we know what the limit is. And new leaves will soon grow.

6 May 2011

Inducing A Geranium (Pelargonium) To Branch

Now we have sorted out the watering and the plant has had time to settle down and become familiar with its new surroundings, we can start to shape it how we want. Since each branch has the potential to end in a flower, and since we want lots of flowers (at least, I do), we need to induce it to branch.

remove meristem of geranium stemTo do this, we remove the young growing tips at the end of each stem, since these contain the apical meristems . This will remove their dominance effect and allow the axillary buds in the leaf axils lower down the stem to develop into side shoots. It's the same process as pinching out a fuchsia.

Were we really keen to produce new green growth, we could remove the flower bud as well. But there's no hurry. The plant already has three stems, and the flowers should give us some pleasure as it matures.

meristem removedIt is often difficult to know exactly where the meristem is. Although the newest leaf has been removed, this is not, in fact the meristem. This is in the tiny (youngest) mass of tissue attached to it. So, just to make sure I have removed everything, I have removed this newest leaf, as well.

Branching could have been induced later, but it's a good idea to start it as close to the base as possible.

Note: You need to be able to see the axillary buds in the leaf axils - they are not always present.

29 April 2011

Watering A New Geranium (Pelargonium)

new geranium (pelargonium)I have been looking for a means to show you a one-size-fits-all method of watering a pot plant. At last we're getting there. This geranium (pelargonium) was purchased in a garden centre five days ago, the healthiest of a bunch, with three growing stems. Rather heavy, though.
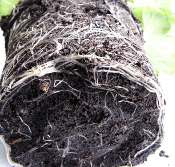
wet geranium roots in soggy compostAlthough recently watered - and thus expected to be heavier - these sparse (compared to the rest) wet roots at the base of the soggy compost reveal it has in fact been over-watered for some time. Pots usually fill with roots from the bottom up. And the tap root circling the base shows this plant has been in the pot for some time. I popped it on the kitchen scales: 13 ounzes (about 370 grams).

After standing the pot on a splayed out kitchen towel overnight, and leaving for a further day, it then weighed a full 3 ounzes (85 grams) less, a loss of 23%. It has not been watered since.

On the fourth day, it weighed 8 ounzes (226 grams), and the compost was just starting to change colour - about right for growth (for a geranium). We should start seeing some root recovery now. Placing the pot outside in the sun for some of the time has helped it dry out more quickly. We need to watch it carefully now, so it doesn't get too dry and scorch the foliage.

root growth just startingThe fifth day, and there's some root growth starting. About three quarters of the compost has now changed colour. The weight is down to just over 7 ounzes (about 200 grams). We could withold watering another day, or so. But best not. Geraniums don't really droop (unless they're sick). The older leaves just turn brown and crinkly. So gave it a good soak and put outside.

With water-sensitive plants, I find it best to water first thing in the morning. This way, the pot has time to drain, and the roots can take up any excess water from the compost more quickly, thus eliminating the risk of leaving the roots in soggy compost without air. And because things are generally drier overnight, there is less risk of disease taking hold. It is good policy to keep a pot drier tissue under the pot on a permanent basis. This ensures compost cannot be too wet for too long.

USE ONLY PLAIN WATER - NO FEED
It is important not to feed the plant until it starts to lose colour. The compost will almost certainly already contain some slow release feed which might support growth for a couple of months. There is no way of knowing, unless you see the feed pellets in the compost. Best to be safe. We can soon feed if we have to.

FOLIAGE COLOUR
I like to avoid plants with dark green foliage. This indicates too much nitrogen has been given for firm healthy growth; the growth will have been forced. And contrary to opinion, plants do not seem to grow fastest in this condition. I find a leaf which is mid-green in the centre (the new growth), turning slightly darker towards the edges is the colour which supports optimum growth.

KEEP CHECKING THE ROOTS
Many people are afraid to remove plants from their pots to examine the roots. Don't be. It's the best way to learn how to grow any plant. Just be careful not to damage it. Place stem between fingers and invert pot onto palm, then press the base of the pot with thumb of other hand. Plant falls out of pot onto palm. Easy.

Drying is important. NEVER WATER ANY PLANT UNTIL THERE HAS BEEN AT LEAST SOME DRYING OF THE COMPOST, the more the better. Some plants can be dried out more than others. You will need to experiment.

14 April 2011

Geranium Cutting: Getting The Right Angle

short-jointed geranium cutting All right. It doesn't look much, I know. But I still couldn't resist a cutting. Why? Well, it's only about 7.5 cm (3 inches) long (no comments, please). Consider how close the leaf nodes* are. And look at those two side branches (red) just itching to get going. And look at the leaf size and how healthy they are (sorry they're upside down - just couldn't get the right angle on this one). And the stem's bright and shiny . . . And it's already flowering (pink) . . . Pity about the shape, though. Never mind. Nothing's perfect.

Made sure there were no dead leaf bracts left on stem to go mouldy in soil, and removed flower; then pushed into freshly-drained garden soil, just like last week.

* Geraniums produce short-jointed growth during the winter months. Since the side shoots come from the nodes, it should produce a more compact plant

7 April 2011

Geranium Shoot Tip Cuttings: How More Leaves Can Accelerate Rooting

Once a shoot tip is severed from the parent plant, it must get busy producing new adventitious roots at the base of the stem. Because all growth needs fuel (sugar) for energy, the first thing the cutting does is use the reserves made before it was severed from the plant. If these reserves are large enough, the plant might be able to make itself a fine and strong new root system. However, this is unlikely. Usually the reserves need supplementing with new sugar made by photosynthesis in the remaining leaf(ves).

Obviously, the more leaves on the cutting, the greater the leaf area, so the more sugars will be produced. Whilst all this seems pretty obvious, there is a problem: Greater leaf area means greater water loss. But without roots, the cutting cannot take up water from the compost. So it can wither and die. A vicious circle.

For this reason, a compromise is reached when taking cuttings. It is standard practice to reduce the number of leaves to just one or two. However, over the years I have consistently noticed two things:
  • small leaves are no use at all - they produce very slow growth
  • a large leaf area greatly accelerates rooting - and plants can determine this better than we can
'Better than we can? Cripes! Does this mean they can think?'
'Don't be silly. They haven't got a brain!'

geranium cutting branched geranium cuttingMost growers would be embarrassed to show plants with shrivelled leaves. But I'm encouraged. Why? Well, look at the evidence. These cuttings, taken last week, are really romping away. I don't think they have yet rooted, but that's not important (well, it is - but not here). What I want to show you is how the plants are jettisoning the excess they don't want (the leaves that are changing colour).

Why not just remove them at the start? Wouldn't this be better?

I don't think so. Even if we didn't remove them, and cut the larger leaves in half (to cut down on water loss), this would also remove any spare sugars lying around in the unwanted leaf. The clever part here is that the cutting can first utilize these sugars, THEN jettison the leaf.

I have found using more leaves to be the best way of taking geranium shoot tip cuttings. First, start with a soil which just binds together when squeezed and is slightly cool to the touch (I use the back of my fingers). Then take the cutting and don't water again as long as there is some sign of green life, especially NEW green life. Watch for new roots at the bottom of the pot. When you DO water, do it from the bottom: stand the pot in a saucer of water for about 10 to 15 minutes.

Of course, everything is not cut and dried. It wouldn't be 'growing' if it were (well, that's not strictly true; it would be growing, but 'growing by numbers'). Because your conditions differ from mine in terms of temperature, humidity, air speed etc., slight adjustments will be needed. But you'll be on the right track. At least, I hope you will.

air-rooted fuchsia cutting showing dead leafJust out of interest, and to consolidate the point somewhat, this fuchsia cutting was taken about a month ago. I know the large leaves are dead (one has already fallen off). But bear in mind it has never been covered. It's been in dry air - even in the sun - the whole time. A seemingly impossible feat. And it's not as if 'Annabel' (it's name) even likes the sun, indicated by the dark red veins. It doesn't. Yet it rooted and is now growing strongly (though uncovered cuttings do take longer to root).

See also: 'A Cut Below Average'

1 April 2011

Geraniums: Removing Unwanted Long Autumn Growth

3 new geranium cuttings from 1 plantThe geranium cutting you saw last year has produced lots of new short growth (red) over the winter. This is good, since it will lead to a more compact plant. Pity about the autumn long growth (pink) stuck in the middle. Never mind. Splitting this plant into 3 sections (green) will help remove the unwanted growth.

geranium remainsThis will leave a compact plant with 3 stems (right). Because this plant now has a basic structure, it can be watered and fed to build it up. It can also be re-potted, soon.

2 extra geraniumsAs a bonus, we also have 2 more short-jointed geranium cuttings. I put these into 3 inch square pots of soil to root (square pots cuts down on space). Soil will keep the growth short-jointed whilst we build up the structure of the new plants. I will also keep them on the dry side and will not feed.

Shriveled Stems On Geranium Cuttings

The last batch of geranium cuttings, taken last November, have never done well. It was asking for trouble trying to root them on old ripe wood so late in the year, but I wanted to show that they could make roots.

unhealthy geranium cuttingThings were going fine until the compost dried out, forcing me to water - almost always fatal with geranium cuttings. The first sign of trouble is when the leaves lose their bloom and become dull and lifeless.

shrivelling geranium stemExamination of the stem shows that instead of being round and shiny, it is becoming sunken, dull and shrivelled (especially at the base). Some sort of wilt or rot disease has taken hold.

Although I have seen this condition several times, I have never been able to match it with any bacterial or fungal disease illustrated in the text books (not the ones that I have, at least). I don't think its 'Pythium' (blackleg) fungal disease. It might be Xanthomonas 'campestris pv. pelargonii' (bacterial stem rot), but I'm not sure. Although this seems most like it, I don't think so. Both diseases are common on geraniums. There are also several other geranium diseases which I have not yet investigated, such as 'Fusarium cutting rot' or 'Cottony stem rot'.

Anyway, whatever the cause, I sealed the whole lot in a freezer bag after first spraying with bleach, then thew the lot in the bin. On no account should this type of infected compost be allowed to infect garden soil.

17 March 2011

Re-Potting Root-Bound? Geranium (Pelargonium)

Been recently getting a lot of limp, floppy, yellowing leaves after watering the geraniums in the house. Although they recover, and also produce large flowers, the plants are not as attractive as they could be. The yellow leaves fall off, leaving bare bases to the stems. Plants flower best when they are root-bound. But I am wondering if this has gone too far. Time to check.

geranium roots out of pot before treatmentThe pot is getting rather full of roots. And there is not much evidence of new growth; the fine feeder roots look old and tired - I don't think they can sustain the plant for another full season, not as they are.

Now is a reasonable time to re-pot the plant (spring). I know there are buds about to break open. But they haven't yet done so. And the plant may never stop flowering for the rest of the season. Growing is always a compromise.


inside geranium root ball after old feeder roots have been removedroot ball reduced in sizeGently brushed away old roots and compost to reveal the inner core and the main root system. Careful not to damage the new fine white roots growing out of the old stuff. This reduced root ball by about two thirds (left). Stood this in water for a few minutes. A drink will help sustain the plant till it can establish itself.

Until now, I have always used plain multi-purpose compost. Time for a change. Used a slightly damp multi-purpose:sand:perlite medium (same one as used on fuchsias), mixed in the ratio of 6:1:1. Carefully coaxed it into spaces around roots with a finger, tapping pot on floor and bashing sides as I went along. Then gently firmed, to give plant support.

I only did one of the two plants. So it will be interesting to see how the other one gets on.

The only thing that worries me about all this is that the over-watering symptoms seem to have occurred since re-commencing feeding after the winter, and since the weather started to warm up. This could be an indication of bacterial or fungal disease. But it seems unlikely. Let's see how things go for now. Time will tell. . ..

10 March 2011

Is This A Leaf Spot?

is this fungal leaf spot?underside of leafThis is the second yellowing leaf found within the past two weeks with a fungal attack at its base. And, as you can see (right), it has gone right through to the underside. Is it leaf spot? I don't know. Had a look through manuals but can't find it.

Although there was an infestation of leaf spot last year, started from an ivy leaf geranium brought in from a new source, it had a different appearance. This infection was walnut-brown with dark, concentric rings. So, if it is leaf spot, it looks like a different type.

All the plants which had been outside were treated with fungicide last year. But this plant was kept indoors, not exposed. There has never been anything like this before. Anyway, even if the plant were infected and if the fungus survived, why has it not appeared before now?

The yellowing leaf was taken from the over-watered plant recently described. So it might not be a leaf spot fungal infection; it might be a disorder caused by the over-watering, which has gone mouldy. Any thoughts?

The Turbo Pot Dryer

Pot plants usually have a considerable proportion of their root tips (that part which takes up water) at the bottom of the pot. And because this is where water gathers after watering; and because most young roots (especially fuchsias) cannot tolerate these conditions for long, it is always worth 'blotting the base of the pot dry' after each good watering.

turbo pot dryerI know this is not new. We covered it last autumn, when I showed you much the same thing. But what I didn't tell you is that you can greatly accelerate the process.

We saw that a paper kitchen towel, or similar, makes a good wick for removing excess water by capillarity. However, if things are really bad, you can greatly accelerate this process by placing the pot and kitchen towel on a sheet of newspaper, or anything which will absorb the excess water and spread it out further away from the pot. This greatly increases the evaporative area. As the newspaper dries, more water is drawn out of the pot to replace it. Simple.

It's common sense really. I don't know why it took me such a long time to think about it.

If you are new to watering, it's worth placing an absorbent pad beneath each pot, preferably about twenty minutes after watering to give the pot time to take up the excess. Then leave it there until it dries out. You will be surprised at how much water comes out of the pot. But this would only be taking up valuable air space needed by the roots.

The downside is that there is some loss of nutrients. No matter. These can be replaced later.

P.S. It works even faster if you first remove the plant from the pot. But don't stand it directly onto newsprint as it might be too acid and burn the roots. Put a folded kitchen towel between the plant and the newsprint.

Fleece Bad For Botrytis (Grey Mould): Myclobutanil Not Helped

botrytis (grey mould) is very bad on these overwintered geraniumsI have never seen botrytis (grey mould) as bad as this on overwintering plants. As you know, I covered them with a double layer of fleece (first time I had used it) late last autumn, just before the severe frosts. Although it helped the plants resist the frost, the trapped, moist, still, cold air provided ideal conditions for this air-borne disease.

I get some botrytis every year, though not to this extent. Of course, I can't say for sure that the fleece made it worse, because I can't be certain what it would have been like without it. I say this because the plants were put in late and had not had time to dry off properly before they were covered, although I did spray them with myclobutanil at storage. And before you say it, I know ventilation is necessary. But there is some ventilation, and giving more is just not an option in this case.

I'm disappointed - Having never treated my plants with anything at this time, I thought I was pretty safe. Live and learn.

P.S. All is not lost. Provided the geraniums can be cut back to clean stem, they will survive. But it is best to wait till new growth is well-established. Any open wounds at this time is asking for trouble.

Next year I will dry the compost off even more before storage. I would have done it last year, but the pots were out in the soaking rain for too long at the end of the season. I'll have to try to cover them.

3 March 2011

Help! What's This?

is this oedema on this geranium leafI don't know whether this is pest or disease. But I found it under a geranium leaf yesterday.

The plant has recently been over-watered, so it could be the disorder oedema (corky scab).

However, it seems to be mostly on the veins, which would tend to indicate pest trouble. Or perhaps it is scar material from a pest attack (though haven't seen any pests)? Can anyone help?