Ask any dahlia grower the secrets of success, and they'll tell you that dahlias need lots and lots of water, plus much much feed . . . And before one can even think about planting dahlias, it's essential to dig lots of compost or manure into the ground the previous autumn . . . Then an organic feed, such as bone meal, should be dug in at the rate of about 140 grams per square metre (4 ounces per square yard) . . . Oh, and don't even consider the project if you haven't got a hosepipe . . . plus lots of garden canes . . . plus gallons of nettle or chamomile tea (or similarly wizardry) . . . Forget it!
Whilst all this could well be so - and I am not disputing it - those who tried the method I outlined last year might well wonder where their stunning plants and flowers came from. And all this without an autumn pre-treatment, with little supplementary feed, without the use of a single cane, and despite early season cold weather complete with drought.
In my own garden I went further. If you check last year's dahlia posts, you will see I deliberately withheld water from my plants up to a point where I nearly lost them - I only watered once, all season. And I supplied no supplementary feed (apart from that specified). Yet the plants flowered almost as well as normal . . . Yes, there were slug and snail problems. But this was probably because the plants were doing too well, producing too much lush growth - something I never expected.
So why am I not recommending the same methods this year? Well I am . . .sort of. But I feel there's room for improvement. I didn't plant all the tubers 30 cms * (1 foot) deep in March, last year; I also started some in pots, once the weather had become warmer. With the spring bulbs being late this year, I want to use this method again (I usually remove the spring bulbs to make way for the dahlias). But there's also another reason, which will become clear as we go along.
STARTING DAHLIA TUBERS
After uncovering, the over-wintered dahlias look much the same as last year (see last year's notes for separating).
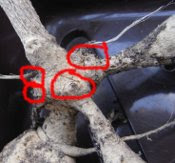
 After separation, ensure all soil is removed along with over-wintering pests and slug eggs (like little round yellow pills). Look for a good strong shoot with at least one tuber attached. The axillary buds, from where the new shoots will emerge, will probably be visible at the neck, where the tuber attaches to the stem (see diagram).
 After trimming, if necessary lay the tuber in a shallow tray of soil or compost (or you can use a pot) so that its neck is just exposed (this makes it easier to take early cuttings, if required). The food in the tuber will support the shoot whilst it roots. Note that it doesn't need a full tuber - just a small piece will do if you only have a small pot.
 After watering, place tray in a well-lit spot to encourage tight, strong growth. This is very important. We don't want etiolated (weak and spindly) plants. If you can find a nice sunny spot outside, this would be ideal. Watch out for frost. And make sure the soil/compost does not completely dry out. The idea is to keep the roots moist, not wet.
Within a few weeks, young strong shoots should develop from the buds.
Note: Young dahlias are a favourite food of slugs. I always add some slug pellets, once the surface starts to dry.
* The tops of the tubers were not 30 cms deep. This depth allows for adding the compost and for the depth of the tubers. The eyes, from where the new shoots developed, were about 20 cm (8 inches) below ground level.
P.S. If you have shallow soil, don't worry, I'll be dealing with this soon.
See also:
How Geotropism Can Build Drought Resistance In Dahlias
Dahlias Started In Trays Are Short-Jointed
No comments:
Post a Comment