 If you want to keep a plant growing, keep the roots growing. Once this stops, growth stops. As you can see, the roots are beginning to fill the pot, so growth will be slowing down. Most growers re-pot in half inch stages, saying this helps fill the pot better. They also use additions to the compost, such as grit or perlite, to help avoid over-watering. I have never done any of this - I have always used plain multi-purpose compost. Provided it is not compressed too much, and provided it is allowed to dry out adequately between waterings, there should be no problems. I am not saying there are no benefits to compost additions - there will be. But growing, to me, is about keeping things simple and cheap. Re-potting can be done as per last year. A frost-free spot in the garden would also be ideal. If you want to cut costs, try mixing about half compost, half garden soil. Because of the severed root, I am not re-potting this pot. The severed root seems to be still alive, and the new root buds formed on the other half are starting to grow.
Showing posts with label seeds. Show all posts
Showing posts with label seeds. Show all posts
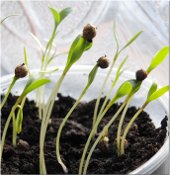
1 April 2011
Coriander Re-Pot Increases Growth Rate And Leaf Size
The time has come to give the coriander roots more space - time for a re-pot (see last year's post). Although this is not absolutely necessary, a larger root run will vastly increase both growth rate and leaf size. And we need to get a move on now so we can cut the crop before it goes to seed, as it does in early summer.  If you want to keep a plant growing, keep the roots growing. Once this stops, growth stops. As you can see, the roots are beginning to fill the pot, so growth will be slowing down. Most growers re-pot in half inch stages, saying this helps fill the pot better. They also use additions to the compost, such as grit or perlite, to help avoid over-watering. I have never done any of this - I have always used plain multi-purpose compost. Provided it is not compressed too much, and provided it is allowed to dry out adequately between waterings, there should be no problems. I am not saying there are no benefits to compost additions - there will be. But growing, to me, is about keeping things simple and cheap. Re-potting can be done as per last year. A frost-free spot in the garden would also be ideal. If you want to cut costs, try mixing about half compost, half garden soil. Because of the severed root, I am not re-potting this pot. The severed root seems to be still alive, and the new root buds formed on the other half are starting to grow.
If you want to keep a plant growing, keep the roots growing. Once this stops, growth stops. As you can see, the roots are beginning to fill the pot, so growth will be slowing down. Most growers re-pot in half inch stages, saying this helps fill the pot better. They also use additions to the compost, such as grit or perlite, to help avoid over-watering. I have never done any of this - I have always used plain multi-purpose compost. Provided it is not compressed too much, and provided it is allowed to dry out adequately between waterings, there should be no problems. I am not saying there are no benefits to compost additions - there will be. But growing, to me, is about keeping things simple and cheap. Re-potting can be done as per last year. A frost-free spot in the garden would also be ideal. If you want to cut costs, try mixing about half compost, half garden soil. Because of the severed root, I am not re-potting this pot. The severed root seems to be still alive, and the new root buds formed on the other half are starting to grow.
31 March 2011
Hypogeal Germination of Monocot, Corn ('Zea mays') Produces Coleoptile
In monocots, such as corn and grasses, only one cotyledon is present. At germination, this remains below ground (hypogeal germination), permanently in the grain, and in direct contact with the large endosperm. COLEOPTILE PROTECTS THE SHOOT TIP  Corn and other grasses (monocots) have a special sheath of cells called a coleoptile which surrounds the true leaves. On germination, this coleoptile is first to emerge from the ground and provides protection for the young tender meristem of the first true leaf which then emerges from within it (see diagram). As we shall see later, oat coleoptiles are famous for being used in experiments on growth hormones. See also: 'Types of Seed Germination - Epigeal and Hypogeal'
 Corn and other grasses (monocots) have a special sheath of cells called a coleoptile which surrounds the true leaves. On germination, this coleoptile is first to emerge from the ground and provides protection for the young tender meristem of the first true leaf which then emerges from within it (see diagram). As we shall see later, oat coleoptiles are famous for being used in experiments on growth hormones. See also: 'Types of Seed Germination - Epigeal and Hypogeal'
Structure of Corn ('Zea mays') Seed
 In maize, the seed coat is fused with the ovary wall, so this technically makes it a fruit, not a seed.
As with all monocotyledonous (monocot) plants, obviously only one cotyledon is present - in maize, this is large and shield-shaped.
Members of the grass family (e.g. 'Zea', 'Avena', and 'Triticum'), plus some other monocots, have an additional structure, called the coleorhiza, covering the root tip; the coleoptile encloses the young primary shoot.
Upon germination, the radicle and epicotyl rupture the seed and enter the soil.
24 March 2011
Lettuce First Water After 43 Days
 The lettuce planted in a cup of soil last month has reached 'pricking out' stage (the first true leaf has emerged - see red arrows) and would normally be transplanted into a tray(s). Things have been very slow because of the weather and because I have been deliberately withholding water to show just how well they can manage without it.
 As you can see, (and similar to the coriander) despite little action on top, there has been considerable action below ground. The roots reached the bottom of the cup (some 7 or 8 cm (3 inches) about a week ago. To split the plants now would cause quite a bit of damage * to them. But this doesn't matter, since I intend to grow them as a unit, as another community of plants.
Because this is a leafy type of lettuce and doesn't form a head, it should be possible to pot them up into a larger pot and pick at the leaves all summer. That's the theory, anyhow.
I gave them a good drink for now to help them along.
* If you want to prick out your seedlings, best to use shallow compost. This makes separating the plants much easier.
Coriander First Water After 43 Days
 As with the lettuce, the emergence of first true leaves (arrowed) indicate it is time to transplant to provide more room and better compost for the coriander seedlings. We're not doing this. As mentioned elsewhere, we are going to keep them as a community, just like last year.
Because the cup is getting rather light, and there is little condensation left on its sides, I applied the first water since planting 43 days ago. A good soak now and then is usually preferable to little given often, since it allows the compost to draw in vital oxygen from the atmosphere to replace the water lost as the compost dries out.
I gave about a quarter of a cup (50 mls) of plain water. Still too early for feed.
It is unfortunate that this is the cup with the severed root described earlier. I would have preferred to keep the side of the cup dry. Never mind.
10 March 2011
Displaced Coriander Seedling Shows Geotropism At Work
The main roots on both the coriander and the lettuce have now reached the bottom of their cups. No water given yet. We shall soon be returning to this for a fascinating insight. For now, I want to tell you about GEOTROPISM - a plant's growth response to gravity.
Shoots grow away from gravity and are said to be NEGATIVELY GEOTROPIC. But roots show POSITIVE GEOTROPISM, growth towards gravity.
 Just a couple of weeks ago, all seemed lost for this germinating coriander seedling. The seed case had been pulled out of the compost during germination; the root lay prostrate on the surface, its tip facing upward.
 Examine the seed's response in its struggle to survive (right). Notice how, 28 days later, the root hairs have anchored the root (radicle) to the surface of the compost, allowing its tip to be thrust downwards to access water and food from the compost. Meanwhile, the cotyledons (seed leaves of developing shoot) are struggling free from the seed case (testa) and are thrusting upwards towards the light.
It's amazing just how resilient, resourceful and determined plants are. It seems they will do everything they can to survive any situation. And I do mean ANY situation. If only they had a brain . . . .
24 February 2011
Coriander After 16 Days
 Coriander roots are now about 3.5 cm (1.5 inches) long. They have done well to make so much growth in 4 days at such low temperature.
This is a tap root system; it will be forming lateral roots soon. Since coriander comes from a hot dry climate, a taproot system is ideal to access deep water and nutrients.
 Things are starting moving on top, now. The hooked hypocotyls have turned green and the cotyledons (seed leaves) are about to emerge from the seeds.
WHAT'S THE POINT?
The point I want to make by showing you all this is that seed development is deceiving. Were it not for the fact that we can see the roots, we would never believe they had developed to the extent they have. This is why novice growers over-water seeds: As the compost dries on the surface, they believe the roots are still too short to access water deeper in the compost. They are not.
21 February 2011
Coriander Seeds After 12 Days
I know I showed you this last year. But its so important we should revisit.

 In 4 days, and although these coriander seeds in the plastic cup (left) have been placed in a much cooler spot (average temp. about 5 deg C), the roots (radicles) have doubled in size (compared with right, taken 4 days ago) and are now about 2.5 cm (1 inch) long.
Novice growers are often amazed to see so much root development with hardly anything happening above ground. And because we can also see water droplets on the side of the cup, we know the seeds do not need watering, no matter how dry the surface gets. This is wonderful, since we can now at last avoid the 'cardinal sin' of OVER-WATERING, and quickly develop a good watering technique.
BUT THERE'S MORE . . .
I don't know about you, but I was surprised to see coriander growing in such cool conditions. Although, having said this, it is mostly the root which has grown. This is good. Because a low temperature produces stronger, healthier plants.
Note: Coriander seeds are unusual in that they seem to produce two plants per seed (there would normally be only one root (radicle) per seed). No one ever seems to mention this. A coriander seed produces two radicles, each of which will develop into a separate tap root.
17 February 2011
Lettuce Seed Germinating In Soil Cups
 5 days after sowing in a cupful of damp garden soil kept at approximately 8 deg C (46 deg F), this lettuce seed shows quite clearly that the root (radicle) is first to emerge from the seed case (testa), complete with delicate root hairs to absorb water from the soil. The white hypocotyl (the part between the root hairs and the seed) has extended. Had the seed been buried, this hypocotyl would also have hooked over to drag the seed case containing the cotyledons (or 'seed leaves') out of the soil as it extended upwards.
GEOTROPISM
Note that even young roots will always grow downwards. They are said to exhibit 'positive geotropism'. Shoots exhibit 'negative geotropism' and grow upwards towards the light.
 After 9 days, you can just see the cotyledons (seed leaves) emerging from this seed. Note that they have turned green in the light; the hypocotyl has also turned green. The green pigment cholorophyll is used to produce food (sugar) by 'photosynthesis'. Once this is done, the young plant is independent of the food supply in the seed. This point must be reached as soon as possible.
LIGHT AND TEMPERATURE
Lettuce seeds are sensitive to both light and temperature for germination. We have already seen how lettuce seeds react to light when germinating.
What is also not generally known, however, is that lettuce seed germination virtually 'drops off a cliff' at 25 deg C, with very slow germination even at 26 deg C. But there is also good news: Germination starts at 2 deg C (36 deg F). Peter Thompson shows this very clearly in his excellent book 'Creative Propagation'
Bibliography: Thompson, Peter(2005) 'Creative Propagation 2nd ed' (Pub:USA and UK by 'Timber Press')
Coriander In Cups After 9 Days
 The coriander is only just germinating after being kept at about 15 deg C for 9 days. I removed the cover on the second day. Note that the seeds are still very moist, perhaps even too moist.
Types Of Seed Germination - Epigeal and Hypogeal
I wasn't going to mention the types of germination, but if I ignore it someone is bound to point it out. Whilst this has little or no effect upon growing techniques, it does give a more complete representation of the germination picture. As we shall see (hopefully), following the emergence and establishment of a new root system (radicle), the stem starts to develop and the plumule is thrust upwards. However, there are two types of germination, dependent upon what happens to the cotyledons: i.e. whether these grow ABOVE the ground (epigeal) or remain BELOW it (hypogeal).
 EPIGEAL GERMINATION ('epigeal' means 'above the ground') In dicotyledons, if that part of the shoot axis just BELOW the cotyledons (the hypocotyl) elongates, this drags the cotyledons out of the soil (the hypocotyl bends over and drags the cotyledons behind it). The plumule, along with its delicate growing point, the shoot meristem, is protected by being enclosed between the cotyledons. e.g. Most seeds, including sunflower, castor oil and French bean HYPOGEAL GERMINATION ('hypogeal' means 'below the ground') If that part of the shoot axis ABOVE the cotyledon(s) (the epicotyl) elongates, the plumule still emerges from the ground, but the cotyledon(s) is/are left behind. The epicotyl is also hooked and the plumule is dragged backwards to minimise damage to the tip. e.g. Broad beans, peas and corn. In both cases, the shoot straightens upon reaching light. This is another phytochrome-controlled response. See also: 'Hypogeal Germination of Monocot Corn (Maize)'; 'What Is A Seed?'; 'How To Germinate Seeds More Successfully'

10 February 2011
How To Germinate Seeds More Successfully
Strange how seeds germinate and grow in the wild as if by magic, even in seemingly impossible conditions, yet not when our two penneth is involved. And it's not just because we're growing them inside. If ever you have spilled a few grass seeds between the flags whilst seeding a lawn, you will known what I am talkling about. Why is it that grass seeds are so difficult to grow on a lawn (at least for me), where one would assume they have everything they need, whilst they never fail to grow between the flags, devoid of water and soil? I don't know - another one of those growing mysteries. But seriously, how can we improve our competence in this area? How can we germinate seeds more successfully?
UNDERSTANDING THE PROCESS
We have already looked at the structure of seeds and have seen that they are very-much-alive embryo plants complete with root, stem and leaf; yet amazingly these same seeds are able to maintain themselves in this state for long periods of time. How do they do this, and why?
SURVIVING THE WORST
Seeds are the way the Gymnosperms and Angiosperms (flowering plants) increase their presence whilst surviving conditions too severe and/or too restricted for normal growth. These might be climatic such as drought or frost; or they might be physical such as fire or flood; or they might involve other factors such as light quality, or soil condition, or competition.
Over millions of years, plants have adapted to survive the worst (and also to anticipate the worst, but that's another story). They have squared the circle by creating a form - the seed - in which they are very much alive yet apparently dead (didn't I always say they were clever?). The seed represents the DORMANT stage of a plant's life cycle. This is how they do it.
A HARD COAT AND A PARCHED THROAT
As seeds mature they lose water and develop a hard coat.
Drying down to about 14% greatly reduces cell respiration: that process which is essential to all life. And this allows the embryo to use less of the food store from the seed, thus increasing its survival potential.
The seed coat keeps out water and air, to maintain the dormant state. Often hormones (growth substances) are also involved. Abscisic acid (ABA) both induces and maintains dormancy. Another hormone, gibberellic acid, works the other way; it is often used commercially to break dormancy.
OTHER PROCESSES
It is hard to believe that a seemingly dead and insignificant seed can be constantly monitoring the light in terms of intensity, colour and duration. Yet it does (See 'Should We Dig In The Dark?'). Furthermore, it also monitors the level of carbon dioxide around it . . . And also the amount and type of nutrients . . . soil acidity . . . And . . so on. Seeds really are deceivingly complex little critters.
WHY DOES IT DO ALL THIS?
All the above is used by the seed to begin its growth journey from the right position, in the right soil, at the right time of year . . . etc . . . to give it the best chance of survival. After all, it only gets one chance. If it messes up, that's it: instant death; that's why there are so many seeds. We can learn a lot here: If we become familiar with a seed's natural environment, we can usually be successful by emulating them. This is the secret to propagating difficult seeds.
READ THE PACKET
However, whilst plant dormancy is a fascinating study, it is far too diverse and complex to go into here. Fortunately, as mere ordinary growers we only need to know a few essentials. This is because most of the seeds we sow in our pots, containers, and even in our gardens, will come out of their dormant state and commence active growth simply by supplying water, air and the correct amount of warmth. Oh, and I should add another factor: light.
And, before I forget, there is something which is vital to success, something which no one ever seems to consider mentioning: READING THE PACKET and FOLLOWING ITS INSTRUCTIONS - to the letter, if possible. This way, any little quirks the seeds might have will be catered for. However, having said this, it is surprising how much packets differ in instructions, even over quite significant things. For example, I was instructed (by the packet) to cover the basil seeds last year, only to discover from a reliable source that they should not be covered, just pushed into the compost (at last, an excuse!)
THE GERMINATION PROCESS IN DICOTS
As the dry seed imbibes water, the enzymes within it wake up and begin to work upon the food stores (oils, starches or proteins) and mobilise them to produce fuel for new growth. Rapid swelling occurs at this stage and the contents of the seed burst through the seed coat, starting with the root (the radicle). Using the food reserves, it is essential to access and secure a water supply.
After this, the shoot (plumule) stretches upward, often dragging the cotyledons (which now have taken the form of seed leave(s)) behind it. Arching and dragging in this way prevents damage to the tender new leaves.
The new plant uses phytochrome to determine light intensity. If it is too low (as it would be if surrounded by other plants), the hormone gibberellic acid is produced which induces stretching (etiolation) until sufficient light is available. The leaves remain small at this stage to waste as little food as possible, and only develop further once sufficient light is reached. At this time, the leaves begin to photosynthesise and produce food to fuel further growth. It is essential this stage is reached as soon as possible.
NOW . . . AT LAST . . . HOW TO SOW SEEDS
THE PERFECT SCENARIO
As growers, we need to think of ways to supply enough water at sowing for the seeds to imbibe and start growing, then provide an ideal environment in terms of water/air mix, temperature, light, and nutrient levels.
We are often told to soak trays of compost with water AFTER sowing seeds. Whilst I cannot say this is wrong, it is nevertheless where most novices go wrong. And the reasons are obvious:
From what we have just seen, soaking only satisfies the first part of seed growth - that of imbibing water. It is only necessary to begin the process. Furthermore, it tends to disturb the freshly-sown seeds too much, leaving some exposed and others at different depths, and therefore at differing light and carbon dioxide concentrations. Not a good start.
I would advise to soak, then drain the compost, but BEFORE the seeds are sown. After levelling and light tamping, the seeds can then be sown, and covered if necessary (read the packet) with fine dry compost shaken evenly from an empty plant pot, or similar.
As the water gradually soaks down under gravity, it will pull oxygen (vital for growth) into the surface to replace it. Combined with the water lost through evaporation, this will work wonders for the seeds, and in my opinion should be all that is necessary. However, some growers mix their seeds with a fine layer of sharp sand, or perlite or vermiculite. All this helps keep the seeds moist whilst avoiding drowning and thus causing the onset of fungal diseases such as 'pythium' or 'phytophthora' which cause damping off.
It doesn't matter how much water is in the compost BELOW the seeds, since the developing root need not enter it. It can stop growing once reached, then follow the level down as this water is removed.
APPLY NO FURTHER WATER
Clearly, if further water is applied too soon, it will occupy the pore space around the seed and thus remove its vital supply of oxygen.
Most novice growers, not realising any of this, apply water too soon and drown the seeds. For some reason, we have all been conditioned to believe that roots need to be immersed in water. It must be those bean and pea seeds we grew in jam jars at school. No matter. Whatever the cause, we would all do well to read and digest the above. Success with seeds should then be possible.
WHAT ABOUT COVERING?
Here we go again. Can I just say, there is one truth which all growers should have framed and hung above their bed:
DISEASE LOVES EXCESS HUMIDITY.
This is the cause, in some way or other, of almost all plant problems - at least as far as the novice is concerned.
I am a dry grower and avoid covering anything if at all possible, no matter what the gardening books might recommend. Needless to say, after soaking seed compost with water, as described earlier, I do not cover it (many growers cover with a sheet of glass). And I am pleased to say that the technique outlined has been virtually 100% successful. I like to see the top of the compost changing colour. That way I know it is still damp enough underneath but airy enough on the surface.
I know I am using a propagator at the moment (to propagate begonias), but that is only because it was too early to grow most things. You will find more success with seeds if you grow them in natural conditions at a natural time of year. Propagators can be fine, but they also can provide too much humidity and, surprisingly, too much heat. They can also provide a heat which is too even (some plants need a different night and day temperature of at least 5 deg C). Study the germination temperatures on the back of the packet carefully. You will be amazed at how many plants like it cool. Don't be in a hurry. You can't force plants.
COMPOST MIX
Many growers either buy in special seed compost, or mix coarse sand or perlite or vermiculite into multipurpose. This is a good practice, since it helps aeration and also reduces the nutrient level.
However, this blog is about GROWING AT LEAST COST. It is therefore my intention to show you how to achieve good results with what you have. I have no axe to grind. And you can be sure that I will not look down on you if, for example, you prefer to use your own soil, free from the garden. Indeed, if you look at last year's posts, you will see I did that on several occasions (I am even now using last year's compost and last year's seeds). Even so, I would - for now at least - recommend a good brand of fresh, multi-purpose compost, which we can use for all purposes.
Planting Coriander Seeds
Coriander is easy to grow on a windowsill. And now is a good time to plant it so that it has time to mature before June. Although it will grow all year round from seed, it tends to be difficult to grow in the summer, as it runs to seed itself very easily during the hotter months.
I am using 200ml clear plastic drinking cups. These have several advantages for growing seeds, especially for coriander, where small plantings can be made at weekly intervals (or whatever interval is most suitable) throughout the year without taking up too much space. Using these cups is also an ideal way to learn how to grow, since we can see exactly (well, ALMOST exactly) what is happening beneath the surface of the compost, and we can have a better idea of what watering is all about. I outlined the benefits last March in 'Seeds in a Cup - Background'.
The technique used to grow basil last year, outlined in 'Growing On A Windowsill', was successful for coriander (though, unfortunately, not for the basil). I am using it again here with slight modification.
 An awl is a good tool to puncture the cup as near to the base as possible, so that the hole is visible and is not actually beneath the cup (where it would be blocked). It doesn't have to be too large, since - contrary to rhetoric - water will drain quite quickly even from the tiniest hole (smaller holes are also good for outside use, since they prevent slugs and other pests getting into the pots - just thought I'd mention that)
 Use about 20 seeds and press them, evenly spaced, into the compost as far as you can without compressing it too much. Don't forget to place one or two at the edge so you can see the roots growing down the side of the cup.
You don't need to cover the seeds with dry compost. What I do is cover them for about a day or two with clingfilm. But I make sure that there is a hole in this film to prevent excessive humidity. Drops of water on the film first thing in the morning is O.K.
Place in a south-facing shallow windowsill in good light (direct sunlight is O.K. but watch for excessive drying and heating). This should keep the cup about 18 to 20 deg C (64 to 68 deg F) - you don't need to be too fussy. It is good if the surface of the compost dries a little, since this will draw air in and help avoid disease, but make sure seeds themselves remain at least partly damp. If you scratch the surface of the compost, it should be damp just beneath the surface. Spray with water if necessary. Otherwise, after 3 or 4 days, the seeds should be moist enough (they turn darker in colour) and spraying should not be necessary.
You should see the seed cases bursting open after 4 or 5 days.
If you haven't got a south-facing windowsill, start seeds off in a warm spot, but place cup in a cooler spot (about 15 to 16 deg C) once they start germinating.
Watering should not be necessary for a couple of weeks.
Click here to see last year's coriander posts.
I am using 200ml clear plastic drinking cups. These have several advantages for growing seeds, especially for coriander, where small plantings can be made at weekly intervals (or whatever interval is most suitable) throughout the year without taking up too much space. Using these cups is also an ideal way to learn how to grow, since we can see exactly (well, ALMOST exactly) what is happening beneath the surface of the compost, and we can have a better idea of what watering is all about. I outlined the benefits last March in 'Seeds in a Cup - Background'.
THE TECHNIQUE
The technique used to grow basil last year, outlined in 'Growing On A Windowsill', was successful for coriander (though, unfortunately, not for the basil). I am using it again here with slight modification.
 An awl is a good tool to puncture the cup as near to the base as possible, so that the hole is visible and is not actually beneath the cup (where it would be blocked). It doesn't have to be too large, since - contrary to rhetoric - water will drain quite quickly even from the tiniest hole (smaller holes are also good for outside use, since they prevent slugs and other pests getting into the pots - just thought I'd mention that)
 Use about 20 seeds and press them, evenly spaced, into the compost as far as you can without compressing it too much. Don't forget to place one or two at the edge so you can see the roots growing down the side of the cup.
You don't need to cover the seeds with dry compost. What I do is cover them for about a day or two with clingfilm. But I make sure that there is a hole in this film to prevent excessive humidity. Drops of water on the film first thing in the morning is O.K.
Place in a south-facing shallow windowsill in good light (direct sunlight is O.K. but watch for excessive drying and heating). This should keep the cup about 18 to 20 deg C (64 to 68 deg F) - you don't need to be too fussy. It is good if the surface of the compost dries a little, since this will draw air in and help avoid disease, but make sure seeds themselves remain at least partly damp. If you scratch the surface of the compost, it should be damp just beneath the surface. Spray with water if necessary. Otherwise, after 3 or 4 days, the seeds should be moist enough (they turn darker in colour) and spraying should not be necessary.
You should see the seed cases bursting open after 4 or 5 days.
If you haven't got a south-facing windowsill, start seeds off in a warm spot, but place cup in a cooler spot (about 15 to 16 deg C) once they start germinating.
Watering should not be necessary for a couple of weeks.
Click here to see last year's coriander posts.
What Is A Seed?
Although they come in many sizes, all seeds give the same impression - that they're DEAD. Upon catching our first glimpse of a packet's often miserable amount of contents, it is hard to conceive that each seed case contains a well-developed multi-cellular young plant, complete with embryonic roots, stem, with leaves already formed.
Of course, it's not too difficult to understand why this should be. When we think of living things, we tend to compare them to ourselves. And it's hard to imagine surviving for very long after being dried out like parchment, and perhaps frozen down to about -17 deg C for a few months (or even years) in the process.
But seeds can easily survive these conditions. And some seeds have survived - without man's help - for centuries, and even longer. Dr. Linda Berg, in her book 'Introductory Botany', states that:
SEED STRUCTURE
The embryonic root (radicle) and shoot (plumule) come attached to one (as in Monocots) or two (as in Dicots) 'seed leaves' (cotyledons) The embryo is surrounded by varying amounts of 'endosperm tissue', and the whole lot is encased in the 'seed coat'(testa). Sometimes (e.g. bean) much of the endosperm has developed into cotyledon, or seed leaf.
TWO BASIC STRUCTURES
 If you cut open a pea or bean seed (left), you will find they are comprised mostly of two large nut-like cotyledons; there is little soft endosperm. On a bean seed, it is also possible to see the micropyle. This is a tiny hole through which the pollen tube passed through the ovule to allow fertilision the egg.
 On the other hand, a corn seed (right) has little structure, consisting mostly of starchy endosperm; with a small cotyledon.
SOURCE OF FOOD
No living thing can exist without a supply of food to supply energy to fuel basic metabolism, albeit this is greatly reduced during dormancy. Dormant animals have a supply of fat; plants vary in both the nature of the food reserve and in where it is stored. Oils or sugars (mostly starch) might be stored either in the endosperm or in the cotyledons.
Reference: Berg, L (1997) Introductory Botany: Plants, People and the Environment (U.S.A.:Saunders College Publishing)
Of course, it's not too difficult to understand why this should be. When we think of living things, we tend to compare them to ourselves. And it's hard to imagine surviving for very long after being dried out like parchment, and perhaps frozen down to about -17 deg C for a few months (or even years) in the process.
But seeds can easily survive these conditions. And some seeds have survived - without man's help - for centuries, and even longer. Dr. Linda Berg, in her book 'Introductory Botany', states that:
'the longest-lived seed reliably recorded (by carbon dating), a sacred lotus, Nelumbo, from China, germinated after about 1200 years.'I have even heard stories of corn seeds germinating after being removed from ancient Egyptian tombs, though I don't know how reliable this is. Nevertheless, it makes us think - in fact, it's absolutely staggering. And it's often made possible by the structure of the seed.
SEED STRUCTURE
The embryonic root (radicle) and shoot (plumule) come attached to one (as in Monocots) or two (as in Dicots) 'seed leaves' (cotyledons) The embryo is surrounded by varying amounts of 'endosperm tissue', and the whole lot is encased in the 'seed coat'(testa). Sometimes (e.g. bean) much of the endosperm has developed into cotyledon, or seed leaf.
TWO BASIC STRUCTURES
 If you cut open a pea or bean seed (left), you will find they are comprised mostly of two large nut-like cotyledons; there is little soft endosperm. On a bean seed, it is also possible to see the micropyle. This is a tiny hole through which the pollen tube passed through the ovule to allow fertilision the egg.
 On the other hand, a corn seed (right) has little structure, consisting mostly of starchy endosperm; with a small cotyledon.
SOURCE OF FOOD
No living thing can exist without a supply of food to supply energy to fuel basic metabolism, albeit this is greatly reduced during dormancy. Dormant animals have a supply of fat; plants vary in both the nature of the food reserve and in where it is stored. Oils or sugars (mostly starch) might be stored either in the endosperm or in the cotyledons.
Reference: Berg, L (1997) Introductory Botany: Plants, People and the Environment (U.S.A.:Saunders College Publishing)
6 January 2011
When Should We Plant Seeds?
Is now a good time to plant seeds? How do we know the best time to plant them? How should we do it? (click seeds category for last year's notes). These are the sort of questions which might be troubling novice growers (is it any wonder with all the marketing hype). And not just novices; seasoned growers are even more concerned, though bitter experience has usually provided the answer - that there is no correct time, provided you are properly prepared.
If you want the biggest and often the best plants, it pays to grow them for as long a season as possible. In the U.K. this means extending the season, usually at the beginning when plants are young and can more easily be controlled. From this point of view, getting seeds off to the earliest start obviously makes sense. But take care.
What novices need to understand is that extending the season is not easy.
Forcing plants usually results in weak growth. I find it far better to let them grow in their own time. And they will if you can be patient. Growing is difficult for those in a hurry.
If you want the biggest and often the best plants, it pays to grow them for as long a season as possible. In the U.K. this means extending the season, usually at the beginning when plants are young and can more easily be controlled. From this point of view, getting seeds off to the earliest start obviously makes sense. But take care.
What novices need to understand is that extending the season is not easy.
- Light levels on a window sill can be too low in January and early February - special growing lamps would be required
- Winter temperatures are too low for most seeds - a heated propagator (not the airing cupboard) is usually needed
- Plants grow quickly, so sufficient space must be available to keep them growing free from frost - a point often overlooked by most novices. Protection will be needed until the risk of frost is gone, usually towards the middle or end of May. A greenhouse, or at least a cold frame is almost an essential
Forcing plants usually results in weak growth. I find it far better to let them grow in their own time. And they will if you can be patient. Growing is difficult for those in a hurry.
Coriander Canary Detects Low Light
 All seedlings will etiolate (stretch) if the light intensity is too low. The coriander here is no exception. I have been germinating seeds at room temperature (a cool room), then cooling down to 7 to 8 deg C (44 to 46 deg F) during December (see growing coriander notes).
 As you can see from this photo, things were going fine until last week when the mild foggy weather reduced light levels and increased temperatures to 10 deg C (50 deg F). The etiolation (shown above) happened overnight.
This tells me three things:
- coriander will actually grow at low temperatures - far lower than I expected
- most of the winter light is acceptable at these temperatures - it is just the odd fluky day (fog and heat) that can cause problems
- it is still too early to plant most seeds - best wait till the light improves
The etiolated seedlings will still develop and will not be wasted. So it is worth planting a few seeds, just to be sure of adequate light levels.
P.S. I would love to know what fungus is growing on the compost. It doesn't seem to affect the coriander.
14 December 2010
Going Back to Basil. Are Low Energy Lights the Problem?
It's been bothering me all year. I don't like failure, at the best of times. And to fail at the first hurdle . . . Well! But those who have read the early posts know this is just what happened - the very first seeds (basil) failed to germinate, and I wasn't really able to give a satisfactory explanation (I put it down to temperature). Now, after reading something more about the effects of light quality on lettuce seed germination, I have had a re-think. I don't know why I never saw it before. Basil might also need a light stimulus to germinate.
The seeds were placed near a low-energy fluorescent bulb, so were probably low in essential orange-red (660nm) light. This seems especially apt since basil comes from a part of the world where natural light contains much light of this wavelength.
The more I think about this explanation, the more it makes sense. Although the propagator was warmer than the original position, it was also in stronger natural light.
Note that phytochrome stimulation does not need strong light, as does photosynthesis. A low wattage tungsten bulb is effective.
7 December 2010
Should We Dig in the Dark?
I know the ground is frozen solid, but for those of you with some digging still to do in weedy soil, here's something to consider:
As mentioned elsewhere, many seeds are sensitive to the quality of light for germination; this helps them grow in ideal positions. Some species require an open site; others prefer company. By assessing the quality of light (i.e. its constitution), they are able to determine their position.
How do they do this? They use a pigment called 'phytochrome', which is capable of determining the proportions of red and far-red light available. Leaves filter out red light whilst far-red is filtered much less, hence decreasing the red:far-red ratio. Those seeds requiring an open position germinate when there is a high proportion of red light available, and vice versa.
Many garden weeds germinate following light stimulation, often for just a few seconds. Digging in the dark would deprive exposed red-light-requiring weed seeds of this stimulus and hence hence reduce germination up to four-fold (since they would have the impression that they had landed in shade).
Before you rush for the spade handle and the flashlight, please bear in mind that this is only an idea, not - I think - one to be taken too seriously. . . although I don't know . . .?
5 May 2010
Basil Re-Pot
 At long last basil has grown enough to be re-potted (basil was the first planting way back in March).
It really needs thinning out a little, but it is notoriously difficult to split up. So if I put it into a 10 cm (4 inch) pot, it should have plenty of room to spread out.
I think it must have been the cold temperatures which have made it grow so slowly. Still, at least we have some basil, even though I did have to germinate it in a propagator.
4 May 2010
Coriander Finished
 Just as it was starting to get going after re-potting, the coriander has started to bolt (run to seed). So cut up and put in freezer. Still, we have had our money's worth out of it.
Coriander is notorious for bolting at this time of year, but this variety was supposed to be resistant. Just shows that we cannot always go by what is written on the packet.
Seeding is mostly a photoperiodic (controlled by daylength) response. Had the season been a bit warmer, there would have been a much heavier crop by now. Maybe next year?
Subscribe to:
Posts (Atom)