Learning how to water plants to increase growth in pots, container or garden - especially how to water roots and tubers. Specialities: root growth or tuber growth of lawns, fuchsias, geraniums, dahlias and begonias.

27 May 2011

Bedding Plants: Common Mistakes - Part One

The last weekend in May is traditional planting time in the UK for summer bedding plants. Amazingly, something which should be straightforward often ends in failure. Here are some of the common mistakes:
  • poor quality plants
  • wrong weather conditions
  • wrong time of day
  • poor watering technique
  • feeding at wrong time
  • wrong feed
  • poor after-care

POOR QUALITY PLANTS

They say one cannot make a 'silk purse out of a sow's ear'. How true. Start with good strong plants, avoiding:
  • end-of-line bargains (unless you know you're doing)
  • plants which do not look healthy (leaves should be unblemished and uniformally green)
  • dehydrated plants (leaves should be erect, not limp)
  • weeds growing in pot
Many add pot-bound plants (thick roots growing strongly through base of pot) to the list. You can actually use these. But demand a discount, because there will be a growth set-back once you have cut them out of the pot (never pull plants out by holding their stems or leaves - after slicing off protruding roots level with base of pot, invert pot onto palm, then push base of pot with thumb of other hand; you might need to cut around rim with a knife first, but avoid this, if possible).

WRONG WEATHER CONDITIONS
Visit a garden centre during a spell of rainy weather and it will be devoid of customers. Some gardeners are like those couples in ornamental weather houses - you know, the ones attached to catgut who only venture out when the weather is about to turn dry and sunny. Yet a prolonged spell of overcast, showery weather provides near perfect conditions for planting, especially if the soil has received sufficient water to get down a foot or two.

Work with the weather if you can. Choose an overcast day, then rush out and plant between the showers - it pays dividends (if you can avoid contracting pneumonia)

If the weather is too hot and rain is forecast, delay planting till then. Have everything prepared. And DON'T FORGET THAT HOT, CLEAR WEATHER OFTEN MEANS OVERNIGHT GROUND FROST, so cover plants at night with horticultural fleece till they are hardened off (fleece is also good for shading from sun)

WRONG TIME OF DAY
Humans being humans, we cannot resist rushing out in the burning mid-day sun to put our plants in the ground, as if we are somehow doing them a favour. No! No! No! Plants are averse to burning sun and even to heat. The best time to plant is at the end of the day, preferably when rain forecast (you will need to watch out for slugs). This was covered last year in 'Resisting the Heat'.

POOR WATERING TECHNIQUE
Most of this has been covered elsewhere (click 'starters' link at side). But what I want to tell you is this:
  • As much water should be given to your plants BEFORE planting as possible. This is not generally understood.
  • No matter how careful you are, there will always be some impairment to root functioning caused by the disturbance.
  • Also, roots need air around them to function well. So waterlogged soil is no use.
Before Planting
Therefore, give your plants a good soaking at least four hours before planting. This will give time for enough water to be taken up to sustain establishment after planting, and also to allow any excess water to drain away from around the roots, thereby allowing them to function well right from the off.

Make sure the ground is thoroughly wetted, down to at least 30cm (1 foot), if possible. As I have told you elsewhere, dry ground is notoriously difficult to wet. Make sure any water you apply does not run away through cracks in the soil, or even run off the soil surface.

After Planting
Preferably do not apply water; otherwise, give a good dousing. Then refrain from watering as long as possible (even to wilting point). Plants can sense moisture levels; as these diminish they send out roots to look for it. If water is given too early, the roots become lazy and do not develop, consequently leaving the plants more drought-susceptible.

Beware of panning or puddling the soil surface, especially on clay or silt soils in hot sunny weather. This mud dries hard and seals out air vital for root development. If this happens, allow to dry, then break up the hard surface.

Ongoing Watering
DO NOT WATER ON A DAILY BASIS. Leave the soil to dry out for at least a few days. As water is taken up by the plants, air is drawn down to the roots to take its place. Repeated soaking followed by drying encourages a good root system (remember the geranium?). As a rough guide, let surface dry out down to about 5cm (2 inches) between waterings, then apply 5 litres per square metre. A fine watering rose and gentle pressure should be used.

FEEDING
DO NOT APPLY ANY FEED WHATSOEVER at this stage. There is no way of knowing how much feed is already in the compost; there is also no knowing whether or not dry weather will return.

PLANTING TECHNIQUE

Gently firm plants into loose soil with knuckles, so they are adequately supported. Do not apply too much pressure, try to avoid damaging roots and do not handle by stems or leaves. Watch out for slugs and frost.

P.S. Most of the above has already been dealt with in the earlier posts of last year. It's worth having a look.

Choosing A Summer Lawn Feed Needn't Be A Nightmare

Once the lawn has been watered (see 'Revive A Summer Lawn By Watering Its Roots') and has begun to grow, a feed can speed recovery - but what type? Should you choose a liquid? Or a granular? There are many different options. Choosing can be nightmare - But it needn't.

PROBLEMS WITH TRADITIONAL GRANULAR FEEDS
As outlined last year, the problem with traditional granular feeds is that they're difficult to apply without scorching the grass, especially in dry weather. I used to avoid this by applying lawn fertilizer granules just as the sky was blackening for a thunderstorm - preferably after the first few drops or rain had already fallen, just to be sure. But this is very wasteful as, being soluble, much of the nitrogen washes straight off the surface into the borders.

In the end, I found liquid feeds to be the best value and easiest to apply as I outlined in 'Summer Feeding A Lawn'.

Liquid feeds are also surprisingly economical, quick-acting and easy to apply (they only require a watering can fitted with a rose). So I would still recommend them.

BENEFITS OF NEW SLOW-RELEASE GRANULAR FEEDS
However, there are now a few slow-release lawn feeds around which, because they release their nutrients over about four months (normal granules last about six weeks), minimise scorching. And, once applied, no further action should be required. This is an obvious benefit over liquid feeds, which need applying monthly. However, things might not be quite so straightforward . . ..

Although they don't break down without water, a situation could arise in a dry summer where all the feed could still be on the lawn surface in autumn, then warm heavy rains could cause a rapid release of ureic nitrogen at just the wrong time of year, making the lawn susceptible to disease. So these feeds still need a regular supply of water throughout the summer.

Furthermore, once applied, it is impossible to rake out dead grass from the turf without also removing them in the process. This is not so bad as it sounds, since this dead material soon covers over and breaks down.

fertilizer spinnerAnother drawback to slow-release granules is that most of them on the market are difficult to apply by hand at the rate specified. This can be overcome by using a hand-held fertilizer spinner, available cheaply in most gardening outlets.

Things are definintely improving as far as lawn feeds are concerned.

Re-Potting A Leggy Tomato Plant

this leggy tomato plant needs re-pottingThis tomato plant is a bit leggy, to say the least. So I'm re-potting it into a gallon (20cm deep) pot, burying the lower nodes (after removing leaves) beneath the compost upto the red line. This should keep the plant more stable and allow some adventitious roots to grow from the stem, allowing greater access to food and water (see 'How Adventitious Roots Can Supercharge Growth').

tomato plant with buried nodesAfter removing the lower leaves, I set the plant in the bottom of the pot and added medium-wet (see 'Wetness Of Compost') multi-purpose compost*.

Although not a good idea, I'm going to put the plants outside. The weather is cold and windy and the stems are moving around but, provided they don't break, this should strengthen them. With the plants hardly hardened off (they should be gradually acclimatised), all we need now is some frost.

* Because the whole plant is sitting nearly on the bottom of the pot with a relatively tiny root system, it is important not to drown the plant by adding too much water too soon. Remember that any water added will percolate down to the base of the pot. This is not normally a problem when the plant is at the top of the pot.

Make sure there are unrestricted drainage holes (these will also facilitate air entry, helping the roots take up water and nutrients) in the base of the pot; and delay further watering as long as possible, so the roots will go out all over the compost** seeking water.

** See also 'Potato Feeder Roots Fan Out In All Directions' to see how roots spread out through soil or compost.

Old Cuticles Are Sure Sign Of Pest Trouble

old cuticles on leafold cuticle on leaf (enlarged)If you find discarded cuticles lying around on your plant's leaves (this is a geranium leaf), it's a sure sign of pest trouble. These look like aphid cuticles, and aphids reproduce very quickly. So check the plant immediately and take appropriate action.

provado sprayI use thiacloprid spray (eg 'Provado Ultimate Bug Killer', which is a long-lasting systemic (enters plant and moves to where needed) pesticide. But you can use an organic spray, or even soapy water (some growers even wash them off with plain water). The only downside with contact pesticide sprays is that, because they work by contact, you must apply to the whole plant.

Potato Feeder Roots Fan Out In All Directions

potato feeder roots are fanned out in all directions, up and downThese are potato feeder roots fanning out inside a half-litre (pint) pot. Two weeks ago, I cut out a 1.25mm (half inch) cube (including an eye) from a sprouting tuber and planted it in damp soil half way down the pot (green).

The roots quickly encircled the pot. But what's interesting is that the roots fanned out in all directions, up as well as down. And the upper root (red) began to level out once it got within 1.25mm of the surface.
potato feeder root follows water, up and down
However, as the surface dried out, it turned downwards. I then watered the pot around the stem of the freshly-emerged shoot so that it did not wet the sides but sank down the middle of the pot. As you can see, the root soon changed direction and began to follow the water downwards.

Note: This root property of also growing upwards enables us to place tomato plants (these belong to the same family as potatoes) at the bottom of a pot.

Geranium (Pelargonium) Adventitious Roots

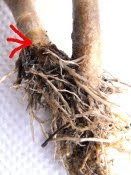
geranium (pelargonium) adventitious rootsWashing the soil off this geranium (pelargonium) cutting has revealed adventitious roots (marked with red arrow) growing from the stem branches which were below soil level. The cutting was started from the branch on the right; the branch on the left has grown from an axillary bud (see 'Taking Geranium Cuttings').

20 May 2011

Feathery Coriander Leaves

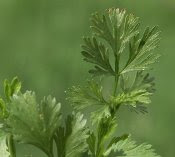
feathery coriander leaves are a sign it is going to seed
When coriander leaves become deeply fissured and take on a feathery appearance, the plants are running to seed. Although still edible, they become bitter. This happens from this time through till August in the UK.

I am not sure what causes this. Some say it's the hot weather. But I don't think it is. Coriander seems to grow normally during hot Augusts. So it could be caused by shorter summer nights (i.e. it's a 'photoperiodic' response (induced by daylength)).

Photoperiodism is common in plants in temperate regions where seasonal climatic differences exist; but I don't think it's so common in Mediterranean plants, as I think coriander is. I could do with some advice on this.

Plants constantly manage daylength using phytochrome in their leaves. Their many activities never cease to amaze me.

Revive A Summer Lawn By Watering Its Roots

patchy summer lawn
The recent long spell of dry weather has not done much for lawn growth in the UK. Roots have become starved of water, thus causing the turf to wither and die. I thought mine would be OK after all the treatment it had last autumn. Not so. As this recent photo - taken about three weeks ago - shows, it was looking decidedly patchy; yet it still felt soft under foot.


Always a handy tool, a garden fork soon revealed the problem: The patches of dying grass were bone dry underneath - so much so that it was sometimes difficult to get the fork into the ground because the soil had become hard. So there was nothing I could do except fork it all over and apply water into the holes. The fork test is a good guide. It should always be possible to push the tines into a lawn fairly easily; if you need to stand on it too much, water is needed - or soon will be.


TAKE IMMEDIATE ACTION

If you can see drought damage, it will already be well-advanced. So the sooner you take action, the better.


WETTING A DRY LAWN

Once a lawn dries out, it is virtually impossible to re-wet; the dry surface acts like a thatch roof, so water just runs off. We covered this last year when I showed how I get water into a dry lawn.


If all the above seems just a bit too strenuous and you don't mind running a sprinkler (or you're fortunate enough to have had some rain), you might be able to get away with just pricking the surface to get the water through the thatch.


I use a spiking tool if I can. But usually the surface has become too hard for the spikes to penetrate, so a sharp fork is useful.


WHAT YOU MUSTN'T DO

There is always a temptation to feed a dried-out lawn. DON'T - at least, not yet. Feeding a dry lawn is fatal, since it will invariably cause scorching. Always water first, then feed once it starts to recover.


WATERING ALMOST ALWAYS WORKS

In fact, I have found that WATERING WILL ALMOST ALWAYS REVIVE A LAWN, no matter how bad it looks. But the water must be applied to the roots not just to the surface. This is the stumbling block. Because it is easy to assume that if water is applied in abundance, it will find its way down. Take if from me - IT WON'T - it simply runs off.

Adventitious Roots Develop By Covering Dahlia Nodes

exposed dahlia nodes now need covering
This is the dahlia cutting, rooted in a tray, and planted last week. To encourage adventitious root development it is important to cover the nodes
(where the leaves join the stem) with moist soil.


dahlia nodes now covered with soil
I have 'earthed up' this dahlia to the point marked in red above, then lightly firmed the soil with my knuckles to bring it into closer contact with the stem. This has covered the nodes and lower leaves (I don't remove them, but you can if you wish) whilst providing enough leaf for the photosynthesis which will fuel further growth. This covering also affords some protection against frost; and also against slugs, which have suddenly become a problem.

As the new roots develop, growth should be enhanced because the plant will be able to access more food and water.

Reducing Water Produces Strong New Roots On Geranium (Pelargonium)

reducing water produces strong new growth on geranium
Look at the strong new roots growing on the geranium (pelargonium) we looked at three weeks ago. If you remember, it had been over-watered. (the pot weighed 370g (13 ounces)) before purchase and the roots weren't looking too healthy.

WETTING AND DRYING INDUCES ROOT GROWTH
By repeatedly allowing the pot to dry down to 7 ounces (about 200g) then adding 4 ounces of water (about 120ml), with no other watering, the aeration of the compost together with drying has produced this result. The pot is watered just as the compost, as seen through the holes in the base of the pot, is just starting to change colour. This now defines the watering regime for the plant.

NO FEEDING YET
I have applied no feed yet, since there will be slow-release feed already in the compost. This has meant I could not dry the pot out to its maximum. I did try to go further, but the leaves started to scorch. No matter. At least we know what the limit is. And new leaves will soon grow.

Multi-Plant Fuchsia Covers New Pot

multi-plant fuchsia started last October now fills a 3 inch pot
As expected, potting up the multi-plant fuchsia from a 51mm (2 inch) to a 76mm (3 inch) pot has really stimulated growth (see Coriander Re-Pot Increases Growth Rate And Leaf Size)

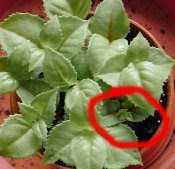
. The plant is looking fine except for a weak plant (ringed red) which seems to be getting left behind by the other eight (the pot was originally made up last October from 9 cuttings). So it's not perfect. But I'm still pleased with things so far. It's growing much more evenly than the other fuchsias, which look as if they have have spent too much time on the town. I don't know what's wrong with them.

Of course, there's still a long way to go. But by next year, provided we don't lose the plant over winter, it should be looking really good. I'll keep it in this pot until it's almost filled with roots.


14 May 2011

What If You Don't Make Compost, What Then?

Pick up any gardening book and you might be forgiven for thinking that if you don't make compost you can't grow plants in a garden. Of course, in reality this is an exaggeration; the choice is not so stark. Nevertheless, there is still a consensus which believes home made compost is necessary to improve a soil's structure and water retention properties. Well. Take it from me: It's not.

There are other ways to improve soil structure, and even to nourish plants. And I'm not talking about compost bought in from a local authority, or spent mushroom compost, or even composted horse manure. Of course, all these have their uses. And you will know the latter is a particular favourite of mine; it's absolutely wonderful for flowers, if applied early enough*.

No. I'm talking about the old multi-purpose and ericaceous composts sitting outside in pots and containers. And I'm talking about the old lawn rakings which I suggested you bag up. Each of these makes an excellent soil conditioner and will help all soils hold onto far more water and nutrients.

And don't forget that every time you put bedding plants in your soil, you are adding multi-purpose compost. It all adds up. And it's extremely beneficial. This is because it's not the soft green plant material which builds humus (essential to build soil structure). No. It's the old woody (containing lignin) material and other such almost indigestible stuff - which is very difficult to break down, even in a normal compost heap - which makes humus. And you don't need much of it. Just a little can work wonders on a difficult soil (sand or clay).

JUST BURY IT ALL
What hardly anyone mentions is that the soil can make its own compost. It's Nature's own waste disposal system. If waste material is buried (best to chop it up a bit first), and provided there is some free nitrogen and moisture in the soil (there is in most), soil fungi can get to work making humus through enzyme action (soil bacteria will also break down the other stuff, as well).

WHY ADD HUMUS
Humus in soil not only improves water holding capacity, but also imparts an electrical property called a 'cation exchange capacity', which allows soil to hold on to nutrient ions (because they possess an opposite electric charge), which might otherwise be lost through leaching. Its sticky nature will also bind the smaller soil particles into crumbs, thus aiding drainage and aeration.

* If horse manure is stacked (at least 1 metre square stack), then watered and turned every other day, it will break down into fine compost within a couple of weeks. As the stack cools down (it can reach 85 degrees Centigrade[**] (185 degrees F)), it will begin to cure and remove any excess ammonia. When the now dark straw is about half-covered with white actinomycetes, no smell of ammonia should remain. In this state, it can be used on plants at any time of year, either in the garden or in pots.
[** Need a larger stack to do this. Ideally, stack should be at least 2 metres wide, and 1.5 metres high. This will help keep the heat in whilst allowing some aeration. ]

Severing Coriander Roots Improves Growth

some coriander plants have now caught up with controlSince last month, most of the coriander plants with severed roots* have caught up with the control (red). It looks as if severing the roots - thereby inducing earlier lateral root production - can substantially improve growth.

The pot was left without water for a short period, so things have not been ideal. But, provided the plants do not run to seed, it will be interesting to see what happens from now on.

IMPLICATIONS FOR POTTING UP
Many growers pot their plants up into larger pots as soon as the primary root(s) encircle the base of the pot. Instead of this, why not break the root(s) off. The plant could then be left longer in its pot and produce a better root structure which should ultimately lead to a stronger plant.

I have always teased away excess roots encircling the pot of pot-bound plants, then broken it off before re-potting. Until recently, I thought everyone did this.

IMPLICATIONS FOR POTTING DOWN
Who said you 'can't squeeze a quart into a pint pot'? Not me. Not any more. What I mean is that it might be possible to quite severely trim the roots and re-pot a subsequently improved plant into a smaller pot. Of course, exhibition growers have done this for years. I am beginning to see why.

* plants with roots severed half way down the pot, and below

How Geotropism Can Build Drought-Resistance In Dahlias

dahlia shoots offset in potAsk any grower to plant a pot plant, and they will position it vertically in the soil. This is traditional, the way it's aways been done. But this technique is not too good if we want to build drought-resistance, especially in a shallow soil. So we are going to do something different, using a little geotropic wizardry. This offset young dahlia is perfect for our needs.

WHAT IS GEOTROPISM?
Geotropism is a plant's response to gravity. It's why roots grow downwards (positive geotropism) and shoots grow upwards (negative geotropism). What this means in practice is that it doesn't really matter which way around we put our plant in the soil, it will eventually correct itself. Of course, this takes time, especially if the plant is inverted, but nevertheless it will be done.

dahlia planted on side to lower nodesBecause this plant is short-jointed (compact), it will fit on its side in the planting hole, so that the plant is as deep as possible. And it doesn't even matter if the roots are above the stem. What does matter is that each node on the stem can produce new roots and shoots much lower down in the soil than would otherwise be possible.

This should work fine. But you will need to take care you don't snap the shoot off when filling the hole. Put some soil beneath it to give support, then water it in around the shoot.

See also:
Producing Drought-Resistant Dahlias In Shallow Soil
Dahlias Started In Trays Are Short-Jointed

Dahlias Started In Trays Are Short-Jointed

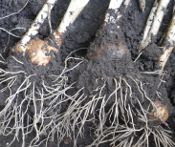
nodes on dahlia tuber in trayThis dahlia tuber hasn't grown much since planting in soil in a seed tray nearly two months ago. I believe this to be good news. Can I explain:

It's not how MUCH it has grown, but the TYPE OF GROWTH it has made, which is important. Keeping cool, in good light, and restricting water and space has produced a miniature plant - one that is far more short-jointed than traditional dahlias started early in pots, especially if heat has been applied.

So what? Why is this important? Surely we want the plant to get big as soon as possible, don't we? And what does it matter how short-jointed a plant is if it is to be buried in a hole?

Well, I think it matters quite a lot. As you can see, there are at least three nodes within the first 2.5 inches (7 cm) of shoot. And because the soil in the tray is shallower than a pot, this sets the plant lower in the ground . . . And because the nodes are so low, they will be even deeper in the ground where there should be even more moisture . . . And because each node can produce an additional set of adventitious roots, we should have some great growth potential . . . And because each node should produce two new shoots, we should get more flowers . . . And because the shoots are coming from below ground, the plant should be more compact and more stable, so should not need staking. The advantages seem almost endless. The only problem is that there's a lot of catching up to do - it's that 'tortoise and hare' thing again. Will there be enough time left in the season? Let's hope so.

See also:
Producing Drought-Resistant Dahlias In Shallow Soil
How Geotropism Can Build Drought-Resistance In Dahlias

Natural Rain Water Is Best

The recent rainfall has done wonders for the soil. And now with overcast conditions, moist soil and constant showers, it's almost perfect (apart from the wind) for planting. After deliberating long and hard, I decided to lift the daffodils early and get some more dahlias in, just in case the dry weather comes back.

It's always best to work with nature. But, apart from this, I don't like watering, at the best of times - I always feel it's cheating, somehow. And plants don't grow as well on tap water as they do on natural rain water.

daffodil bulbs after liftingLaid bulbs, leaves in tact, out on floor in a cool, light spot, out of direct sunlight. Will have to watch they don't dry out. Normally, flowering has been over for 3 or 4 weeks by this time. But this year, because I used a mixed bag of bulbs, some flowers have only just finished. Growing is always a compromise.

6 May 2011

Inducing A Geranium (Pelargonium) To Branch

Now we have sorted out the watering and the plant has had time to settle down and become familiar with its new surroundings, we can start to shape it how we want. Since each branch has the potential to end in a flower, and since we want lots of flowers (at least, I do), we need to induce it to branch.

remove meristem of geranium stemTo do this, we remove the young growing tips at the end of each stem, since these contain the apical meristems . This will remove their dominance effect and allow the axillary buds in the leaf axils lower down the stem to develop into side shoots. It's the same process as pinching out a fuchsia.

Were we really keen to produce new green growth, we could remove the flower bud as well. But there's no hurry. The plant already has three stems, and the flowers should give us some pleasure as it matures.

meristem removedIt is often difficult to know exactly where the meristem is. Although the newest leaf has been removed, this is not, in fact the meristem. This is in the tiny (youngest) mass of tissue attached to it. So, just to make sure I have removed everything, I have removed this newest leaf, as well.

Branching could have been induced later, but it's a good idea to start it as close to the base as possible.

Note: You need to be able to see the axillary buds in the leaf axils - they are not always present.

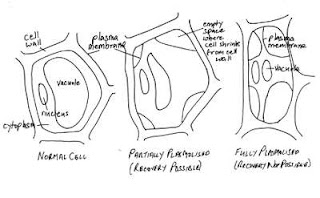
Stages Of Plasmolysis In Hypertonic Salt Solution

If cells are exposed to a hypertonic salt solution, water leaves as the vacuoles (which contain most of a cell's water) shrink (see how water enters root hairs), and the cytoplasm gradually shrinks away from the cell walls, leaving empty spaces. This condition is called 'plasmolysis'.

stages of plasmolysisThe far left diagram shows a normal cell in a hypotonic solution. After placing in hypertonic salt solution, plasmolysis begins. In its early stages (central photo (sorry, not to scale)), wilting occurs which, in the early stages is reversible by placing plant in plain water. However, as plasmolysis progresses, the cytoplasm shrinks so much that it often causes the roots to shrink also. This stage is fatal - there is no recovery potential.

Note: we also saw this condtion over winter when we looked at cell freezing.

Parasol Plant Might Need Different Watering Technique

new growth starting on parasol plantThis new growth on the over-watered parasol plant indicates recovery. The plant has not been watered for 17 days.

compost of parasol plant shows water gradientI don't know if you can see, but the bottom of the compost is still quite damp. So needs no water, yet. However, most of the rest in this 7 inch (17.5cm) pot is almost bone dry, especially the original compost above the lime arrow (the plant has been in this pot about 15 years, but when it fills with roots, I remove the lower part and replace with fresh compost. This has been done two or three times)

This dry compost is probably the cause of the over-watering trouble. Were I to water the pot now, the water would run off the dry compost, straight to the bottom of the pot, leaving the roots once again soggy. I haven't really thought about this before. But perhaps a better plan might be to start spraying the top of the pot with tepid water, thus gradually dampening the compost from the top. This would then allow the roots higher in the pot to become active. And the excess water would gradually seep down.

This wetting of dry soil or compost is a real problem, especially during a dry spell of weather. If you have some dry soil, throw a bucket of water onto it, then scrape away the surface to see what has happened. I promise you, you will be amazed. I certainly was when I first tried it.

How Hypotonic And Hypertonic Solutions Affect Water Uptake In Plants

how water enters root hairs

Although not so-far described in detail, we have seen that water enters plant roots through the root hairs. Each hair is an extension - up to a length of about 4 mm - of a single epidermal cell (the epidermis is the outermost layer of cells on a herbaceous plant). Because these hairs are so fine, they are able to work their way around individual soil particles and absorb the water surrounding them. This is done by osmosis.

Soil solution is usually HYPOTONIC (contains proportionally more water than solute) to the cell contents of the root hairs, so water moves INTO them by osmosis.

However, problems arise when, for some reason, the soil solution becomes HYPERTONIC (contains proportionally less water), since this causes water to move OUT of the roots hairs and into the soil solution. This is dangerous, since it initially causes wilting, then eventually plasmolysis (when the cell contents pull away from the cell wall) and, eventually, death.

HOW SOIL SOLUTION STRENGTH VARIES

Soil solution strength varies:
  • naturally
  • induced
NATURAL VARIATION BY DRYING
As the soil and its solution dries, it loses only water, not solute, and becomes more hypertonic to the root hairs

INDUCED VARIATION BY FEEDING

Liquid feeds are a prime cause. If too strong, they can easily be hypertonic to the roots, especially as the soil dries and loses water. Great care should always be taken when feeding. It is so easy to damage a plant. This is why I do not recommend feeding young plants (plants are more vulnerable when young).

Another cause is positioning strong feeds and composts too close to the roots. I always leave a distance of at least 5 cm (2 inches), and even this is hardly enough. I also try to place feed to the side of the roots, if possible. This way, they don't have to grow through the feed - they can take it, or leave it alone.

There is a lesson to learn from all this: FEEDING IS EXTREMELY DANGEROUS AND SHOULD BE AVOIDED WHENEVER POSSIBLE

Dahlias In Beds Have Survived

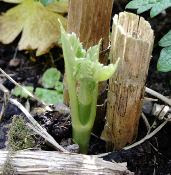
new dahlia shoot in garden is now peeping throughI never expected to be able to show you this - a new shoot springing from a dahlia overwintered in a flower bed - not after the winter we have just had. I did not cover the plants. They were left untouched in the beds about 10 to 15 cms (4 to 5 inches) deep. Amazing. Dahlias definitely do seem much more frost tolerant than we think - unless I just have some frost-tolerant varieties.