The water does not seem to be soaking down into the lawn quickly enough (after 24 hours). I gave it 1.25 cm (half and inch) of water yesterday. Should be soft down a few inches by now.
I could get the fork down 4 cm (inch and a half) yesterday. But it was hard as concrete lower down. I'll give it another day or two to see what happens.
28 May 2010
Thatch Should Do It!
Meet Spike.
 To get water into my lawn when it's dry, I use a lawn spiker. It punches nail holes in the turf as I push it along. Fantastic.
However, there is one proviso: The lawn needs to be soft (i.e. moist) first - too hard and it just bumps along over the surface, like it did yesterday. It's a chicken-and-egg situation.
This is where patience comes in. Wetting the surface layer allows the spikes to get a hold, then they will dig into the thatch, making holes for the water. But it's not easy. In fact, it is just about the hardest job in my garden.
If the thatch will not wet, then a few drops of washing-up liquid applied with a watering can (use an eco-friendly washing liquid if you wish) works wonders. They act as a surfactant (I think that's the word for a wetting agent) and reduce the surface tension, thereby facilitating wetting. However, I don't like doing this, because water from down below reaches the surface, soil particle by soil particle, using this same surface tension. Removing it could deprive the roots of water. I don't know this, but I suspect.
A sharp garden fork is a good tool for breaking through the thatch. You don't need to spike it all: just dry spots.
Watering in the Rain
Everyone thinks I'm mad when they see me watering the lawn whilst storm clouds gather overhead. 'Doesn't he know he's wasting his time?' 'It'll be raining soon?' (What? Not you, as well?). Of course, they don't actually say that I'm mad - not to my face, anyhow - it's just a feeling: a very strong one (could it have something to do with the looks I get!).
But after a long dry spell, this makes a lot of sense to me (the watering, I mean). Wetting the surface allows rainwater to penetrate the surface, rather than run off and be ineffective. A dry lawn acts like a thatched roof!
The same principle applies with a sprinkler - often more so since they put out water very quickly. It is a good idea to run a sprinkler for a few minutes only, just to wet the surface, then wait for several hours (best left overnight) before continuing in short bursts. I have found this to be effective. I place a plant saucer under the sprinkler to guage how much water has been applied.
 Normally, I like to apply water in 1cm (1/2 inch) sessions, giving enough (usually about 2.5cm (1 inch) in total) so the fork tines will easily go down full depth. Any resistance indicates water shortage (or compaction - or both).
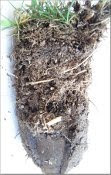 My lawn (and probably yours also) contains more than just thatch. This plug (taken out with an auger) shows about 4.5 cm (1.5 inches) of impenetrable old roots and debris. Hardly anyone ever mentions this in the gardening books. We are led to believe that thatch is that stuff on the surface which can easily be raked off (well, with nothing more than a light sweat).
I have tried for years to remove this thatch. It will come off with a mechanical scarifier, but it leaves nothing behind. It's not like this all over the lawn, just in patches. The way to remove it is to add lime and to keep moist and aerated. We are led to believe that lawns will not grow with over half an inch of thatch. Tell me about it.
Compaction Story
One spring, about fifteen years ago, the lawn just wouldn't grow. Oh, I had given it all the treatments - twice over, just to make sure. It had been fed, watered - the lot. Still nothing. It stood there like a worn-out cricket pitch. Weeks went by. Still nothing.
Then, one day, I noticed some growth. Not where it should be, in the centre of the lawn, but around the edges. Recent heavy rain had moistened the borders around the lawn. The problem seemed to be water. The edges had soaked up water from the borders.
But how could it be water? Apart from that month, it had been raining since the previous autumn. It couldn't possibly be short of water, could it?
It was. When I dug through the surface, the soil was bone dry, set like concrete underneath. I could not believe my eyes.
Then I looked at the inch and a half of thatch which was standing between the soil and the rainwater. It too was bone dry.
I got a fork and forced it down through the thatch (It was so hard I had to jump on the fork. It is like this again, now) and stirred it around. In fact, I had to move the fork around just to get it in. I did this all over, then filled up the holes with water. After this, further water went in as if by magic. It hardly seemed to take any water to wet the deeper layers, whereas I had had the sprinkler running for hours before. Amazing.
This problem is called 'Compaction'. Of course, I had heard of it, but thought it was caused by children playing on muddy turf. I had no idea that it applied to almost every lawn in the country. Yes, it will apply to yours as well. Give it a test.
TEST FOR COMPACTION
If you can easily push a garden fork into the surface to full depth on a dry lawn, then things are O.K. If you can't, then there is a problem. The fork is the test. It never fails.
 The tool on the left is a hollow-tiner. You push it into the soil and it takes out plugs to let in air and water. There are mechanical versions if this seems like too much work. Professional lawn companies will do it for you. But it's expensive. And it only lasts two or three years.
Then, one day, I noticed some growth. Not where it should be, in the centre of the lawn, but around the edges. Recent heavy rain had moistened the borders around the lawn. The problem seemed to be water. The edges had soaked up water from the borders.
But how could it be water? Apart from that month, it had been raining since the previous autumn. It couldn't possibly be short of water, could it?
It was. When I dug through the surface, the soil was bone dry, set like concrete underneath. I could not believe my eyes.
Then I looked at the inch and a half of thatch which was standing between the soil and the rainwater. It too was bone dry.I got a fork and forced it down through the thatch (It was so hard I had to jump on the fork. It is like this again, now) and stirred it around. In fact, I had to move the fork around just to get it in. I did this all over, then filled up the holes with water. After this, further water went in as if by magic. It hardly seemed to take any water to wet the deeper layers, whereas I had had the sprinkler running for hours before. Amazing.
This problem is called 'Compaction'. Of course, I had heard of it, but thought it was caused by children playing on muddy turf. I had no idea that it applied to almost every lawn in the country. Yes, it will apply to yours as well. Give it a test.
TEST FOR COMPACTION
If you can easily push a garden fork into the surface to full depth on a dry lawn, then things are O.K. If you can't, then there is a problem. The fork is the test. It never fails.
 The tool on the left is a hollow-tiner. You push it into the soil and it takes out plugs to let in air and water. There are mechanical versions if this seems like too much work. Professional lawn companies will do it for you. But it's expensive. And it only lasts two or three years.
Lawn Disaster
 It doesn't take much to destroy a lawn - just one foolish decision. Definitely needs watering now!
Still, at least we know that the roots will have gone down as deep as possible. And if it weren't for my vanity (I like to have a green lawn), there is a case for not watering, especially where there is evidence that some grass is surviving. Although this patchiness will look unsightly in the short term, the good grass often gradually spreads out over the weaker grasses, thus making a more drought-resistant lawn.
However, there is a risk. Utility lawns are often not able to do this. And they tend to be made up of less drought-resistant grasses (perennial ryegrass). The best way to deal with this type of lawn is to cut it to 2.5 cm (one inch) to produce a thick blanket of turf to reduce water loss. Then water at the first sign of trouble.
27 May 2010
Hosta Now
 The blue hosta is not so bad as I had feared. So it looks as if the slug and snail treatments might have had some effect. It was certainly much worse than this last year.
I am left wondering that it might not have been snail problems after all, but wood pigeons. Anyway, whatever it was, I am glad I don't have to suffer the humiliation of a collander-like plant all season.
'Gardening Which' did an article on slug and snail resistant hostas in their recent May edition. Although some were better than others, nothing really worked perfectly.
21 May 2010
Snailed Again
 I knew it! Something told me the other day to check the hostas for snail damage. I forgot. This is the result.
Once these leaves have opened out, they will look awful. So am going to remove them and hope for some re-growth. Don't know if they will re-grow. But I can live in hope.
So much for the prevention methods. Looks like it will be 'back to the drawing board'. Think I might dig up the hosta and put a couple of fuchsias there instead.
There is some possibility that it might not be snails: I have seen a couple of wood pigeons around recently. And the holes do look rather ragged, as if they have been torn, not chewed. But, having said this, there seems to be some slime on the back of the leaves, which would indicate slug or snail damage.
Always follow your instincts. They keep you in tune with your plants more than you might think. This has been my experience.
Not Sure I Should Have Cut It
I always cut the lawn a touch higher in hot weather, to give it a bit more strength. It was beginning to feel hard under foot last night (it is best to cut lawns in the evening as the sun is going down, to avoid water loss), but I cut it because it might have been too long after another 3 or 4 days.
And because I was in a hurry, I didn't raise the blades.
It looked all right this morning, but it would have been better left.
A sprinkler would be useful. I usually give it a really good drink to see it through a hot spell. But I am trying to avoid using one this year. Might be changing my mind soon, though.
Resisting the Heat
As tempting as it is during a spell of hot weather to rush out into the garden in the heat of the day and put in the bedding plants, we need to bear in mind one thing: Most plants do not like hot weather, especially when they are very young.
So, if you can restrain yourself 'till evening, when the sun is weaker, this is the best time to plant. But make sure everything has been well-watered first. And water again after planting.
But what if you just cannot wait? What if mid-day is the only time available?
Well, get yourself some sheets of newspaper, or kitchen towels (split each into 2 layers) and pop these over the top of the plants to keep off the hot sun, just for a few hours. It will work wonders. And you can wet them if you wish.
It's a pity newspapers look so unsightly, because they make a wonderful insulator for the soil, as they reflect the sun's rays. They are also porous, moisture-retentive and biodegradable. Yes, it really is a pity they are so unsightly.
19 May 2010
Update on Geranium
The geranium (pelargonium) you saw last week has survived. However, the leaves pictured still look the same. But, unlike flaccid (dehydrated) leaves, they are now quite firm, not limp. And they have got some sheen back - they don't look like dull suede shoes any more. Looks like the problem might be some weedkiller on my hands, or similar.
Many weedkillers contain plant hormones which incite plants to do strange things. Too high a concentration is usually fatal for plants (that's how they kill weeds).
Some plants are very sensitive. I shall never forget, years ago, watching my roses keel over after 'smelling' 2,4-D. I have washed the watering can out more thoroughly ever since.
I don't really think the problem is weedkiller (I hardly ever use it). But I can't think of anything else it could be.
I'll just give them a bit more of a rest, then tell you how to restore them, like new.
Storing Daffodil Bulbs
With the dahlias now coming through, it is time to lift the daffodil bulbs and crocus corms. I know this is not recommended, but I left them in for the first time last year; and of those planted in soil, I lost every daffodil bulb except one. Those grown in compost in the pots survived.
Have had a problem with bulb rot (not sure which one) for a few years, now. Usually remove soft bulbs before re-planting in autumn.
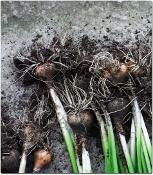 I always leave the leaves attached. These die back naturally and the bulbs dry out on the concrete floor. This ensures there will be enough feed going into the bulb to support flowering next year. I used to have a problem with blanks. But this seems to have sorted it.
Once sure they are absolutely dry, I hang them up in an open supermarket carrier bag, making sure the air can get around them. This seems to suit them fine.
Dividing Begonia Tubers
 Sorry about the photo. Hope it is clear we are about to cut through a mature begonia tuber with a knife.
If we want maximum flowers per plant, there is no need to do this. However, if we want bigger blooms, it is best to limit the number of shoots to two or three. This way there is more food available per shoot.
Each half was planted in a separate pot of multipurpose compost, five centimetres (2 inches) below the surface to allow the roots which will develop on the top of the tuber (begonias are unusual in this respect) to take in water. This gives better results.
Some say that dividing in this way reduces the vigour of each tuber. But I can't say I have found this. They have always done well.
Sneaky Vine Weevil
 Look what I found overwintered with a begonia tuber. Before planting, it is best to remove as much peat or soil as possible from around the tubers. I only just spotted this vine weevil. I must remember to treat the plant later in the year in case I missed any others.
It is unusual to find grubs at this time year. Normally they would have pupated into adult weevils by now, ready to lay a fresh lot of eggs in the autumn. It really is a strange season.
We're Through
 This is one of the dahlias from which we took cuttings after hurrying it along in the propagator. During the last warmish spell, I planted them all outside, leaves and all, so that the tips of the leaves were about 2.5 cm (1 inch) below the soil surface. As you can see from the pinkish edges, this has done them no harm whatsoever.
These plants will now be as tough as old boots, and well able to withstand the cold. I don't cover them. If we get a severe frost, then this will only kill the leaves; they will re-grow from below.
Note how dry the soil is. I will not water them yet, to encourage them to form deep and extensive roots. This should save much work later on.
P.S. Those planted in March are just showing through. But they were put in much deeper. This warm spell should really speed things up.
15 May 2010
Cutting a Summer Lawn
 Lawn is looking a bit better than in March, although still not right. Just given it the second half of the first summer feed.
I have started cutting twice per week now.
CUT EVENLY AND OFTEN
If there is one thing more than any other which gives a good lawn, it is CUTTING - REGULAR CUTTING to a constant height. Lawns, probably more than any other plant (a lawn is millions of little plants) is a creature of habit, for reasons we shall soon discover. Even if you do this every fortnight, your lawn will soon adapt and form a turf. But whatever you do, keep it constant and regular.
For a rough-and-ready utility lawn, and using a rotary mower (the one with the horizontal single spinning blade, like a propeller), cut at 1 inch. This will give a nice lawn after a short time, especially if it is fed as well.
However, to get a tightly-knit fine turf, use a cylinder mower (the type most people don't use) with a cutting height of about 1/2 to 3/4 inches. This is usually about right for maximum growth consistent with maximum thickening and drought-resistance.
I know the purists will be screaming that it needs cutting shorter (down to 1/4 inch) to give a tight turf. I do not agree - not on my lawn, at least. Cutting too low causes scalping (especially with a rotary mower) on an uneven lawn, thus severely disfiguring it and opening the door for moss problems.
But worse than this, it also makes it less drought-resistant. A thicker turf insulates the surface against excess water loss, since it contains air.
THE CARDINAL SIN
The worst thing you can do is leave it too long and then cut it down too much. If you do this too often, you will destroy your lawn.
Troubleshooting Sickly Geraniums
 These dark green drooping leaves say that all is not well. But what?
Yellowing and drooping leaves are signs of:
cold
lack of water
too much water
exhaustion
shock
pests
virus disease
over-feeding
 These roots are fine for their age (at least 3 years old). They are not brown and rotting.
The compost is dryish, but not completely so. It is certainly not soggy.
Rules out over-watering.
No grubs among roots, nor any sign of damage (chewing). Nothing in leaves either.
Rules out pests.
Could it be the recent cold nights (down to 0 deg C)? Yes, but if it is, there is not much can be done apart from moving away from window.
However, WE CANNOT TAKE THE CHANCE THAT THE PROBLEM IS OVER-FEEDING/LACK OF WATER. DRASTIC ACTION NEEDED; ELSE IT WILL BE TOO LATE, IF IT IS NOT TOO LATE ALREADY.
The pot is not actually light enough (i.e. lighter than it normally is before watering) to signal water shortage.
So what is different? What have I done that I don't normally do?
Eight days ago, I gave it a feed with a high nitrogen feed. Not too much. But I did apply it at the maximum recommended rate; and I gave a lot more than normal. As outlined elsewhere, this plant has hardly ever been fed - and then with a high potassium feed ('Phostrogen Plant Food'). So there could be a shock effect here. The plant is asked to suddenly start soft growing, whereas it has only ever known hard growing.
However, more likely, judging from the limp dark green leaves (they are far darker than normal), is too high a concentration of feed in the compost, causing water to be drawn out of the plant roots by ex-osmosis. This is also consistent with the sudden onset of the wilting.
But whether this is a correct diagnosis or not, we must get water into the plant, if possible.
Gave it a thorough soaking and left it to drain before placing it in a light but not a sunny spot. This should take the pressure off and allow it to recuperate. Hopefully, it will now recover. And definitely no more feeding for a long time; then back to 'Phostrogen'. Time will reveal the problem. But keeping the plants alive is the essential priority.
11 May 2010
Lumps and Bumps
 Just in case you're wondering, can I make something quite clear: This is not the lawn! No, it's a field of spring corn.
This lumpy soil has stood up to the recent rains very well, unlike the one we saw last week. This is almost certainly because it contains more humus (formed from organic matter), which gives it structure.
Before planting seeds, many of us think it is necessary to break down soil almost to dust. Not so, as you can see. Provided there is enough food in the seed to sustain growth until the young shoot (plumule) can reach light, lumps can be accommodated quite easily. In fact, they are a good thing, because they help maintain structure. Even very fine seeds would germinate in a soil such as this, although perhaps not so well as they would in a finer one (Bet you're glad to hear that!).
Another common misconception is that all stones need removing. A surface containing small stones can be a very good thing, especially if the soil has a tendency to pan. As soil dries, it shrinks away from the stone edges leaving gaps, thus allowing air and water to penetrate where it could not before. i.e. It keeps the surface open.
Feeling the Pinch
INDUCING BUSHINESS
 Removing the growing tip at the top of a plant allows the buds lower down the stem (in the angles where each leaf joins the stem) to develop into new side shoots. This makes the plant bush out, rather than growing up into a long single pole.
This principle is called 'stopping' or 'pinching out' and will work for almost any plant.
The process is repeated after every couple-or-so pairs of leaves have developed on each side shoot.
If the plant is watered the night before, the tips will probably snap off just by bending them over.
The new fuchsias have only been stopped once, after the second pair of leaves. Consequently, each plant has four shoots, each of which needs shortening. I have been agonising over whether to leave two or three pairs of leaves on each shoot. Decided to stop after three. This should give nine new branches per stem, thirty-six in total (plus any others which might develop from the base). Since it takes about eight weeks for single fuchsias to flower after stopping, they should be in flower by the end of July. There might be time for another stop. We shall have to see.
Controlling Weeds in the Lawn
If the weeds in your lawn are driving you mad, and if you cannot/do-not wish to dig them out, then help is at hand. I have found 'Verdone' to be an excellent lawn weedkiller. 'Verdone' can be applied by either sprayer or watering can. Spraying is best because it does not use as much. So not only is it more economical, there is less risk of weedkiller getting into the flower beds (it can be washed off the surface in heavy rain), or even into the water supply. Just carefully follow the instructions. If you do this, success is virtually guaranteed, with a few provisos:
Because 'Verdone' is a systemic weedkiller, it works as the weeds grow. This will take a few weeks and means that if weeds such as dandelions are close to releasing seeds, you will have to remove the seed heads (or even the flowers) by hand.
You need to watch out for rain. Systemic weedkillers need to be on the weed leaves for a certain length of time to ensure they have entered the plants. The instructions will tell you how long.
The weeds must be growing - actively growing.
You must not spray in wind, or the weedkiller might drift onto your favourite plants.
You need to keep your pets indoors until the weeds are dry, and watch your fish.
Most people feed, weed and mosskill their lawn by applying granular fertilizers. Nothing wrong with this. But they are much more difficult to use, and quite often cause scorching at this time of year, resulting in permanent damage to the lawn. A sprinkler is a good thing to have if you intend to use this type of weedkiller.
FOLLOW-UPS
Once the weeds have been killed, you might get the odd one germinating here and there. Instead of treating the whole lawn again, I use a spot weedkiller to zap them one by one. You can buy spot lawn weedkillers from garden centres, but it is cheaper to make up your own. I use an old kitchen spray, but you can buy small hand-hold sprayers.
A word of WARNING here. Make sure you are using a LAWN spot weeder, not a general purpose garden one. Lawn weedkillers are SELECTIVE - they kill the weeds but not the grass; general weedkillers (e.g. glyphosate) are not - they kill most growing green things.
Wear gloves and avoid inhaling the spray. Wash out everything thoroughly after use, especially the watering can. You need to be especially careful. Wash it out 3 or 4 times. Even better: buy one in a different colour just for weedkillers.
MOSS Moss should not be a problem now, as it will die off in the dry summer weather. If you can buy it, 'GreenUp' (55.5% ferrous sulphate) is extremely good. 'GreenUp' (made by Vitax) contains no lawn feed, so can be given at any time. All you do is dilute it in water and apply with a watering can or sprayer. It will turn the moss black before your eyes. If your garden centre doesn't sell it, it is worth asking them to get it in stock. It is especially useful over winter when you can nip moss in the bud without applying feed. If you wait till spring (the traditional method), it is too late: much of the grass will have been killed.
A cheaper way of killing moss than using 'GreenUp' is to use ferrous sulphate crystals. These can be bought from fertizer suppliers.
More New Kids
 It's no use. I just can't face all those lettuce (most of them have taken) without some tomatoes. So, against my better judgement, I picked up two 'Ailsa Craigs', the last two left in the nursery (I only wanted one, but I couldn't leave the other).
 When I got them home, I could see why no-one wanted them. I suffer from this rare kind of purchasing blindness. I just cannot see faults whilst someone is stood over me (I suppose it might be like the publishing blindness I suffer with this blog - I can't see any faults until it is published).
 Apart from the fact that they have been neglected (as seen by the dry roots showing through the base of the pot, the elongated shape and the pale lower leaves), I was alarmed to spot this brown base on one of the plants. It looks suspiciously like root rot.
 However, as you can see, the roots look quite healthy (they are white, not brown). And the brown base of the stem is firm, not soft. So we might just get away with it.
Re-potted them into 11.5cm (4 1/2 inch) pots of ericaceous (lime-free) compost.
Did not water; compost was moist enough for now.
New Kids on the Block

 Picked up these two fuchsias over the weekend. I thought you might have had enough of geraniums (pelargoniums) for now (Don't worry, they will be coming back!).
I wanted to show you how I grow begonias (which, unlike geraniums, are partial-shade, moisture-loving plants). But with the season being so late, there might not be time, especially since I haven't planted most of them. Fuchsias can be handled in a similar way to begonias (they also love moist semi-shade) but they grow much quicker.
I must admit, fuchsias have never really appealed to me before. But, for some reason, my opinion is changing.
'Hawkshead' (right) is a hardy bush fuchsia (it can be left in the ground over winter) which grows to about 1 metre. There is a permanently-damp, semi-shaded (does not get the mid-day sun) spot in the front garden behind the wall, which should suit it just fine. But keeping it in the pot for a while yet, so we can get some growth.
'Gartenmeister Bonstedt' (left) is a dark salmon coloured, cluster-type triphylla hybrid (has long thin finger-like flowers) with bottle-green/purple foliage. It should also do quite well in a container.
8 May 2010
Hello, Mr. Toad
 I spotted this little fellow on the lawn. Never seen one here before. Should help in battle with slugs and insect pests.
Pricking Out Lettuce
Lettuce seedlings getting too cramped. Need transplanting (pricking out). But this cold windy weather has caused a problem.
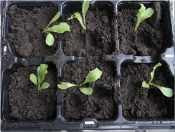
 I like to prick out tiny seedlings at this stage, just as the first true leaf (the one which looks like the plant) is emerging between the two cotyledons. However, with the weather being so bad, I have left it rather too long. So am now forced to transplant them, weather or no weather.
 I am putting some in the container outside, which we prepared earlier. No, they are not weeds growing in the centre, they're our spring onions!
Instead of giving them a full spacing of 20cm (8 inches), I am cramming them up a bit (10 cm). If they all take, we can remove some before they are fully grown to make room for the others.
We need to keep a close watch-out for slugs.
With the winter now fast approaching, I am not too hopeful of success.
 Old plant trays are really useful at times like these. After washing out and filling with soil (or compost), I am putting some lettuce in as an insurance, in case we lose those outside. I haven't covered the tray (you can buy perspex covers for these trays in garden centres), but have made sure they are well-watered and kept warm but out of the sun. If they wilt too much, I will cover them later (and/or spray with clean water).
You can buy non-heated propagators in garden centres, which are this size (half full seed tray) and ideal for placing on a windowsill. I saw one this year which had a base tray to hold 3 propagators.
The trick with transplanting is to be very gentle with the plants. Take care not to bruise them, and not to disturb the soil around the roots any more than necessary.
5 May 2010
Dealing With Ground Elder
ssGround Elder is one of those really difficult perennial weeds which always seem to establish themselves around the roots of our plants and/or in other difficult positions. Its roots spread out far and wide and are difficult to fully access. If not completely removed, it can re-grow from bits of root left in the ground.
 Here it is under paving, wrapped around the roots of a conifer hedge, where it is virtually impossible to dig out. Until recently no weedkillers were capable of destroying it without also destroying the hedge.
Glyphosate has changed all this. This is a systemic weedkiller which can enter through the leaf pores (stomata) and travel in the sap down to the roots, thus making it possible to kill the weed. Unlike previous systemic weedkillers, it is inactivated in the soil, so presents no risk of harming the hedge.
With the warmer weather approaching (we hope!), now is a good time to apply this weedkiller, which works much better when the weeds are growing quickly.
I use an old kitchen spray as a spot weeder to spray, especially the stomata on the underside of the leaves. You can buy glyphosate sprays in the garden centres. Take care only to treat the weed. And do not apply so much that it runs off.
Glyphosate is also available in gel form and comes in a bottle with a brush in the cap. This is useful where access is limited.
Always wear gloves when dealing with weedkillers, and be careful not to touch anything else before washing your hands.
Glyphosate is safe to wildlife and pets, once it has dried.
Cutting Revival
 After 12 days, our wilting dahlia cutting has now revived (actually, it has been revived for a couple of days now). I don't know if you can see the pinky-red edges. This is usually a very good sign.
 The pot is feeling rather light, in need of some water. I am going to add a little around the stem of the cutting to ensure it does not dry out. Any excess will then be mopped up by the surrounding compost. This way, we can be sure it will not become water-logged, thus preventing air getting to the base of the cutting (oxygen is essential to the rooting process).
The idea with cuttings is to keep the compost just moist enough to prevent the cutting from drying out, but not so wet that it will block air passage, thus causing the cutting to rot.
Basil Re-Pot
 At long last basil has grown enough to be re-potted (basil was the first planting way back in March).
It really needs thinning out a little, but it is notoriously difficult to split up. So if I put it into a 10 cm (4 inch) pot, it should have plenty of room to spread out.
I think it must have been the cold temperatures which have made it grow so slowly. Still, at least we have some basil, even though I did have to germinate it in a propagator.
4 May 2010
Get Hoeing
 The recent rain has germinated annual weed seeds. This dry spell is an ideal time to get the hoe going, before these weeds start seeding. Because the soil is drying fast, be careful not to go too deep, since this will cause too much water loss. Keeping the hoe to the top 2 cm or so is sufficient to kill the weeds, which will shrivel in the sun.
Hoeing will also help keep the slugs at bay. These do not like moving on loose dry soil.
Because hoeing loosens the top layer of soil, it will sever the capillarity link between the soil surface and the lower layers. This prevents water wicking its way up to the surface of the soil and being lost to the atmosphere. In other words, hoeing in this way conserves water.
The loose surface layer will be very useful later in the summer, since it insulates the soil against the hot sun (because it contains more air). As it dries, it turns lighter in colour, thus lowering the surface temperature by reflecting the sun's rays. This also helps reduce water loss and helps the roots perform more efficiently.
Coriander Finished
 Just as it was starting to get going after re-potting, the coriander has started to bolt (run to seed). So cut up and put in freezer. Still, we have had our money's worth out of it.
Coriander is notorious for bolting at this time of year, but this variety was supposed to be resistant. Just shows that we cannot always go by what is written on the packet.
Seeding is mostly a photoperiodic (controlled by daylength) response. Had the season been a bit warmer, there would have been a much heavier crop by now. Maybe next year?
Panned Soil
, be As you can see, the recent heavy rain followed by sun has baked this soil surface into a hard crust (pan). This is partly because there is little structure in the soil to resist this, but mostly because it was broken up too finely before planting.
This pan needs to be broken up immediately, since it is preventing oxygen getting down to the roots. And roots cannot take in water without oxygen, contrary to what we might suppose. It is also preventing other essential gaseous exchange.
A Dutch hoe is an ideal tool to use, since this will also kill off any small weeds which might be gaining a hold.
To give a soil more structure, we can add organic matter to it in spring. This will be broken down by the soil micro-organisms to form humus which has the effect of sticking the finer particles together to form larger ones (crumbs). Not only do these allow gases to access and leave the soil more easily, but they also resist this panning.
 As you can see, the recent heavy rain followed by sun has baked this soil surface into a hard crust (pan). This is partly because there is little structure in the soil to resist this, but mostly because it was broken up too finely before planting.
This pan needs to be broken up immediately, since it is preventing oxygen getting down to the roots. And roots cannot take in water without oxygen, contrary to what we might suppose. It is also preventing other essential gaseous exchange.
A Dutch hoe is an ideal tool to use, since this will also kill off any small weeds which might be gaining a hold.
To give a soil more structure, we can add organic matter to it in spring. This will be broken down by the soil micro-organisms to form humus which has the effect of sticking the finer particles together to form larger ones (crumbs). Not only do these allow gases to access and leave the soil more easily, but they also resist this panning.
1 May 2010
Time to Plant
 Plants in storage tell us when they are ready to return to the soil. The buds on this dry begonia tuber (overwintered in the garage) are telling us the time is right. This tuber will develop very quickly in damp (not wet) soil, especially since this soil will have warmed up considerably in the spring sunshine.
I like all plants to show some sign of life before attending to them. And because they grow more quickly than those planted earlier, there is less time for attack by slugs, fungi and the like. This makes growing more successful.
Normally I plant out my stored dahlias at this stage. I don't know why I put them in earlier this year - especially as the season has kept so cold. Well I do know - it was to get earlier growth. But, as I have said before, things catch up. I bet I haven't saved more than a few days.
From 'Death', Life
 I know I go on about it, but I am always amazed at how plants will struggle to survive the seemingly impossible. I over-winter my outdoor pots in the garage behind a translucent glass-fibre door, and, to be honest, I thought these geraniums were a goner this year after being subjected to the winter frosts protected only by a sheet of newspaper.
Once plants lose some water and become a bit limp, their frost-resistance greatly increases. This is partly because the sap becomes more concentrated and freezes at a lower temperature, and partly because the cell contents shrink away from the cell walls, so even if the sap does freeze there will be room for expansion without rupturing the walls. Some plants do actually add chemicals to their cells to lower the freezing point.
I know the pots look untidy, but they seem to survive best like this. I never cut out the dead until the new growth starts, and then I cut back to the new shoots. I have tried cutting back earlier, but it doesn't seem to work, not for me, at least.
Subscribe to:
Posts (Atom)